
Bedrock AgentCore - Understand AgentCore and Build Your First AgentCore AI Agent in Under an Hour
In this blog post you will get to learn how AgentCore addresses the current challenges faced when bringing AI Agents to production, learn about the AgentCore different service components, and host your first AI Agent in AgentCore Runtime.

Scope of this blog:
This blog is part of a Bedrock AgentCore series that will explore the different service components of AgentCore in both the understanding and the build. We will start with AgentCore Runtime, in this blog, where we will launch our first AI Agent, then we will continue to add further capabilities like memory, code execution, gateway tools, etc as we move along in the following blogs within the AgentCore series.
The series contains the following blogs:
Introduction
It has become obvious AI Agents are going to be at the center of productivity and innovation for years to come. This status has been earned as AI Agents got more and more powerful leveraging access to business specific context, tools, business systems through APIs, memory, acquired the the ability to write and execute code on the user's behalf, and ,needless to say, running within the constraints of per-defined guardrails to ensure safety and compliance.
Multi agent orchestration takes things up a notch. An orchestration agent can take a high level task, reason through it, break it down to smaller tasks, delegate the execution of these smaller tasks to other agents, run the orchestration, and consolidate outputs till the desired outcome is achieved, all in an autonomous/semi-autonomous operation with or without a human in the loop.
The landscape has evolved with many frameworks to build AI Agents (Strands Agents, LangChain, LangGraph, LlamaIndex, CrewAI, etc..), provide them access to context through MCP (Model Context Protocol), govern the interaction between agents operated by internal or external entities through A2A (Agent to Agent Protocol), and building guardrails to safe guard their operations using guardrail offerings like Amazon Bedrock Guardrails.
Building a production-grade agent comes with challenges
Regardless of the framework you use to build your AI Agent/multi-agent architecture, to move your agent from a concept to a production grade product you remain faced with a set of across the board challenges:
- How to securely host, expose an endpoint, scale your agent infrastructure with demand, and control user access to it
- How to equip your agent with short-term and long-Term memory. No one wants an agent with a memory as good as a Goldfish :)
- How to equip your agent with tools, including access to internal and external APIs in a secure and scalable manner
- How to empower your agent with the ability to execute code in a secure sandbox environment when needed. An example is querying a structure data source and then doing further process of the data. Another good example is the need to run complex calculations. In both cases, writing and executing post extraction code is the answer.
- How to effectively monitor the performance of your agent with proper observability tooling
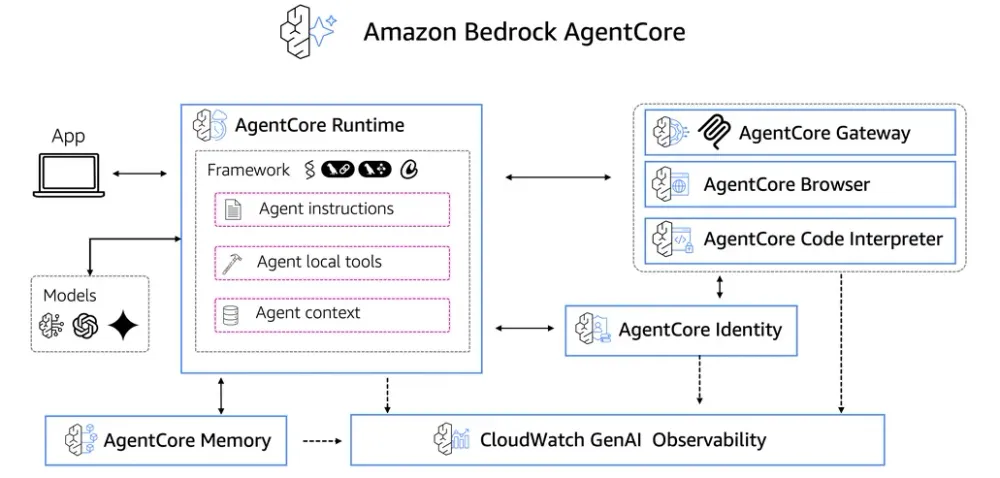
Bedrock AgentCore extends a set of pre-built tools that you can leverage to transform your agent from concept to production without the need to worry about the undifferentiated heavy-lifting involved in building the required infrastructure elements. This is all done through a set of managed services:
- AgentCore Runtime: Securely host and scale your agent infrastructure in per session microVM level isolation
- AgentCore Gateway: MCPfy your Lambdas and APIs and present them to your agents as tools behind and MCP server
- AgentCore Identity: Manage inbound access (user to agent) and outbound access (agent to gateway and other AWS or external resources)
- AgentCore Code Interpreter: Extend the ability for your agent to execute code in a safe and secure sandbox environment with session isolation
- AgentCore Observability: Built in observability that can be accessed using native AWS or external observability tools
Building your first AgentCore powered Agent
1- Preparing your build environment:
You can use your laptop or any other compute resources, for the simplicity here I will demonstrate the concept using a small EC2 instance
a- Create or use an existing VPC:
Create or use an existing VPC with at least one private subnet that has access to the internet through a NAT gateway. You can use the VPC creation wizard by selecting "VPC and more". Here is an example should you choose to create a new VPC


You will notice that we have opted out of an S3 Gateway and also chose to have our NAT Gateway in only one AZ. In a production setup you will want your NAT Gateway to be highly available in multiple AZs and you will likely need an S3 Gateway for secure private access to files. Since this is just a development environment we are keeping our setup simple and trading availability for lower cost.
b- Let's get our EC2 created:
1) Create an IAM role that our EC2 instance can assume to access and configure resources on your behalf. This role need to have the AmazonSSMManagedInstanceCore policy if you intent to use SSM (Simple Systems Manager) to access your instance. During our work this instance will need to access AgentCore services, ECR to create repositories and push and access images, Cognito for authentication and authorization, and other services. For the simplicity, let's create an admin role using the managed AdministratorAccess policy. This role is too powerful, we will need to ensure we delete it once our work is done.
2) Create an EC2 instance, give it a name and use the following configuration:
- Amazon Linux 2023,
- 64-bit (Arm) architecture , AgentCore Runtime uses Arm architecture. Selecting the same architecture for our EC2 will allow us to test locally before we launch
- t4g Small or Micro should be fine
- 20GiB gp3 SSD , this should have enough room for a few container images as we get to build and test locally
- Proceed without a key-pair, we will use either SSM or EC2 connect for a more secure private access connection.
- Edit the network configuration, select your VPC and the private subnet you have created/verified in step 1
Note, to access your instance using SSM, you will need SSM enabled and also the instance will need to have a role that includes the AmazonSSMManagedInstanceCore policy. Alternatively, you can use EC2 Instance Connect, for that you will need a VPC endpoint for the service within your VPC for private access since our instance is in a private subnet
c- Get your environment ready.
1) Here we will install Python 3.11 , ensure we have the most recent pip installed for our Python environment, pull the latest boto3, Install Docker, and install a few more packages that will be needed
plaintext
# Update Linux, install pip, create and activating our environment "myenv"sudo yum update -ysudo yum install python3-pip -ypython3 -m venv ~/myenvsource ~/myenv/bin/activate# Update PATHnano ~/.bashrc- Add to end of fileexport PATH="/<env-path>:$PATH"PS1='\u@\w\$ '- Save (ctrl + O) and exit (Ctrl + x)source ~/.bashrc# Install Python 3.11 in your new environmentsudo dnf update -ysudo dnf install python3.11 -ypython3.11 —version# Install pip for Python 3.11sudo dnf install python3.11-pip -ypython3.11 -m pip --version# Add aliases to your ~/.bashrc filenano ~/.bashrc- Add to end of filealias pip="python3.11 -m pip"alias python="python3.11"- Save (ctrl + O) and exit (Ctrl + x)source ~/.bashrc# Install Docker and add your user to a Docker group- Install Dockersudo dnf update -ysudo dnf install -y dockersudo systemctl start dockersudo systemctl enable dockersudo usermod -aG docker ssm-user- add your user to a docker group (this example assumes you are using ssm-user, if you choose to use EC2 Instance Connect your user will be ec2-user)groups ssm-usernewgrp dockerdocker psdocker --version# Install boto3, bedrock-agentcore, bedrock-agentcore-starter-toolkit, and strands-agentspip install boto3pip install bedrock-agentcore-starter-toolkitpip install bedrock-agentcorepip install strands-agents
3) Enable access to the foundational models that we will use in our setup. I recommend enabling access to Claude models (Haiku 3.5, Sonnet 3.5, Sonnet 3.7, and Sonnet 4)
- Go to Bedrock Console in the region where you are building, in our case us-west-2
- Scroll down in the left side bar, look for Configure and Learn, then select Model access
- Choose Modify model access
- Select the Claude mentioned models and click next
- You will be asked to provide details about your use case (if it was your first time to use Claude in your account) and once complete it will take a minute or two for you to have access
2- Creating your first AgentCore Runtime Agent
a- Create a project directory and initialize:
Here we will create a project directory, install uv, initiate a project, and install required packages
plaintext
# Create a "projects" directory, create an "agent_1" directory withing "projects" and change directory to agent_1cd /usr/tmpmkdir projectscd projectsmkdir agent_1cd agent_1# Install uvcurl -LsSf https://astral.sh/uv/install.sh | sh# Initialize a project using uvuv init --python 3.11# If you get an error like `VIRTUAL_ENV=/home/ec2-user/myenv` does not match the project environment path `.venv`. Try running this commanduv python pin 3.11# Let’s add everything that we will need of packagesuv add 'uvicorn[standard]' strands-agents bedrock_agentcore_starter_toolkit strands-agents-tools bedrock-agentcore
b- Create our first agent agent_1:
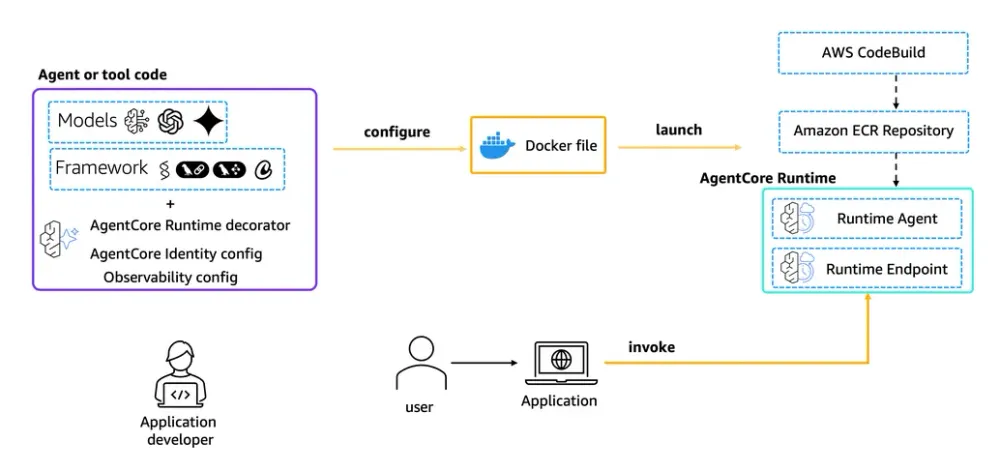
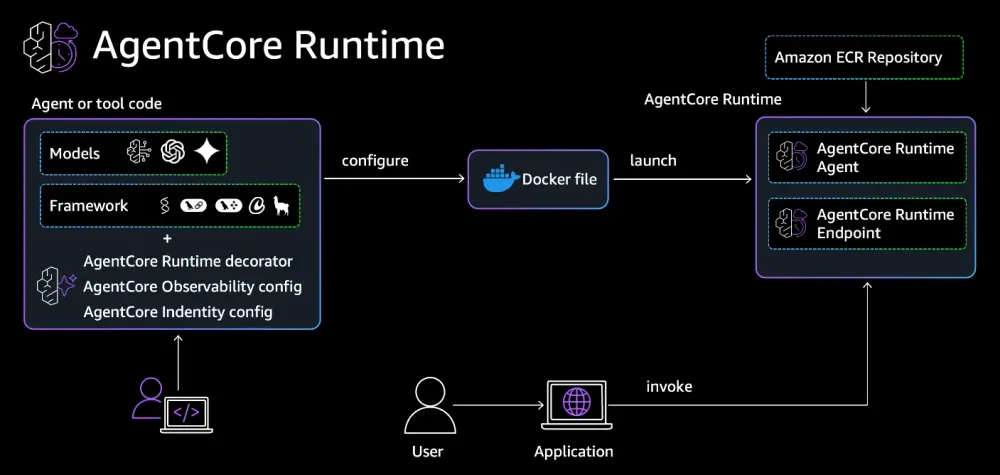
Amazon Bedrock AgentCore Runtime provides a secure, serverless and purpose-built hosting environment for deploying and running AI agents or tools. It is framework agnostic, supports any LLM of your choice, provides MCP support, session isolation, extended execution times up to 8hours, automatically scales with your workload, and has built in authentication capabilities with support for both IAM and OAuth 2.0.
Let’s code our first agent using Strands Agent!
using a text editor, nano for example, copy the following code into a new file and name it agent_1.py
plaintext
# Import packagesfrom bedrock_agentcore.runtime import BedrockAgentCoreAppfrom strands import Agent# Define our app referencing the pre-built BedrockAgentCoreAppapp = BedrockAgentCoreApp()agent = Agent()# Decorating our app@app.entrypointdef invoke(payload):"""Process user input and return a response"""user_message = payload.get("prompt", "Hello")result = agent(user_message)return {"result": result.message}if __name__ == "__main__":app.run()
You will notice in the example we have utilized the pre-built "BedrockAgentCoreApp", a fuction that takes care of handling the invocation headers, responding to ping health status check, and exposing our agent invocation at agent_end_point/invocations. The function payload is passed to us @app.entrypoint
Needless to say, we are here using a plain agent with no tools, context, or specific configuration. Just an agent leveraging the default LLM in Stands Agent configuration. You can bring your entire agent code and use it as is, the blank agent is used here just to demonstrate the concept
c- Test our agent locally
- Let's run our first agent locally to test
uv run uvicorn agent_1:app --host 0.0.0.0 --port 8080 - Now let's test our agent for health check (required by agent core)
you will need a new window to run the test against the locally running server
curl http://localhost:8080/ping - Next, we test our agent for payload response
plaintext
curl -X POST http://localhost:8080/invocations \-H "Content-Type: application/json" \-d '{"prompt": "What is the height of the CN Tower?"}'
In your local server window use
ctrl + c to stop the serverNext testing our agent by building a docker locally and testing it
- Create a Dockerfile using nano or an editor of your choice
plaintext
nano DockerfileFROM ghcr.io/astral-sh/uv:python3.11-bookworm-slimWORKDIR /appCOPY pyproject.toml uv.lock ./RUN uv sync --frozen --no-cacheCOPY agent_1.py ./EXPOSE 8080CMD ["uv", "run", "uvicorn", "agent_1:app", "--host", "0.0.0.0", "--port", "8080"]- Save (Ctrl + o) , and exit (ctrl + c)
- Build and run a docker container locally
plaintext
docker buildx create --usedocker buildx build --platform linux/arm64 -t my-agent:arm64 --load .docker run --platform linux/arm64 -p 8080:8080 \-e AWS_ACCESS_KEY_ID="$AWS_ACCESS_KEY_ID" \-e AWS_SECRET_ACCESS_KEY="$AWS_SECRET_ACCESS_KEY" \-e AWS_SESSION_TOKEN="$AWS_SESSION_TOKEN" \-e AWS_REGION="$AWS_REGION" \my-agent:arm64
- Test your docker build (need a new window for that)
plaintext
curl -X POST http://localhost:8080/invocations \-H "Content-Type: application/json" \-d '{"prompt": "What is the height of the CN Tower?"}'
Excellent, now that we have tested our app and verified our dockerized app also work we can move to the next step ...
d- Pushing our image to an ECR Repository:
In this step we will create an ECR repository, build our docker image, and push it to the repository
plaintext
# Create an ECR repository:aws ecr create-repository --repository-name my_agent_1 --region us-west-2# Login to ECR- do not forget to replace the <account-id> with your account_idaws ecr get-login-password --region us-west-2 | docker login --username AWS --password-stdin <account-id>.dkr.ecr.us-west-2.amazonaws.com# Build and push our docker image to ECR:- do not forget to replace the <account-id> with your account_iddocker buildx build --platform linux/arm64 -t <account-id>.dkr.ecr.us-west-2.amazonaws.com/my_agent_1:latest --push .# Verify the image was pushed:aws ecr describe-images --repository-name my_agent_1 --region us-west-2
3- Launching your Agent into its new home in AgentCore Runtime
Now that we have our docker image in an ECR repo we are only a few steps away from launching it into AgenyCore Runtime. We will need to first create an IAM role for the agent to use to access resources, create a deploy_agent.py file to deploy our, create and invoke_agent file to invoke our agent, then finally test our agent using the console
a- Create an IAM role for our agent to use in Runtime
This IAM role should enable the agent to get access to the resources it needs to access during runtime. This should include both the basic access required for runtime operation and logging and should have a trust policy that allows the AgentCore service to assume the role Here is an example of the trust policy, do not forget to replace the <account_id> with your actual account_id
plaintext
{"Version": "2012-10-17","Statement": [{"Sid": "AssumeRolePolicy","Effect": "Allow","Principal": {"Service": "bedrock-agentcore.amazonaws.com"},"Action": "sts:AssumeRole","Condition": {"StringEquals": {"aws:SourceAccount": "accountId"},"ArnLike": {"aws:SourceArn": "arn:aws:bedrock-agentcore:region:accountId:*"}}}]}
And here is a sample of an in-line policy that you can use for the required permissions. I used an "*" to simplify the setup for the POC but in production you would want to use specific resources values
plaintext
{"Version": "2012-10-17","Statement": [{"Sid": "ECRImageAccess","Effect": "Allow","Action": ["ecr:BatchGetImage","ecr:GetDownloadUrlForLayer"],"Resource": "*"},{"Effect": "Allow","Action": ["logs:DescribeLogStreams","logs:CreateLogGroup"],"Resource": "*"},{"Effect": "Allow","Action": ["logs:DescribeLogGroups"],"Resource": "*"},{"Effect": "Allow","Action": ["logs:CreateLogStream","logs:PutLogEvents"],"Resource": "*"},{"Sid": "ECRTokenAccess","Effect": "Allow","Action": ["ecr:GetAuthorizationToken"],"Resource": "*"},{"Effect": "Allow","Action": ["xray:PutTraceSegments","xray:PutTelemetryRecords","xray:GetSamplingRules","xray:GetSamplingTargets"],"Resource": ["*"]},{"Effect": "Allow","Resource": "*","Action": "cloudwatch:PutMetricData","Condition": {"StringEquals": {"cloudwatch:namespace": "bedrock-agentcore"}}},{"Sid": "GetAgentAccessToken","Effect": "Allow","Action": ["bedrock-agentcore:GetWorkloadAccessToken","bedrock-agentcore:GetWorkloadAccessTokenForJWT","bedrock-agentcore:GetWorkloadAccessTokenForUserId"],"Resource": "*"},{"Sid": "BedrockModelInvocation","Effect": "Allow","Action": ["bedrock:InvokeModel","bedrock:InvokeModelWithResponseStream"],"Resource": "*"}]}
b- Deploying our agent to AgentCore Runtime
Create a deploy_agent.py file to deploy. This is were we launch our agent into AgentCore Runtime, and assign the IAM role we have just created to it. Do not forget the <account-id> , and the <AgentRuntimeRole> by your own values
plaintext
import boto3client = boto3.client('bedrock-agentcore-control', region_name='us-west-2')response = client.create_agent_runtime(agentRuntimeName='my_agent_1',agentRuntimeArtifact={'containerConfiguration': {'containerUri': '<account-id>.dkr.ecr.us-west-2.amazonaws.com/my_agent_1:latest'}},networkConfiguration={"networkMode": "PUBLIC"},roleArn='arn:aws:iam::<account-id>:role/<AgentRuntimeRole>')print(f"Agent Runtime created successfully!")print(f"Agent Runtime ARN: {response['agentRuntimeArn']}")print(f"Status: {response['status']}")
Now, let's deploy!
uv run deploy_agent.py A few things to note here. We have not specified how we would like to authenticate our users. The default is IAM authentication. You can choose to use OAuth 2.0 instead and using AgentCore identity you can leverage federation through third-party idp services like Okta or even login with Google or Facebook. It is worth noting that you can either do IAM or OAuth 2.0, but not the two combined. If you need your agent to leverage both you would create separate end points for each type of authentication under the same agent setup
Let's take a look at the Bedrock AgentCore console. Under agents you should see the agent we have just created. Grab the Agent ARN, we will use to to invoke the agent
c- Invoking our agent
Create an invoke_agent.py file to test
plaintext
import boto3import jsonagent_core_client = boto3.client('bedrock-agentcore', region_name='us-west-2')payload = '{"prompt": "What is the height of the CN Tower?"}'response = agent_core_client.invoke_agent_runtime(agentRuntimeArn='arn:aws:bedrock-agentcore:us-west-2:<account-id>:runtime/<myStrandsAgent-suffix>',runtimeSessionId='dfmeoagmreaklgmrkleafremoigrmtesogmtrskhmtkrlshmt', # Must be 33+ charspayload=payload,qualifier="DEFAULT")response_body = response['response'].read()response_data = json.loads(response_body)print("Agent Response:", response_data)
Now, let's test invoke our agent. Remember here we leveraging the credentials our EC2 has assuming its IAM role
uv run invoke_agent.py Congratulations! You now have your first AI Agent living happily in the cloud under AgnetCore Runtime
Ready for more fun?
Enjoyed reading this content? Let the author know!
Your likes, comments, shares, and saves help creators reach more builders.

Loading recommendations
Loading article