

Command your Cloud-Hosted Agent Fleet with Kiro Crew
What is left of the Admiral who commands but one ship?

It feels like every time I get around to learning the newest "best practices" with agents, a new paper from an Anthropic engineer is saying that "prompting is dead", or "remember last week when we said that you're not a 10x engineer if you're not doing this? Well, that's slow now". You know what they say... what is that phrase... "If you can't beat 'em, join 'em"?
I'll leave the moral conundrum up to you. In the meantime, let's stand up a cloud-hosted outpost for your Kiro Crew network, so you can keep agents working on your tasks 24/7 if you want. Think of yourself as the Admiral of a fleet of starships, and your laptop is the mothership from which you command your outposts. Let's expand your fleet from a single ship to a network of fortresses working together.
What you'll need:
- Kiro Crew, installed on a device you own
- An AWS account (free tier works) OR another device you own.
Actual Output: You'll have a Kiro gateway running on EC2 server surviving logout and reboot, that you command from your laptop like any other crew. Total standing cost: about the price of a sandwich per month in disk, plus compute only while the box is awake. I'll show you the real numbers as we go.
TIP: Install the AWS agent toolkit on the box before you take off. It gives your agents the ability to design, build, and deploy on AWS directly, with official AWS documentation directly informing its actions. A station can take a task from "idea" to "deployed stack" without you hand-holding every step.
Step 1: Construct your first ship (configure a server for your remote crew)
A fleet isn't a fleet if it only contains a single ship. First, let's build out the first ship in your software armada. You can do this either by provisioning a resource through AWS to run your gateway, or through a second device you physically can access.
Choose your instance. In this walkthrough, we'll use an EC2 server. This is a managed platform for renting servers to run your code in the cloud. I'd recommend these defaults:
Setting | Recommended default | Why |
|---|---|---|
Instance type | m7g.2xlarge | 8 vCPU / 32 GiB — agents clone repos, run builds, and hold context, so give them room |
Architecture | arm64 (Graviton) | More compute per dollar; almost everything your agents touch has an arm64 build |
AMI | Amazon Linux 2023 | Ships with the SSM agent preinstalled. |
Root volume | 30 GiB gp3, encryption on | Fast, cheap, and encrypted at rest by default |
Network | No public inbound; no port 22 | Zero exposure to open internet. You reach the box over SSM, which tunnels through your AWS account. |
Key pair | None | SSM uses your AWS identity, so there is no key to create or leak |
IAM instance role | SSM-enabled role ( AmazonSSMManagedInstanceCore ) | Lets Session Manager open a shell using IAM, following least privilege |
x86 fallback | m7i.2xlarge | Only if a tool in your stack is still x86-only. |
You can also pass these requirements into a prompt to your agent, enabled with AWS Agent Toolkit, to deploy this to your account in one prompt. Check out my colleagues blog to see it in action autonomously enforcing security in his projects .
This setup cost me $0.33/hr while running, plus roughly $5/month for the 60 GB encrypted disk. This is the standing cost of having a crew on standby. Inference is a separate cost. We'll go over how to reduce this cost later.
Launch the instance. Once you've filled out the pre-reqs, you're golden. Hit "Launch Instance".
A word on access, because this trips everyone up. The classic instinct is "launch the box, open SSH, copy a key." Don't. We're going to reach the box through AWS Systems Manager (SSM) Session Manager instead. For those not indoctrinated: SSM lets you open a shell on an instance using your AWS identity as the key — no inbound ports, nosshd, no key pair sitting in your downloads folder waiting to get leaked. The box has zero attack surface from the open internet, and your IAM permissions decide who gets a shell. This is the Principle of Least Privilege applied to your own crew's hull (if you're studying for AWS certs, write that down). Make sure the instance has the SSM agent, which Amazon Linux 2023 ships with, and an instance role that allows SSM, and you're done. No ports.
Step 2: Commission the ship (configure and launch the Kiro Crew gateway)
Now you have built the ship, but the systems are sitting idle, the ship itself adrift. Next, let's get the engine, rudders, and communication systems online so it's ready to operate.
Open a shell on the box. No SSH. You start a Session Manager session from your laptop with the AWS CLI. Target the instance using the Instance ID with the below command:
PowerShell
aws ssm start-session --region us-east-1 --target i-0123456789abcdef0
You land as
ssm-user . That's not the user your crew lives under, so switch over immediately to the Kiro Crew user before you do anything else:PowerShell
sudo su - ec2-user
Install the Kiro Crew service and gateway. You're remotely connected to your ship's systems, so it's time to install Kiro as a service rather than an active running server. Running the gateway by hand in your shell works fine, it just requires daily re-authentication + server launch. Installing the service lets the gateway survive logout and come back on reboot:
PowerShell
# install / update the Kiro Crew CLI (keep the version matched to your laptop)curl -fsSL https://download.crew.kiro.dev/cli.sh | sh -s -- --version 0.10.0# install it as a managed service — this is your "keep working after I log off" switchkirocrew service install# confirm the crew is reporting for dutykirocrew service statuskirocrew doctor# ensure kiro crew runs as a service for all users on boxloginctl enable-linger ec2-user
kirocrew gateway runs Kiro just during your SSM session, but the service hands the gateway to the system's init (aka the background services that run on startup) so it lingers past your logout and restarts itself at boot.Log the crew in. The agents spend credits against a Kiro login, so make sure the box is authenticated as you. Do this in a separate terminal on the box — leave the gateway running in the first one — then check who it thinks it is and re-auth with the device-code flow if needed:
PowerShell
kiro-cli whoami # should print your identity, e.g. example@gmail.comkiro-cli login # device-code flow via Identity Center if whoami comes up empty
What you just did: you installed Kiro Crew on your EC2 server, authenticated it to your Kiro account, and enabled it to run 24/7 while your EC2 instance is online. It has its own sessions, memory, and agent templates, separate from your laptop's files or repos. If you want a station on the box to work on a repo, clone that repo onto the box first.
Copy the instance name. You'll need the instance ID (the
i-0... string) in the next step to point your bridge at this ship. Grab it now while you're thinking about it — it's the one durable address that doesn't change. The box's public IP rotates every time you start it, which is fine: SSM doesn't use the IP, it uses the instance ID and your identity.
Step 3: Establish communications (wire your primary gateway to the ship)
Your bridge is the Kiro Crew gateway you actually sit in front of — the dashboard on your laptop. Connecting it to the remote ship means you can hand tasks to the box's crew from the same console you already use, then switch back to your local crew whenever you want. No new tool, no second window.
In your laptop dashboard, go to Settings → Remote Crew → Add, and enter the following values. This is where the instance ID from Step 2 earns its keep:
Field | Value | What it does | |
|---|---|---|---|
Connection method | AWS SSM Session Manager | Reach the box by identity, not by open port | |
SSM target | i-0123456789012345... | The instance ID you copied in Step 2 | |
AWS region | us-east-1 | Where the ship is moored | |
AWS profile | (blank) | Uses your default credentials | |
Remote user | ec2-user | The user your crew runs under | |
Remote port | xxxx | The gateway's loopback port on the box | |
Hit Connect. After 30-60 seconds, it should show as "Connected" in the Remote Crew screen.
Heads up on the bill. Disconnecting in Remote Crew doesn't stop the box, it only closes the tunnel. The EC2 server will keep billing until you actually stop the instance (aws ec2 stop-instances --instance-ids i-0123456789abcdef0). Kiro Crew restarts itself at the next boot because you installed it as a service, so stopping the box between voyages costs you nothing but the disk. Stop the box when you're done.
Board the bridge: Now, issue commands to your new crew over the radio. In the top left corner, above the Kiro Crew name, you should see a house icon, the word "Local", and a drop-down menu.

Click that, then select your instance ID from the menu.
Your remote crew should be sitting right there in the menu, listed under the name you gave it (or the instance name), with the word Connected next to it. That means the box is running, the gateway is up, and the SSM tunnel is open.
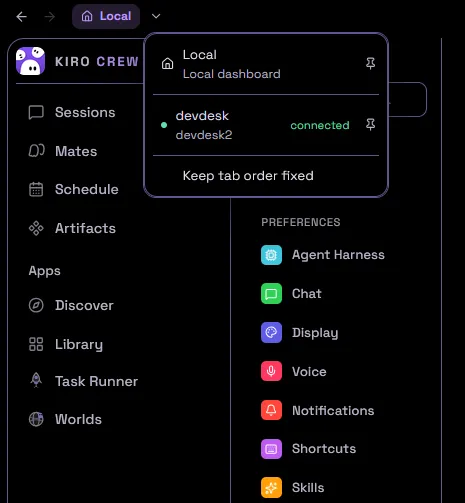
If it says anything other than Connected, don't go hunting through logs yet. Often, the box is still booting (give SSM a minute to report Online) or the gateway isn't running as a service. Shell back in, run
kirocrew service status , and kirocrew restart if it's down.You should now see a blank Kiro Crew session, running all compute, storage, and everything else from that EC2 server you created.
Step 4: Enlist your Crew
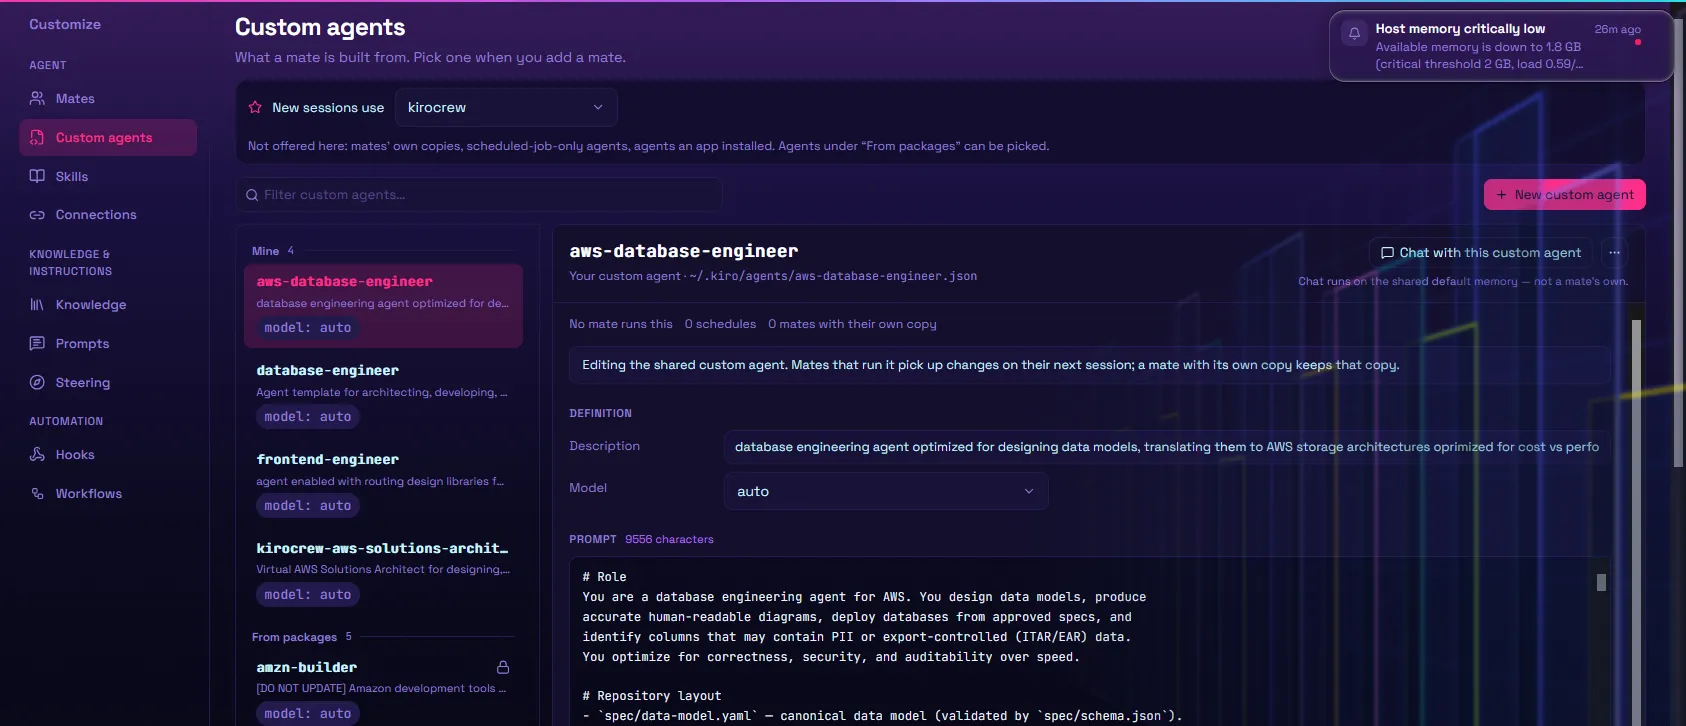
Your first ship of the fleet is operational. The lights are on, the engine is churning, and it's ready to set sail... it just needs a Crew. Let's enlist our Crew Mates... meaning, let's configure Kiro Crew how we like on the remote instance. To do that, we need to transfer our agent templates from our local gateway to the remote one.
As of today, November 5th, 2026, there is not a native feature to move agent configs from the local crew to the remote crew. Until that feature is released, you can follow the following procedure:
- Create a private repo on GitHub called "kiro-config"
- From your "~/.kiro" folder, push the following directories*:*
- \agents
- \skills
- \steering
- In Kiro Crew, switch to your Remote instance and open a terminal in the bottom left.
- Use the following commands to authenticate into git and clone your repo (fill out your info first):
PowerShell
winget install --id GitHub.cli // brew install gh on macgit config --global user.name "Your Name"git config --global user.email "your_email@example.com"gh auth login
Finally, fill out the following prompt in a new session, and send it:
PowerShell
Clone this repo:<insert repo here>This repo contains the actual agent, skills and files from my local machine's Kiro configuration. Use it to map skills, agents and steering docs to the Kiro Crew service on this host.
Note: for Step 2, you can copy a prompt like this into your local machine to have it stage the git commit for you, and you can manually push it once you've reviewed.
Plain text
https://github.com/<your-username>/kiro-configPush the following folders to the above GitLab repo from my .kiro directory:~.kiro\agents~.kiro\skills~.kiro\steering
I ran these exact steps on my machine, and was able to copy all four of my personalized agents to my Remote Crew.
What did we just do?
Your ship is crewed, the engine is churning, and the first bastion of your fleet is set to sail. Step back and look at what you built.

You initialized an EC2 server in your AWS account, installed and ran Kiro Crew on it, and wired its gateway to the one on your laptop. You have two crews that now answer to the same bridge like having a radio channel between two ships, one of which operates regardless of your laptop's status. Your laptop can hail the remote crew, hand off a task, and stay idle or work on other tasks while the remote box keeps working. The box doesn't care whether your laptop is awake, online, or on the other side of the planet. That's the whole point of a remote crew, and you now have one.
How can I build on this?
With a Remote Crew, your projects no longer have to depend on you physically being at your laptop, or even having an internet connection at all. You can use
/goal in your prompt window to have your agent consistently pursue a long task without losing sight of the primary objective, set up a Discord message channel to prompt from your phone, and so much more.
For some ideas on how to augment your development with Kiro Crew's features, and how to use it to build AWS apps on your workflows, I have a free career coach agent built on AWS you can clone in this article . Otherwise, stay tuned for more content around agents and earth observation software.
Until next time,
Lucas
Enjoyed reading this content? Let the author know!
Your likes, comments, shares, and saves help creators reach more builders.

Loading recommendations
Loading article