

Building highly available and resilient applications on Amazon EKS Auto Mode, Part 1: Pod and node failures
Part 1 of a two-part guide to high availability on Amazon EKS Auto Mode. It follows a failure from one pod to a node: what the platform recovers on its own, what you configure (spread, spare capacity, probes, PDBs, disruption budgets, graceful shutdown), and what to watch.

Building resilience on a managed data plane
Amazon EKS Auto Mode takes most of the infrastructure work out of running a cluster. Keeping your application available when something fails inside a Region is still your work, and that is the subject of this guide.
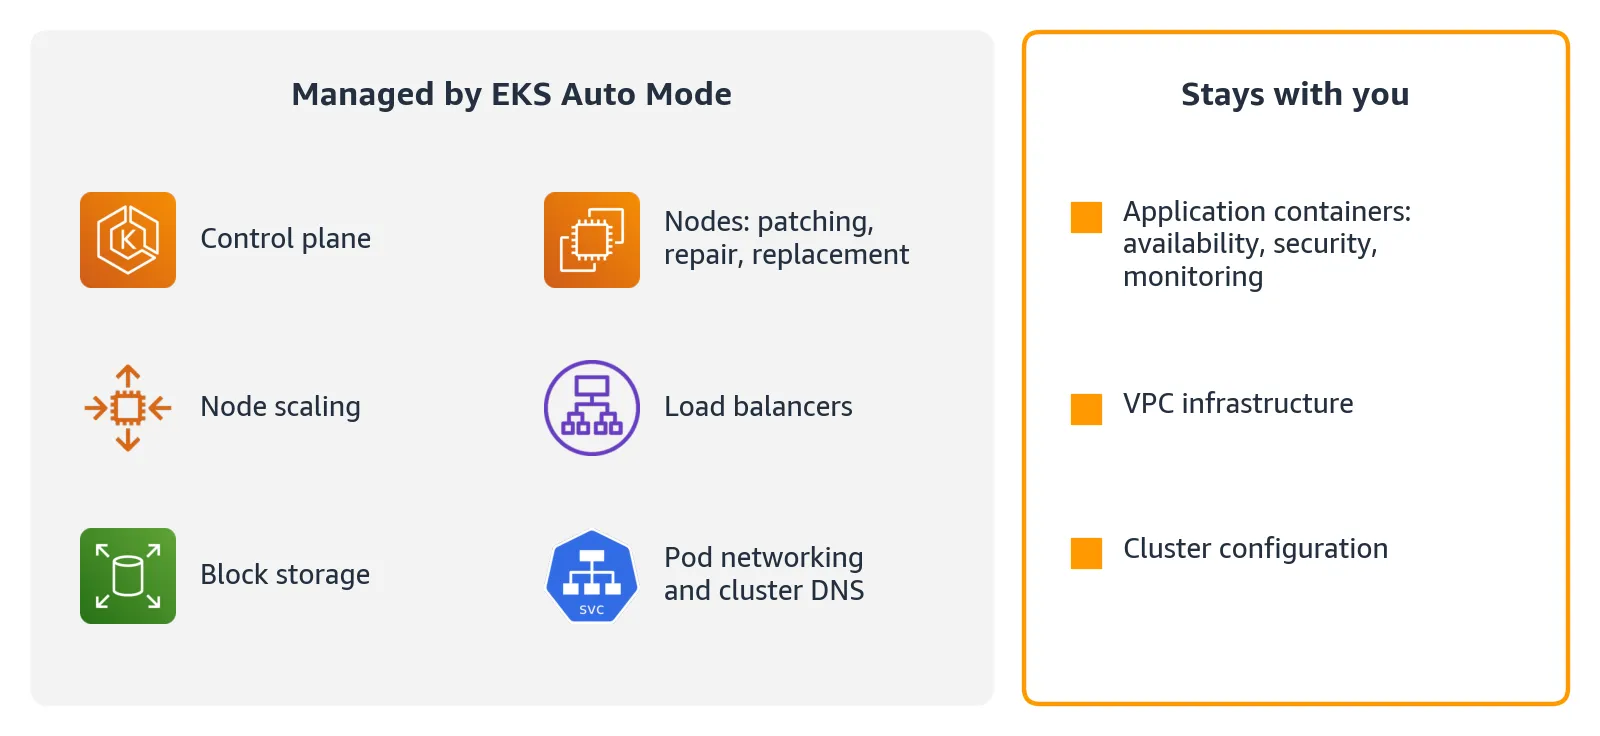
This is Part 1 of two. It covers the failure of a pod and of a node. Part 2 covers the failure of an Availability Zone.
Failures range from one pod to a whole Availability Zone. For each size, part of the response comes from the platform on its own, and part comes from settings you choose. This part covers the two smaller failures, a pod and a node. The two zone failures are the subject of Part 2.
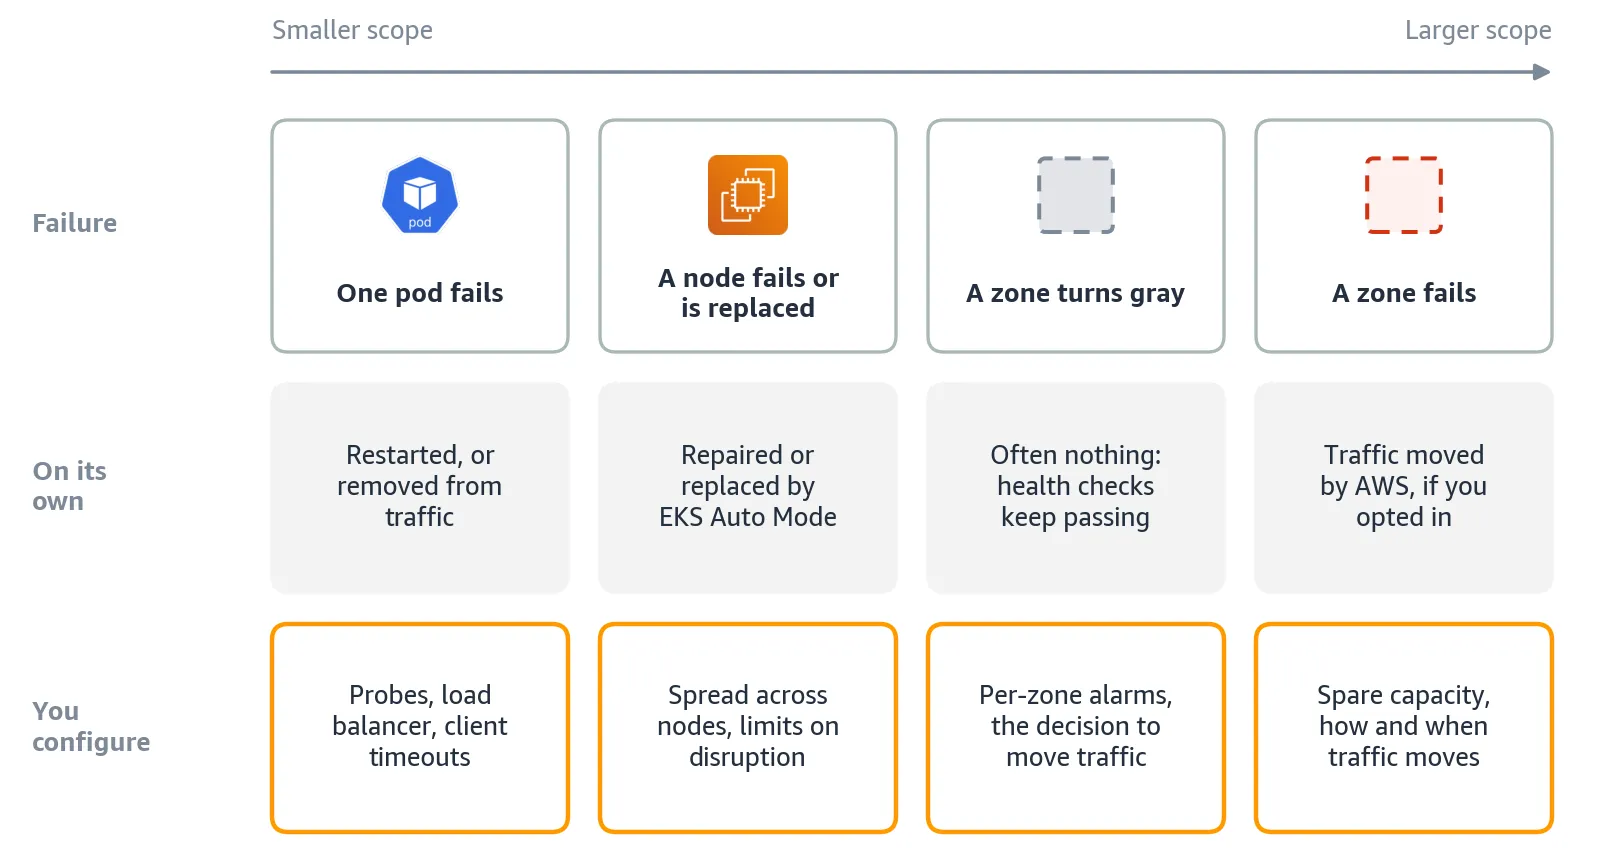
Figure 2: What responds on its own and what you configure, by size of failure.
Losing an entire Region is beyond these responses and needs its own recovery plan, which the AWS disaster recovery whitepaper covers.
Traffic flows in three directions
Most responses in this guide work by changing where traffic goes. A useful model has three directions: north-south traffic from clients through a load balancer, east-west traffic between your services, and outbound traffic from your pods to data stores.
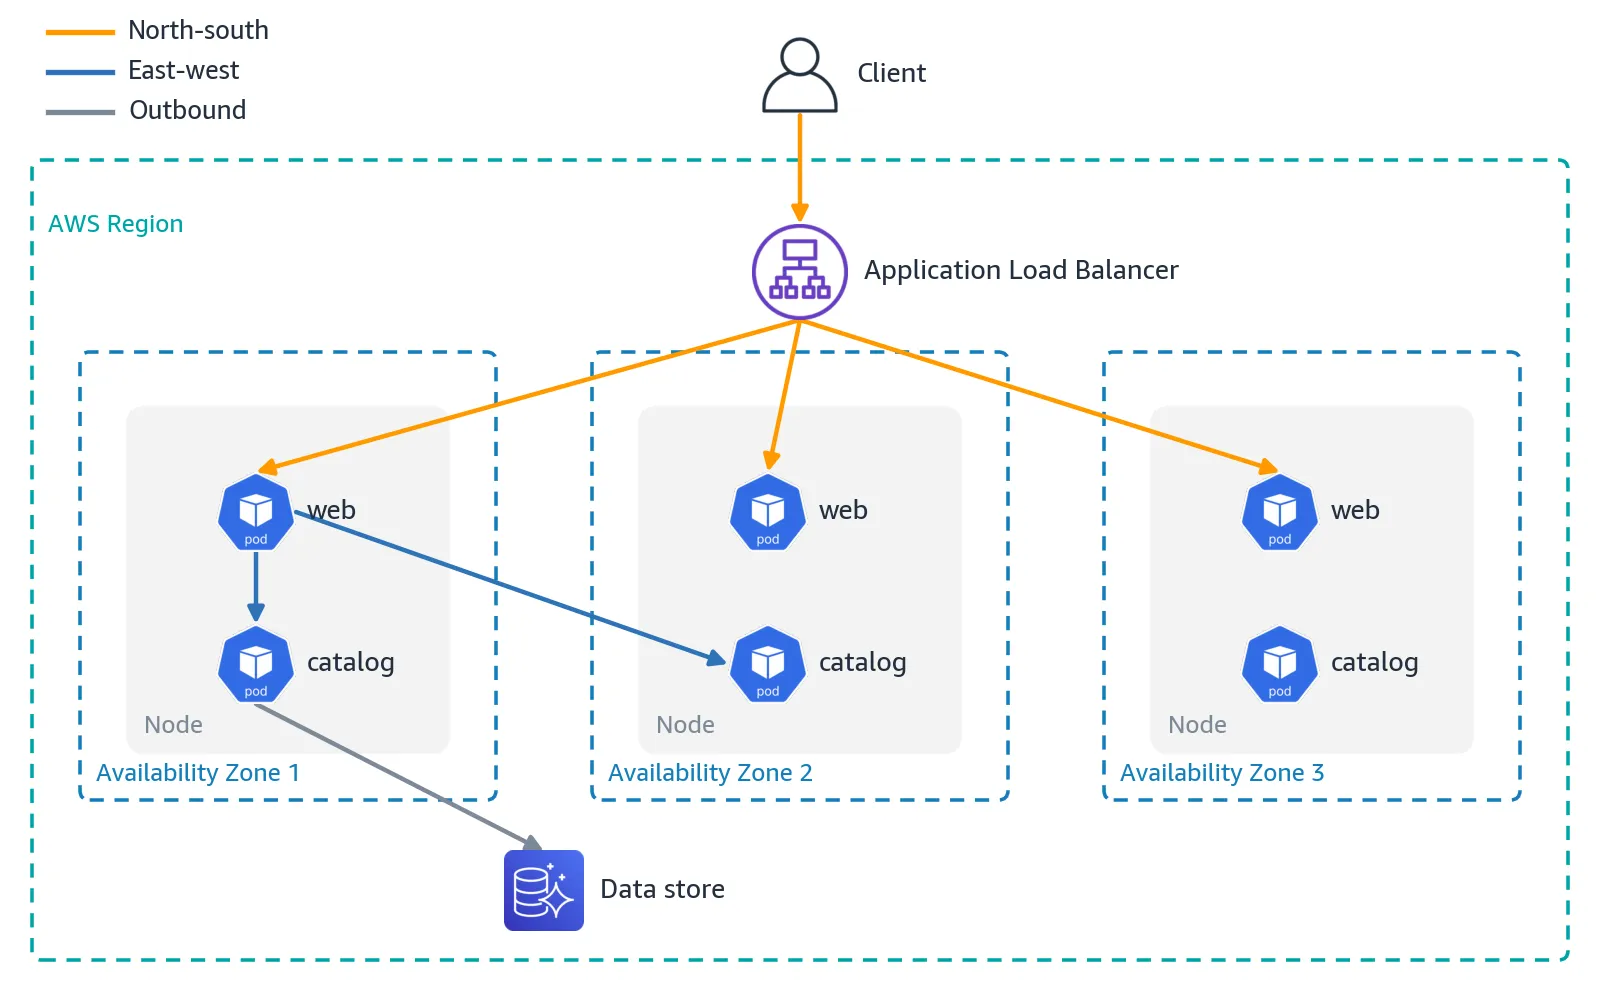
Figure 3: An example application across three Availability Zones.
East-west traffic goes to the ready pods that Kubernetes lists for each Service in EndpointSlices . The responses that follow redirect traffic in two places, the load balancer and those lists. Outbound traffic depends on how each data store is spread across zones.
The foundation: pods and capacity in each zone
Moving traffic away from a zone only works if the other zones have the pods and the room to take it. AWS calls this property static stability : the service survives the loss of a zone without launching anything new.
Amazon Application Recovery Controller (ARC) , which moves traffic away from a zone in Part 2, asks you to have that capacity ready before you use it.
Spreading pods
Spread pods across zones. With nine replicas of your application at three per zone, losing a zone costs a third of them. With five of the nine in one zone, it costs more than half.
Two fields shape it:
-
maxSkewsets the largest difference in pods allowed between two zones.
-
whenUnsatisfiabledecides what happens to a new pod that would exceed that difference.DoNotScheduleleaves it Pending, which keeps the spread within the limit.ScheduleAnywaystill places it, preferring the zones with fewer pods, which keeps pods starting.
The choice matters most when the application grows while a zone is out of traffic, which Part 2 covers. AWS recommends
ScheduleAnyway for zonal shift, so this example uses it, in spec.template.spec :YAML
topologySpreadConstraints:- maxSkew: 1topologyKey: topology.kubernetes.io/zonewhenUnsatisfiable: ScheduleAnywaylabelSelector:matchLabels:app: <app-label>
The scheduler applies the constraint only when it places a pod, so a spread that becomes uneven later, for example after a scale-down, stays uneven .
Spare capacity
Keep spare capacity in each zone. The remaining zones also need room for the extra load. Without it, each new pod waits about one to two minutes for a new node, which is why the EKS documentation recommends over-provisioning .
AWS sizes its own services this way: with three zones, it overprovisions by 50 percent, so each zone runs at two thirds of its capacity and two zones can carry the full load.
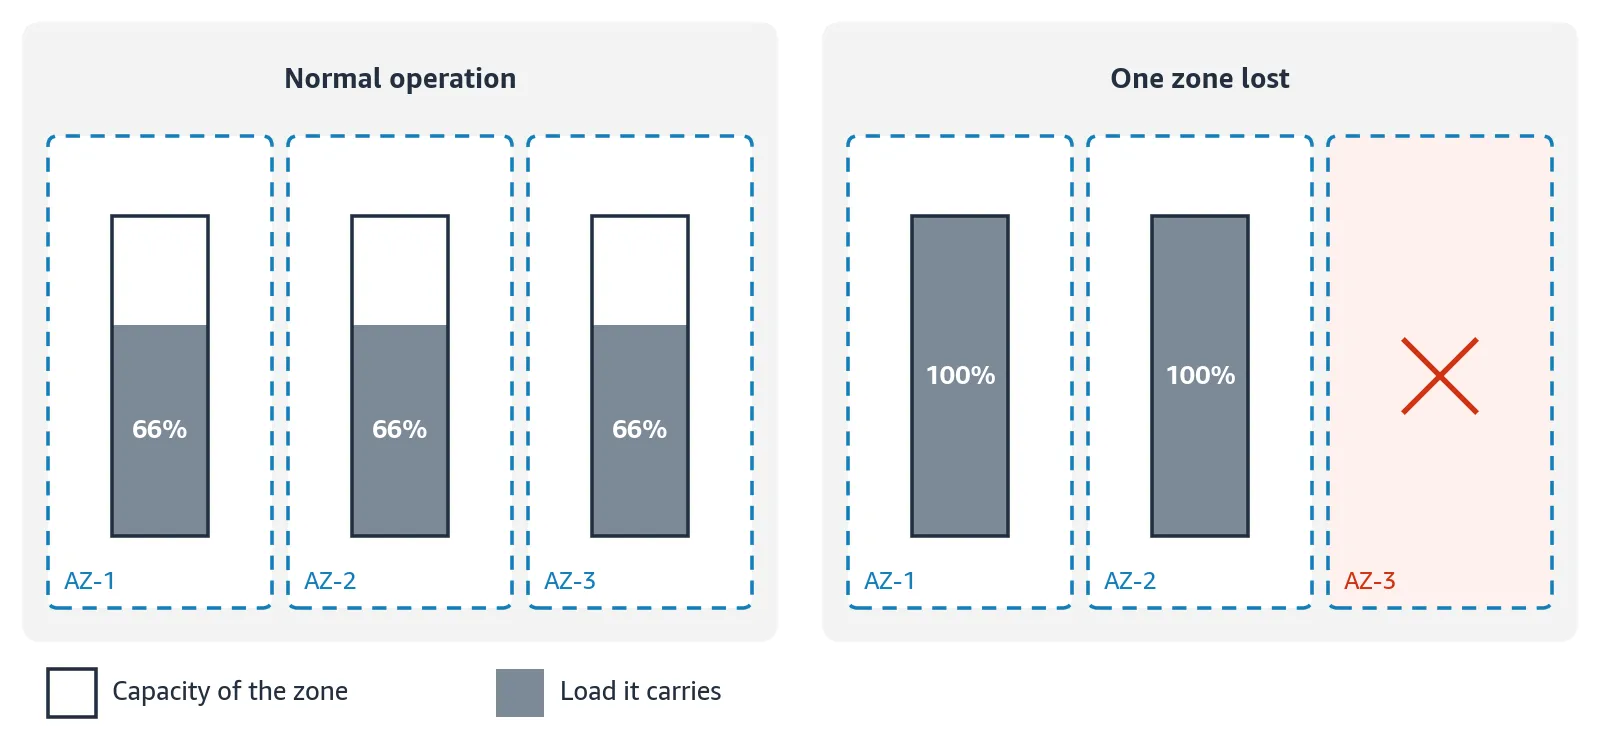
Figure 4: Capacity per zone with 50 percent overprovisioning, from the AWS article on static stability .
You can hold that spare capacity in three ways. A NodePool is the EKS Auto Mode object that defines which nodes launch, and low-priority pods are pods that do no work and hold room for your own pods.
Approach | How it works | Trade-off |
|---|---|---|
Extra replicas | More replicas than normal traffic needs absorb the load | Compute in each zone, all the time |
Static capacity NodePool | A fixed number of nodes stays running, with one NodePool per zone for an even spread | Not consolidated, so billed whether used or not |
Low-priority reserve | The low-priority pods hold the room and give it up to your pods | Billed while idle, and the room returns only with a new node |
Extra replicas need no other object but protect only their own application. The other two hold room that several applications share.
When a pod fails
With pods and room in place, the smallest failure is one pod. It can fail in two ways: it stops responding, or it keeps running while part of its answers are errors.

Give each container a readiness and a liveness probe. The load balancer adds its own health check and stops sending north-south traffic to a pod that fails it. The probes go in
spec.template.spec of the Deployment:YAML
containers:- name: <app>readinessProbe:httpGet:path: <ready-path>port: <port>livenessProbe:httpGet:path: <health-path>port: <port>
The second case is harder, because the pod still passes those checks. A probe asks whether the pod answers, not whether its answers are correct, so a pod whose dependency has failed keeps receiving traffic and returning errors. AWS calls this a gray failure .
For north-south traffic, the Application Load Balancer catches it by comparing pods with each other. With Automatic Target Weights (ATW), it sends less traffic to the pods that return far more errors than the rest, while they keep running.
ATW acts on single pods. When a whole zone misbehaves, the zone is taken out of traffic instead, as Part 2 explains.

Figure 6: Automatic Target Weights compared with a zone taken out of traffic.
Turn on ATW unless you need slow start or sticky sessions. ATW requires the weighted random routing algorithm, which rules both out. In EKS Auto Mode, the algorithm and ATW (
anomaly_mitigation ) go on the Ingress that creates the load balancer, as annotations under metadata :YAML
annotations:alb.ingress.kubernetes.io/target-group-attributes: >-load_balancing.algorithm.type=weighted_random,load_balancing.algorithm.anomaly_mitigation=on
Give east-west calls timeouts and limited retries . These calls have no load balancer in the middle, so a call to a bad pod has to fail fast on its own, and the retry can reach a healthy one.
These mechanisms move traffic from a bad pod to a good one. A bad release that breaks all replicas at once leaves no good pod, and that risk belongs to your rollout process.
When a node fails
Pods run on nodes, and EKS Auto Mode handles a failed node on its own. Its node monitoring agent reports the problem as a node condition, such as
NetworkingReady or KernelReady , and automatic node repair replaces the node.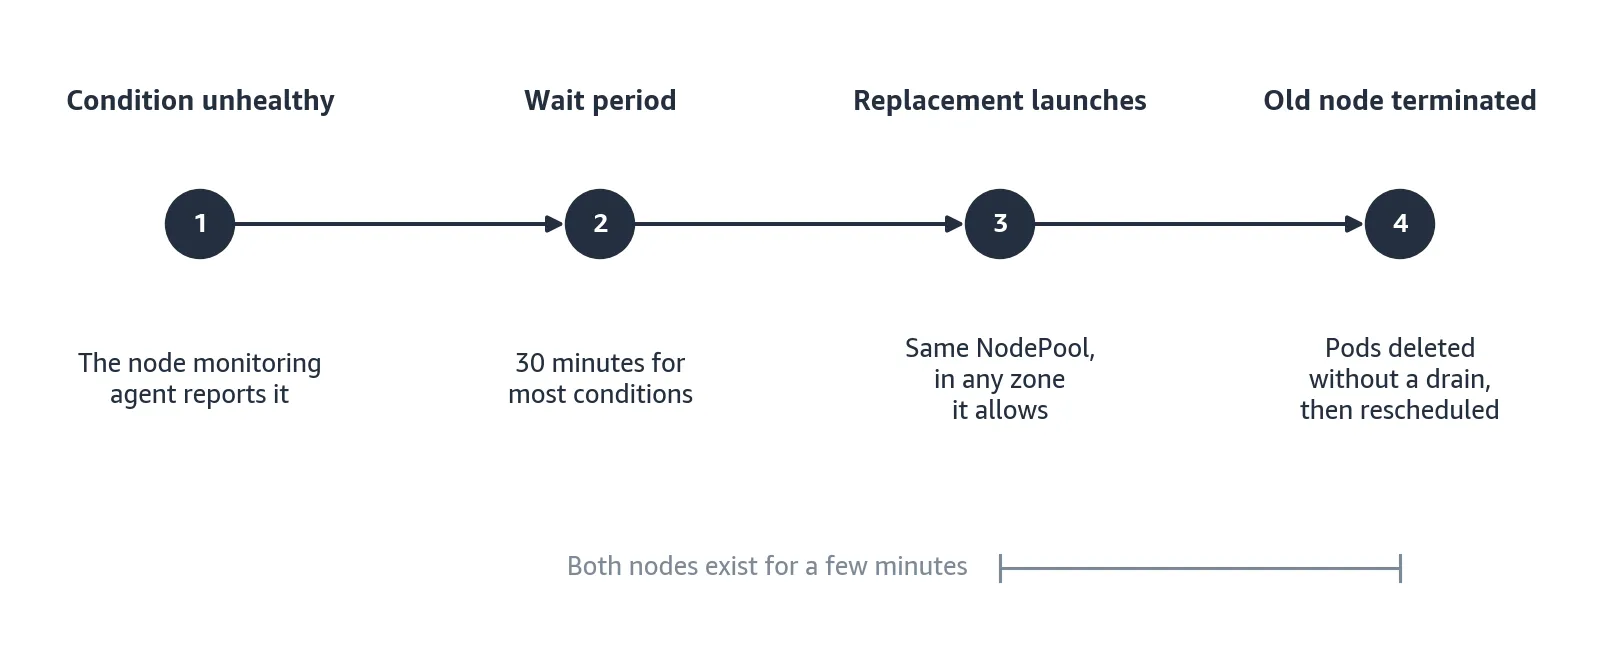
- It bypasses Pod Disruption Budgets (PDBs) , which normally limit how many pods of an application can be down at once. Replicas that share the failed node go down together.
- It pauses when more than 20 percent of the nodes in a NodePool are unhealthy, so it does not act on a failure that hits many nodes at once, and Karpenter, the node manager inside EKS Auto Mode, records a
NodeRepairBlockedevent.
Spread replicas across nodes too. A second spread constraint, by node (
kubernetes.io/hostname ) instead of by zone, keeps replicas on different nodes . It goes in the same topologySpreadConstraints list, with ScheduleAnyway so that a shortage of nodes does not leave pods Pending:YAML
- maxSkew: 1topologyKey: kubernetes.io/hostnamewhenUnsatisfiable: ScheduleAnywaylabelSelector:matchLabels:app: <app-label>
Until repair acts, the node keeps receiving traffic while its pods pass their health checks, so the probes and ATW protect users in the meantime.
When EKS Auto Mode replaces a node
EKS Auto Mode also replaces healthy nodes on purpose, for two reasons:
- Drift: the node no longer matches its desired configuration, most often because a new node image (AMI) came out, which happens about once a week . Changing node settings such as kubelet or sysctl values in a NodeClass also causes drift.
- Expiration: the node reached the age limit of its NodePool.
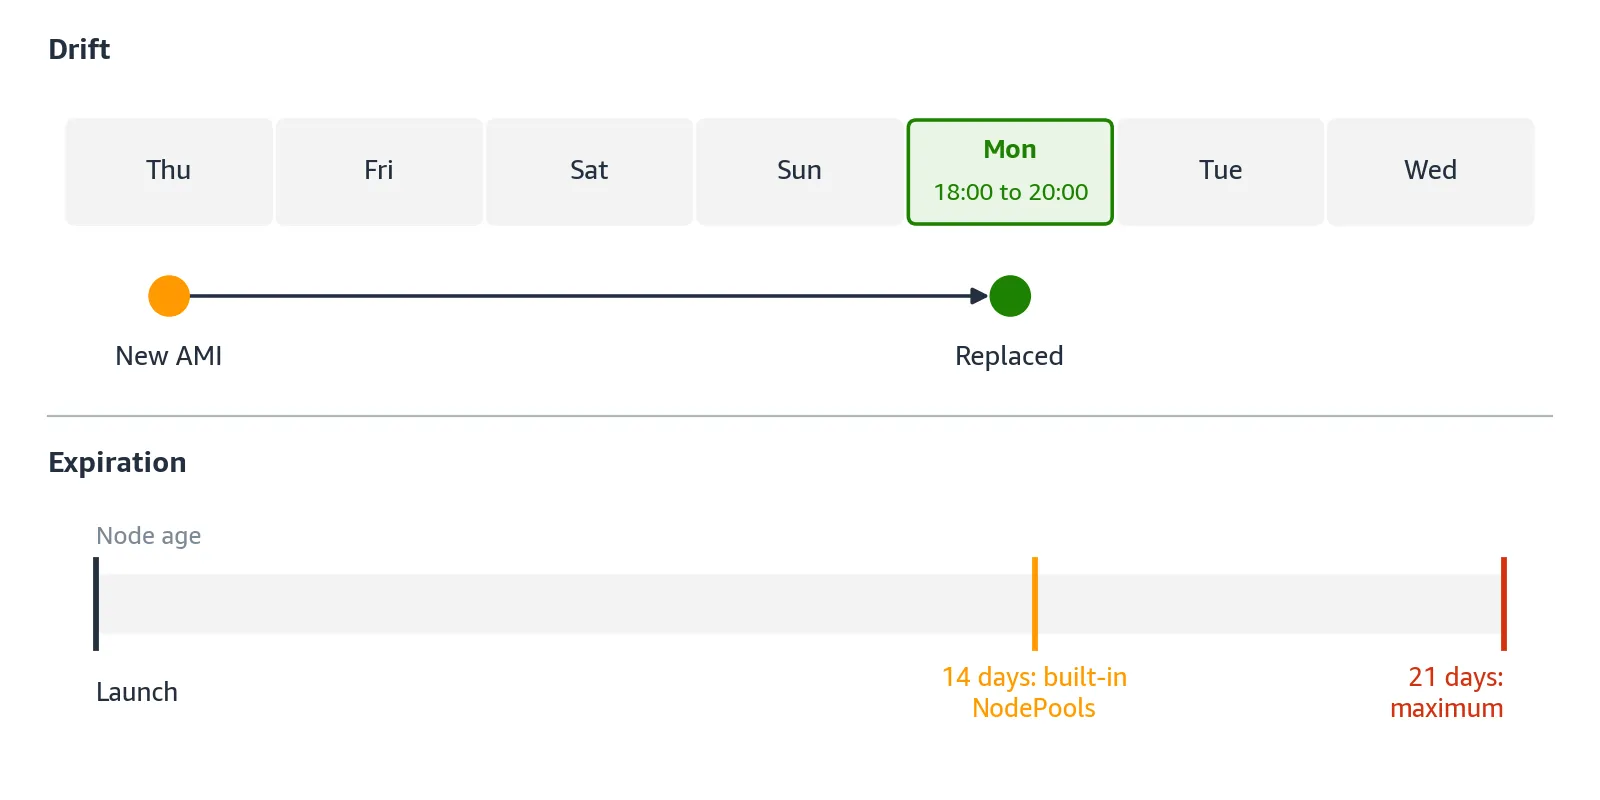
Figure 8: Drift and expiration, with node lifetimes from the EKS documentation and the EKS Auto Mode security overview .
You control the pace of these replacements at two levels: a PDB protects each application, and a NodePool disruption budget protects the pool.
Protect each application with a PDB. Before it replaces a node, EKS Auto Mode evicts its pods in a way that respects the PDB of each application. This PDB allows one pod down at a time:
YAML
spec:maxUnavailable: 1selector:matchLabels:app: <app-label>
maxUnavailable: 0 allows no eviction, so replacements wait, and blocking PDBs can require manual intervention .Pace the pool with a disruption budget. A NodePool disruption budget limits how many nodes EKS Auto Mode replaces at once, and a schedule restricts that to the hours you choose. Karpenter follows the most restrictive budget that is active.
Under
spec.disruption , the first budget below allows drift on up to 10 percent of the nodes for two hours from Monday at 18:00 UTC. The second blocks it for the other 166 hours of the week:YAML
budgets:- nodes: "10%"reasons: [Drifted]schedule: "0 18 * * MON"duration: 2h- nodes: "0"reasons: [Drifted]schedule: "0 20 * * MON"duration: 166h
Watch node age. Budgets do not apply to expiration, so node age is how you see those replacements coming. This command lists the nodes sorted by age:
Bash
kubectl get nodes --sort-by=.metadata.creationTimestamp
Set the consolidation policy explicitly. Consolidation also replaces nodes, to save cost. The
consolidationPolicy field takes three values :-
WhenEmptyremoves only empty nodes.
-
WhenEmptyOrUnderutilizedalso repacks underused nodes for any saving.
-
Balancedacts only when the savings outweigh the cost of evicting the pods.
From EKS 1.37 , new NodePools default to
Balanced , but the default applies only at creation. Recreating a NodePool without the field, for example in a GitOps sync, can change the policy and how often your pods are evicted. To keep Balanced , in spec.disruption :YAML
consolidationPolicy: Balanced
Letting pods leave cleanly
Every replacement and every rollout deletes pods, and a pod deleted mid-request drops that request. Combine four mechanisms, as the AWS blog on highly available applications on EKS Auto Mode does:
- A readiness gate keeps a new pod from counting as Ready until the load balancer reports it healthy.
- A deregistration delay gives the load balancer time to finish the requests in flight when the old pod is deleted.
- A
preStoppause holds the container before the application stops.
- A termination grace period sets the time limit for the whole stop.
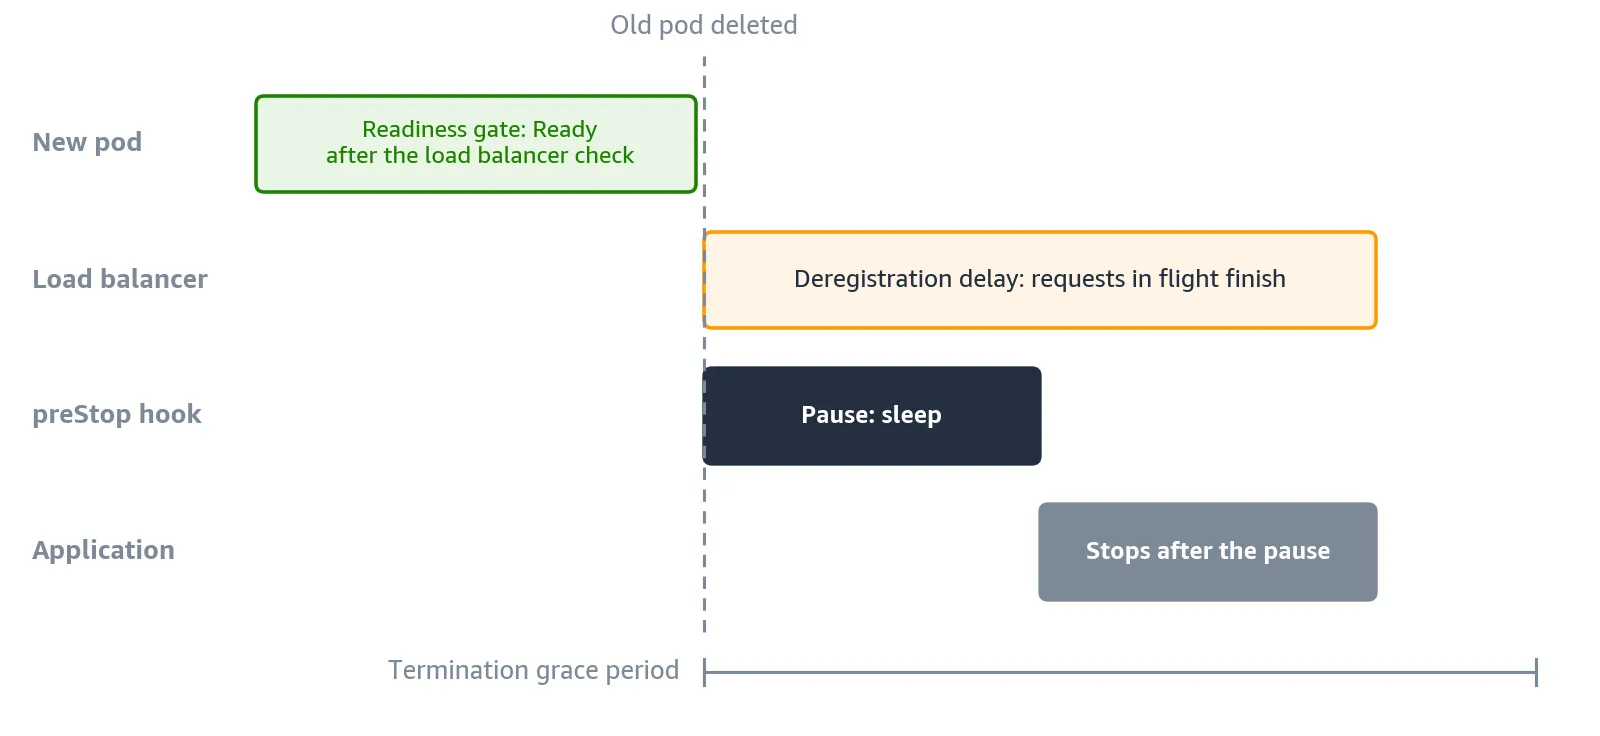
Figure 9: The four mechanisms in time when a pod is replaced. The deregistration delay is 300 seconds by default .
The readiness gate and the deregistration delay belong to the load balancer, and the blog shows how to set them up. The pause and the grace period go in the pod template.
The grace period has to be longer than the pause plus the time your application needs to finish its requests.
The blog uses a 10-second pause, a 60-second grace period, and a 30-second deregistration delay instead of the default 300:
YAML
terminationGracePeriodSeconds: <seconds>containers:- name: <app>lifecycle:preStop:exec:command: ["/bin/sh", "-c", "sleep <seconds>"]
What comes next
This part covered the failures that stay inside a healthy zone: a pod that stops responding or returns errors, a node that fails, and the nodes EKS Auto Mode replaces on purpose.
A whole Availability Zone is a larger failure. Part 2 covers alarms per zone, how to take a zone out of traffic with ARC zonal shift, how to run the cluster while the zone is out, and how to rebalance pods afterward, including the Kubernetes descheduler.
Enjoyed reading this content? Let the author know!
Your likes, comments, shares, and saves help creators reach more builders.

Loading recommendations
Loading article