
Kubernetes CPU Requests in Amazon EKS Auto Mode
Discover how Kubernetes CPU requests trigger node provisioning in Amazon EKS Auto Mode, from unschedulable Pods to EC2 capacity.

A Pod can remain
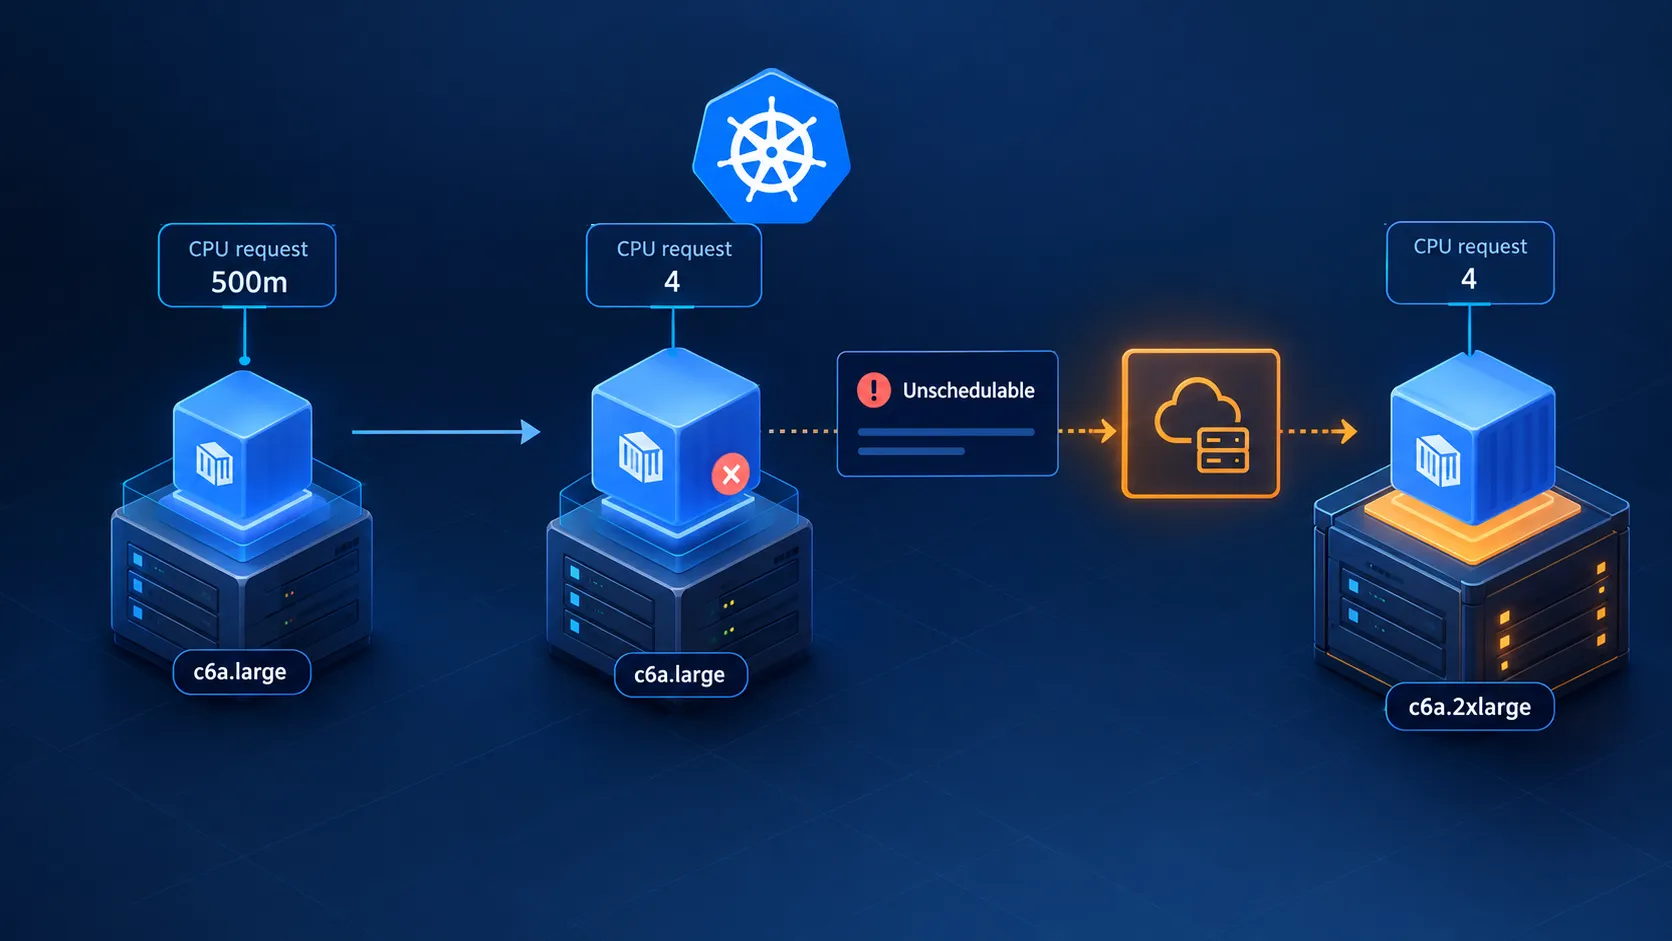
Pending even when an Amazon EKS cluster has healthy nodes. One common reason is that no eligible node has enough allocatable CPU to satisfy the Pod's request.In this hands-on experiment, we first deploy a Pod that requests
500m CPU. Kubernetes schedules it on an existing c6a.large node. We then recreate the Pod with a request of 4 CPUs. The existing node cannot accommodate that request, so the Pod becomes unschedulable and EKS Auto Mode provisions additional capacity.
The experiment demonstrates how a Kubernetes resource request can influence node provisioning. It does not demonstrate scaling based on actual CPU utilization: the container runs
sleep 3600 , which does not consume four CPUs.What we will observe
The experiment follows these steps:
- Deploy a Pod requesting
500mCPU and128Mimemory.
- Confirm that it runs on an existing
c6a.largeinstance.
- Recreate the Pod with a
4CPU request, leaving memory unchanged.
- Observe the
FailedSchedulingevent with reasonInsufficient cpu.
- Inspect the NodeClaim created by EKS Auto Mode.
- Verify that a new
c6a.2xlargeinstance joins the cluster and reachesReady.
- Confirm that the Pod is scheduled on the new node.
The
c6a.2xlarge is the instance type observed in this run, not a guaranteed selection. EKS Auto Mode chooses capacity that satisfies the workload and the constraints of the applicable NodePool, subject to available offerings and capacity.How scheduling leads to provisioning
Kubernetes scheduling and infrastructure provisioning are related, but they are separate operations.
The Kubernetes Scheduler assigns a Pod to a Node. To make that decision, it checks whether the node has enough remaining allocatable resources to satisfy the Pod's requests and whether the Pod meets the node's other scheduling constraints.
A simplified CPU accounting model is:
text
CPU remaining = CPU allocatable - Total CPU requests of scheduled Pods
This is a conceptual model, not the complete scheduling algorithm. The Scheduler also considers memory, ephemeral storage, Pod count, node selectors, affinity, taints and tolerations, topology, volumes, and other constraints.
Three node values are useful when investigating a scheduling decision:
- Capacity is the total resource capacity reported for the node.
- Allocatable is the amount Kubernetes makes available to Pods after node-level reservations.
- Allocated resources in
kubectl describe nodesummarizes the requests and limits of Pods assigned to that node.
An EC2 instance's advertised vCPU count is not the same as the CPU available to new Pods. System and kubelet reservations reduce allocatable capacity, and existing Pod requests consume part of that capacity from the Scheduler's perspective. Actual CPU utilization is not a substitute for request accounting.
When no eligible node can satisfy a Pod, the Scheduler reports a
FailedScheduling event. Insufficient cpu means the CPU fit check failed for the eligible nodes at that time. It does not mean that EC2 failed to launch an instance, nor does it describe how busy the CPUs are.EKS Auto Mode can respond to an unschedulable Pod by provisioning more compute capacity when an enabled NodePool can satisfy the Pod's requirements. The provisioning system evaluates the workload against NodePool constraints and available infrastructure; Kubernetes does not request a particular EC2 instance type directly.
A NodePool defines constraints and disruption settings for nodes that can be provisioned. A NodeClaim is the Kubernetes resource representing a request for a node. After capacity is launched, the instance must register as a Kubernetes Node and become ready before the Scheduler can place the pending Pod on it.
How EKS Auto Mode Provisions New Compute Capacity

Experiment environment
The original experiment used this environment:
Component | Recorded configuration |
|---|---|
AWS Region | us-east-1 |
Amazon EKS | Auto Mode enabled |
Kubernetes version | 1.37 |
NodePools | general-purpose , system |
Workload Pod | cpu-test |
Container image | public.ecr.aws/docker/library/busybox:1.36 |
Container command | sleep 3600 |
EC2 capacity observed | On-Demand |
The handoff records the Kubernetes version as
1.37 , but does not include the cluster's exact EKS platform version. It also does not preserve the full live NodePool and NodeClass YAML, Availability Zone, architecture metadata, NodePool limits, or every effective instance constraint. Inspect these values in your own cluster rather than assuming they match the original run.Prerequisites
You need:
- An existing EKS cluster with Auto Mode enabled.
- AWS CLI and
kubectlconfigured for the cluster.
- Kubernetes permissions to create and delete Pods and inspect Pods, Events, Nodes, NodePools, and NodeClaims.
- AWS IAM permission
ec2:DescribeInstancesif you want to query the EC2 instance from the CLI.
The identity used by the operator is separate from the roles used by EKS and the nodes. The cluster IAM role grants permissions to cluster-managed components; the node IAM role is assumed by EC2 nodes. EKS access entries and Kubernetes RBAC determine which IAM principals can access Kubernetes resources. The operator's AWS CLI identity separately needs permission to call EC2 APIs.
Set the cluster details and connect:
Bash
export AWS_REGION=us-east-1export CLUSTER_NAME="your-cluster-name"aws eks update-kubeconfig \--region "$AWS_REGION" \--name "$CLUSTER_NAME"kubectl cluster-infokubectl get nodes
Check that the expected Auto Mode NodePools exist:
Bash
kubectl get nodepoolskubectl describe nodepool general-purpose
The experiment used the built-in
general-purpose and system pools. AWS documents the built-in pools as managed configurations; their constraints influence which instance offerings are eligible. The original handoff does not include the complete effective configuration at the time of the experiment, so we cannot attribute the c6a.2xlarge selection to a specific individual constraint.Step 1: Schedule a Pod with a 500m CPU request
Create
cpu-test-500m.yaml YAML
apiVersion: v1kind: Podmetadata:name: cpu-testspec:restartPolicy: Nevercontainers:- name: busyboximage: public.ecr.aws/docker/library/busybox:1.36command:- sleep- "3600"resources:requests:cpu: "500m"memory: "128Mi"
Apply the manifest and inspect the Pod
Bash
kubectl apply -f cpu-test-500m.yamlkubectl get pod cpu-test -o widekubectl describe pod cpu-test
Expected outcome: the Pod reaches
Running and is assigned to a node with enough allocatable CPU and memory.
Observed in the experiment: the Pod ran on an EC2
c6a.large instance. The original terminal transcript was not preserved, so the instance type is reported as a documented observation rather than a verbatim command output.
Record the assigned Kubernetes node
Bash
NODE_NAME=$(kubectl get pod cpu-test \-o jsonpath='{.spec.nodeName}')echo "$NODE_NAME"
Inspect its resource accounting
Bash
kubectl describe node "$NODE_NAME"
Review the
Capacity , Allocatable , and Allocated resources sections. The first two show the node's reported total and Pod-assignable resources; the last shows the requests and limits of the Pods already assigned to it.
The original experiment did not preserve the numeric output of
kubectl describe node . We therefore do not infer the exact allocatable CPU on the c6a.large from its EC2 vCPU specification.Step 2: Increase the CPU request to four CPUs
Now change only the CPU request. Keep the memory request, image, and command the same.
Create
cpu-test-4cpu.yaml YAML
apiVersion: v1kind: Podmetadata:name: cpu-testspec:restartPolicy: Nevercontainers:- name: busyboximage: public.ecr.aws/docker/library/busybox:1.36command:- sleep- "3600"resources:requests:cpu: "4"memory: "128Mi"
Delete the first Pod and create the new one
Bash
kubectl delete pod cpu-testkubectl apply -f cpu-test-4cpu.yamlkubectl get pod cpu-test -o widekubectl describe pod cpu-test
Observed in the experiment: the Pod remained
Pending . Its events recorded FailedScheduling with reason Insufficient cpu .
The original complete event message was not retained; this is a summary of the recorded observation, not a verbatim terminal transcript.
Expected outcome: while no eligible node can satisfy the Pod's request and other scheduling constraints, the Pod remains pending. Exact event wording and counts can vary.
The request changed from
500m (half a CPU) to 4 CPUs, while memory remained at 128Mi . This makes CPU request the workload variable changed in the experiment.
The key point is that a request is used for scheduling even when the container is not consuming that amount of CPU at runtime. The
sleep 3600 process does not generate four CPUs of load.
The experiment is about requested resources and scheduling feasibility, not utilization-based scaling.
Step 3: Inspect the NodeClaim created by EKS Auto Mode
When a Pod is unschedulable, EKS Auto Mode can provision additional capacity if an applicable NodePool can meet the Pod's requirements and provisioning is not blocked by constraints or infrastructure availability.
List the NodeClaims
Bash
kubectl get nodeclaims -o wide
Inspect the NodeClaim created during the experiment
Bash
kubectl describe nodeclaim <nodeclaim-name>
Observed in the experiment: EKS Auto Mode created a NodeClaim in the
general-purpose pool. Its generated name was general-purpose-rf7fr . This name is lab evidence only; NodeClaim names are generated and should not be hard-coded.
A NodeClaim provides the Kubernetes-side record of the capacity request and its provisioning lifecycle. Inspect its conditions and, when available, its
status.providerID . A NodeClaim being present does not by itself mean that the EC2 instance has registered as a Ready Kubernetes Node.
The experiment also recorded that the original node entered termination with reason
Empty . Preserve that as a separate lifecycle observation: the available evidence does not establish that the change to the CPU request directly caused the old node's termination.Step 4: Verify the new node and the Pod placement
List the nodes
Bash
kubectl get nodes -o wide
Observed in the experiment: EKS Auto Mode provisioned a new
c6a.2xlarge EC2 instance.
The instance was On-Demand and the corresponding Kubernetes Node reached
Ready . The Pod was then scheduled successfully.
A
c6a.2xlarge has eight advertised vCPUs, but those eight vCPUs should not be treated as eight CPUs of Pod-allocatable capacity.
Check the registered node's Kubernetes resource values
Bash
NODE_NAME=$(kubectl get pod cpu-test \-o jsonpath='{.spec.nodeName}')kubectl describe node "$NODE_NAME"kubectl get pod cpu-test -o wide
Expected outcome: the Pod reaches
Running and its assigned node is the newly provisioned node. The exact instance type is not guaranteed; another compatible offering may be selected in a different run.Correlate the Pod, Node, NodeClaim, and EC2 instance
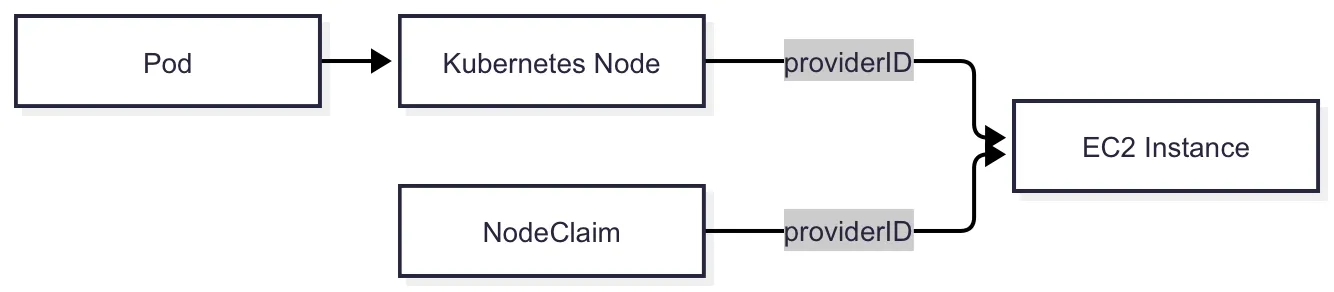
The Kubernetes Node's
spec.providerID is the link to the cloud instance. For an AWS-backed node, the final component of the provider ID is the EC2 instance ID.
First, get the node assigned to the Pod and its provider ID
Bash
NODE_NAME=$(kubectl get pod cpu-test \-o jsonpath='{.spec.nodeName}')PROVIDER_ID=$(kubectl get node "$NODE_NAME" \-o jsonpath='{.spec.providerID}')INSTANCE_ID="${PROVIDER_ID##*/}"printf 'Node: %s\nProvider ID: %s\nInstance ID: %s\n' \"$NODE_NAME" "$PROVIDER_ID" "$INSTANCE_ID"
Find the NodeClaim with the matching provider ID. This command uses
jq Bash
NODECLAIM_NAME=$(kubectl get nodeclaims -o json | \jq -r --arg provider_id "$PROVIDER_ID" \'.items[] | select(.status.providerID == $provider_id) | .metadata.name')printf 'NodeClaim: %s\n' "$NODECLAIM_NAME"kubectl describe nodeclaim "$NODECLAIM_NAME"
If the result is empty, the NodeClaim's provider ID may not yet be populated. Inspect
kubectl get nodeclaims -o wide and retry after the resource progresses.
Finally, query EC2
Bash
aws ec2 describe-instances \--region "$AWS_REGION" \--instance-ids "$INSTANCE_ID" \--query 'Reservations[].Instances[].{InstanceId:InstanceId,InstanceType:InstanceType,State:State.Name,Architecture:Architecture,AvailabilityZone:Placement.AvailabilityZone}'
This command requires the operator's AWS identity to have
ec2:DescribeInstances . The Kubernetes commands require read access to Pods, Nodes, and NodeClaims. These are separate permission systems.
The experiment recorded the new instance as
c6a.2xlarge with On-Demand capacity. The instance ID and complete original AWS CLI output were not retained in the article handoff, so the reusable commands discover the ID dynamically rather than embedding a lab-specific value.
Mapping Kubernetes Resources to EC2 Instances
Using a custom NodePool for a workload class
The experiment used the built-in
general-purpose NodePool. If you need to express workload-specific constraints, you can create a custom NodePool and give its nodes a label.
For example, this NodePool labels its nodes with
workload-class: cpu-oriented YAML
apiVersion: karpenter.sh/v1kind: NodePoolmetadata:name: cpu-orientedspec:template:metadata:labels:workload-class: cpu-orientedspec:nodeClassRef:group: eks.amazonaws.comkind: NodeClassname: defaultrequirements:- key: eks.amazonaws.com/instance-categoryoperator: Invalues:- c- key: eks.amazonaws.com/instance-cpuoperator: Invalues:- "8"- "16"- "32"- key: kubernetes.io/archoperator: Invalues:- amd64- key: karpenter.sh/capacity-typeoperator: Invalues:- on-demand
This is an illustrative custom configuration, not the NodePool used in the original experiment. It assumes the cluster has the Auto Mode
default NodeClass. Check the target cluster's available NodeClass and supported requirements before applying it.
How NodePool Constraints Shape Eligible Compute Capacity

A Pod can target nodes from this pool using a
nodeSelector YAML
spec:nodeSelector:workload-class: cpu-oriented
The selector value must match the label defined under
spec.template.metadata.labels in the NodePool. If the values do not match, the Pod will not be eligible for nodes from this pool.The NodePool constrains the set of eligible capacity; it does not guarantee that a particular EC2 size will be selected. Even with these requirements, the chosen instance depends on the Pod's resource requests, all applicable constraints, and available capacity.
What the experiment teaches us
The two configurations produced the following documented results:
| Initial Pod | Updated Pod |
|---|---|---|
CPU request | 500m | 4 |
Memory request | 128Mi | 128Mi |
Observed EC2 instance | c6a.large | c6a.2xlarge |
Advertised vCPUs | 2 | 8 |
Scheduling result | Scheduled on existing node | Initially FailedScheduling ; scheduled after new node became Ready |
The important change was not an increase in measured CPU consumption. It was an increase in the CPU request that the Scheduler had to accommodate.
The sequence demonstrates the interaction between:
- Pod requests, which describe the resources Kubernetes must account for when scheduling.
- The Scheduler, which determines whether an eligible node can accept the Pod.
- NodePools, which constrain the kinds of nodes the provisioning system can create.
- NodeClaims, which represent requested node capacity.
- EC2, which supplies the compute instance.
- Node registration and readiness, which make the new capacity available to Kubernetes.
The old node's
Empty termination reason and the transient InvalidDiskCapacity warnings observed during node startup are additional lab observations. Both nodes subsequently became Ready ; the available evidence does not establish a more specific cause for either observation, so neither should be treated as proof of a persistent issue or as a direct consequence of the CPU request change.Practical considerations
CPU requests affect scheduling and can therefore affect the infrastructure required to run a workload. A request that is much higher than the workload needs can lead to inefficient placement or larger infrastructure. A request that is too low can increase packing density but may contribute to contention when workloads need more CPU concurrently.
Use application measurements and realistic workload testing to set requests. For production, also consider replicas, disruption budgets, topology spread, graceful termination, and the cost implications of the eligible instance types.
The experiment used a single Pod to isolate scheduling behavior. It does not demonstrate high availability, performance under load, or the minimum instance size required for a four-CPU request.
Clean up
Delete the workload
Bash
kubectl delete pod cpu-test
If you created a custom NodePool for this exercise, remove it when it is no longer needed
Bash
kubectl delete nodepool cpu-oriented
Only delete the EKS cluster if it was created exclusively for this experiment and you have confirmed that deletion is intended. Review related AWS resources and billing independently; deleting a cluster should not be assumed to remove every shared networking or IAM resource.
The original lab cleanup removed the Pod and EKS cluster. The observed EC2 instances reached
terminated ; shared networking resources and IAM roles and policies were preserved. The handoff does not establish that every auxiliary resource, such as ENIs or security groups, was removed.Conclusion
A Kubernetes CPU request is more than a description of an application's desired resources: it is an input to scheduling. When a Pod's request changes from
500m to 4 CPUs, a node that previously accommodated it may no longer be eligible.
In this experiment, the
500m Pod ran on an existing c6a.large . After the request increased to 4 , the Pod became pending with FailedScheduling and Insufficient cpu . EKS Auto Mode created a NodeClaim, provisioned a new c6a.2xlarge instance, and made the node Ready. The Pod was then scheduled successfully.
The instance type is specific to this run, not a fixed outcome. The reusable lesson is to trace the entire path: inspect the Pod's requests and scheduling events, review the matching NodePool, follow the NodeClaim, correlate its provider ID with the Kubernetes Node and EC2 instance, and confirm that the node is Ready before concluding that the workload has usable capacity.
References
Enjoyed reading this content? Let the author know!
Your likes, comments, shares, and saves help creators reach more builders.

Loading recommendations
Loading article