
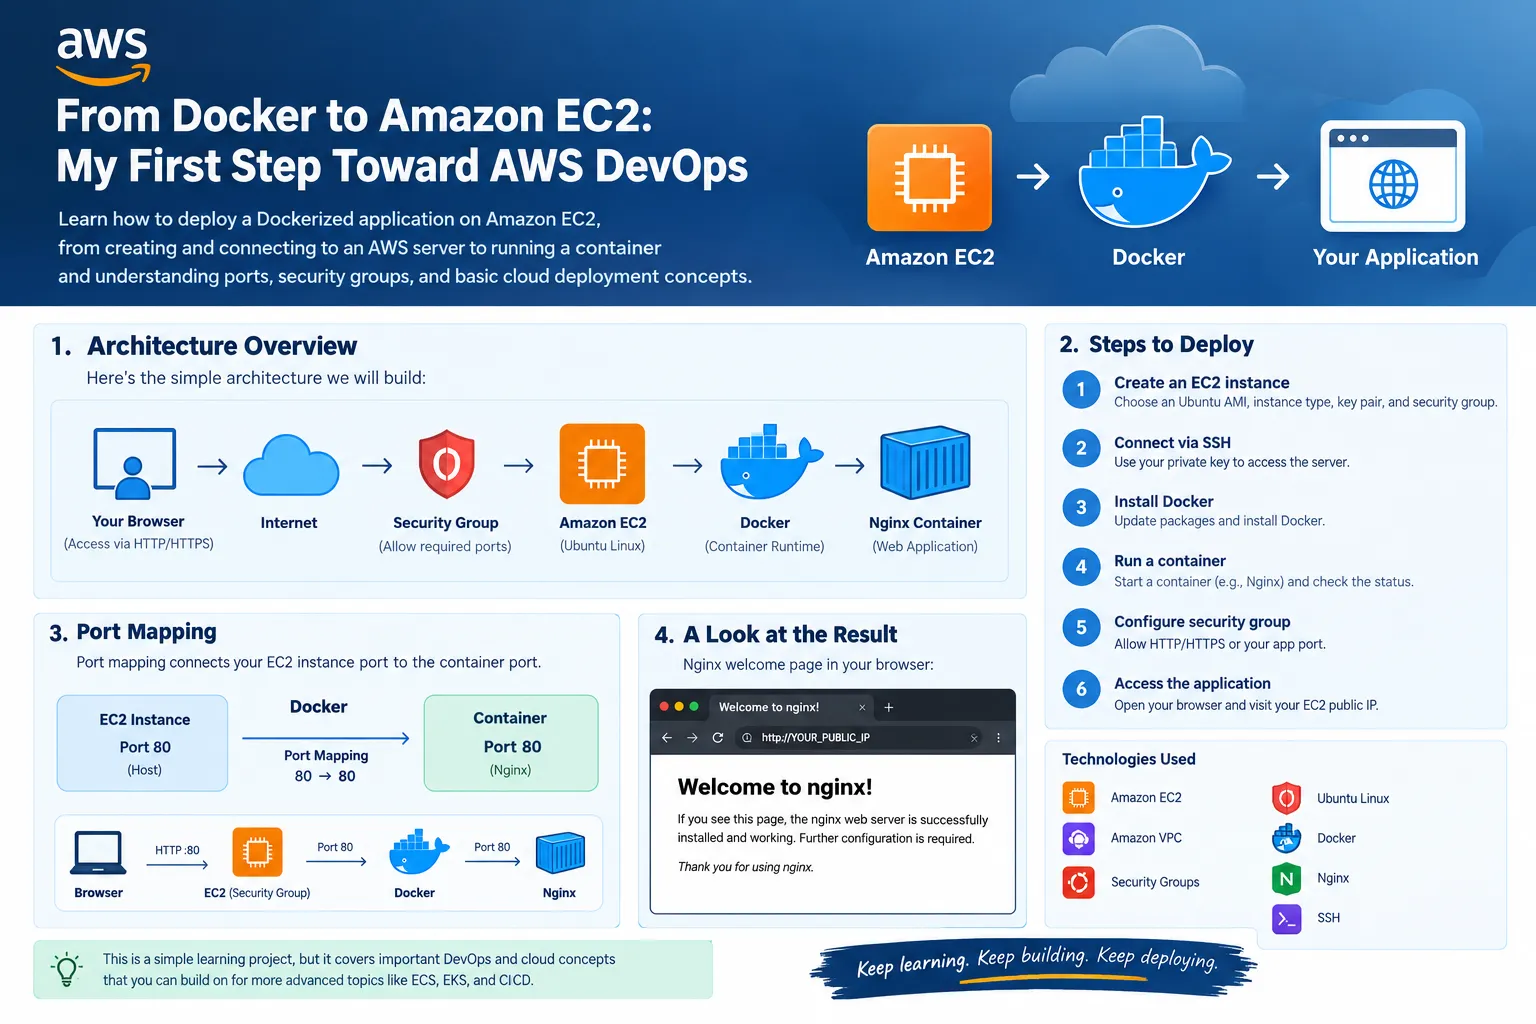
From Docker to Amazon EC2: My First Step Toward AWS DevOps Introduction
Learn how to deploy a Dockerized application on Amazon EC2 from creating and connecting to an AWS server to running a container and understanding ports, security groups and basic cloud deployment concepts.

When I started learning DevOps, I spent a lot of time learning individual tools such as Linux, Git and Docker. However, I soon realized that knowing commands is only one part of the journey. The more important part is understanding how these tools work together to deploy and run an application.
After working with Docker locally, my next step was to understand how I could take a containerized application and run it on AWS.
In this article, I will share a simple hands-on example of running a Docker container on an Amazon EC2 instance. This is a beginner-friendly setup, but it helped me understand some important concepts around cloud servers, networking, ports, security groups and containers.
What Are We Going to Build?
The basic architecture is simple:
1
2
3
4
5
6
7
8
9
10
11
12
13
14
15
16
                 AWS Cloud
                     |
                     v
              Amazon EC2
                     |
                     v
               Ubuntu Linux
                     |
                     v
                  Docker
                     |
                     v
             Docker Container
                     |
                     v
                Web App
The goal is to:
- Create an EC2 instance.
- Connect to it using SSH.
- Install Docker.
- Run a Docker container.
- Configure the required network access.
- Access the application from a browser.
This is not a production architecture. It is a simple learning project that helps build the foundation for more advanced DevOps work.
1. What Is Amazon EC2?
Amazon EC2, or Amazon Elastic Compute Cloud, allows us to create virtual servers in AWS.
If we were working on a traditional server, we would need physical hardware, networking, storage, an operating system and maintenance.
With EC2, AWS provides the underlying infrastructure, while we manage the operating system and applications running on our instance.
For example:
1
2
3
4
5
6
7
8
9
AWS
 |
 +-- EC2 Instance
       |
       +-- Ubuntu
       |
       +-- Docker
       |
       +-- Application
Learning EC2 is useful because it introduces several important cloud concepts:
- Virtual servers
- Operating systems
- IP addresses
- Networking
- Security groups
- Storage
- SSH
- Application deployment
These fundamentals become very useful later when working with services such as Amazon ECS and Amazon EKS.
2. Creating an EC2 Instance
The first step is to create an EC2 instance from the AWS Management Console.
For this learning project, I can use an Ubuntu-based EC2 instance.
When creating the instance, we need to configure a few basic things:
- Amazon Machine Image (AMI)
- Instance type
- Key pair
- Network settings
- Security group
- Storage
For a simple learning project, we don't need a large instance.
The important part is understanding what each option does rather than simply selecting values without knowing why.
3. Understanding the Security Group
One of the first AWS networking concepts I learned was the security group.
A security group works like a virtual firewall for our EC2 instance.
For example, to connect to the server using SSH:
1
2
3
Protocol: TCP
Port: 22
Purpose: SSH
If our web application is running on HTTP:
1
2
3
Protocol: TCP
Port: 80
Purpose: HTTP
If our application is directly listening on port 3000:
1
2
3
Protocol: TCP
Port: 3000
Purpose: Application
The important lesson here is:
Only expose the ports that your application actually needs.
For SSH, allowing access only from your own IP address is generally safer than opening SSH to the entire internet.
4. Connecting to the EC2 Instance
After creating the EC2 instance, we can connect to it using SSH.
For an Ubuntu instance, the command looks like:
1
ssh -i my-key.pem ubuntu@YOUR_PUBLIC_IP
Here:
1
my-key.pem
is our private key file and:
1
YOUR_PUBLIC_IP
is the public IP address assigned to the EC2 instance.
If everything is configured correctly, we should see a terminal similar to:
1
ubuntu-172-31-xx-xx:~$At this point, we are working directly inside our cloud server.
That was one of the first things that made the cloud concept feel practical to me: the server is running somewhere in AWS, but I can manage it from my own computer through SSH.
5. Updating Ubuntu
Before installing Docker, I recommend updating the package information.
Run:
1
sudo apt update
We can also install available updates:
1
sudo apt upgrade -y
The
sudo command allows us to execute commands with elevated privileges.6. Installing Docker
Now we can install Docker.
On Ubuntu, one simple approach for a learning environment is:
1
sudo apt install docker.io -y
After the installation finishes, check the Docker version:
1
docker --version
We should get output similar to:
1
Docker version 28.x.x
The exact version may be different depending on when the installation is performed.
7. Starting the Docker Service
Next, we can start Docker:
1
sudo systemctl start docker
To make Docker start automatically when the server boots:
1
sudo systemctl enable docker
We can check the service status:
1
sudo systemctl status docker
If everything is working correctly, Docker should show an active status.
8. Running Our First Container
Before deploying our own application, let's test Docker with Nginx.
Run:
1
sudo docker run -d -p 80:80 nginx
At first, this command may look confusing, so let's break it down.
docker run
Creates and starts a new container.
-d
Runs the container in detached mode, which means it continues running in the background.
-p 80:80
Maps a port on the EC2 host to a port inside the container.
nginx
This is the Docker image we want to run.
We can check the running containers with:
1
sudo docker ps
We should now see the Nginx container.
9. Understanding Docker Port Mapping
Port mapping was one of the concepts I wanted to understand properly when learning Docker.
When we run:
1
docker run -d -p 80:80 nginx
the first port is the host port and the second port is the container port.
1
2
EC2 Host                     Container
   Port 80  ---------------->  Port 80
So when someone accesses:
1
http://YOUR_PUBLIC_IP
the request reaches port 80 on the EC2 instance and Docker forwards it to port 80 inside the Nginx container.
The complete flow looks like this:
1
2
3
4
5
6
7
8
9
10
11
12
13
14
15
16
17
Browser
   |
   | HTTP :80
   v
Internet
   |
   v
EC2 Security Group
   |
   v
EC2 Port 80
   |
   v
Docker
   |
   v
Nginx Container :80
Understanding this flow makes container networking much easier.
10. Accessing the Application
Now we can open a browser and enter:
1
http://YOUR_PUBLIC_IP
If the security group allows HTTP traffic and the container is running correctly, we should see the Nginx welcome page.
At this point, we have successfully run a containerized application on an AWS EC2 server.
It may be a small example, but several important components are working together:
1
2
3
4
5
6
7
8
9
AWS EC2
   ↓
Ubuntu
   ↓
Docker
   ↓
Nginx
   ↓
Browser
11. What About Our Own Application?
Running Nginx is useful for testing, but in a real project we usually want to deploy our own application.
For example, suppose we have a simple Node.js application.
We could create a Dockerfile like this:
1
2
3
4
5
6
7
8
9
10
11
12
13
FROM node:20

WORKDIR /app

COPY package*.json ./

RUN npm install

COPY . .

EXPOSE 3000

CMD ["npm", "start"]
We can build the Docker image:
1
docker build -t my-app .
Then run the container:
1
docker run -d -p 3000:3000 my-app
Now the application is running inside a Docker container.
If we want to access port 3000 directly from the internet, we also need to make sure that the EC2 security group allows the required traffic.
12. Why Use Docker?
One of the reasons Docker is so useful is that it allows us to package an application together with its required environment and dependencies.
Without containers, we might have:
1
2
3
4
5
6
7
Server
 |
 +-- Install Node.js
 +-- Install npm packages
 +-- Configure application
 +-- Configure environment
 +-- Run application
With Docker, we can package the application into an image:
1
2
3
4
5
6
Docker Image
 |
 +-- Application
 +-- Dependencies
 +-- Runtime
 +-- Configuration
The same image can then be used in different environments.
This makes application deployment more consistent.
13. EC2 and Docker Are Not the Same Thing
This was another important concept for me.
EC2 and Docker solve different problems.
EC2 provides the virtual server.
Docker provides containerization.
So we can think of it like this:
1
2
Amazon EC2
= Cloud Server
and:
1
2
Docker
= Container Platform
They can work together:
1
2
3
4
5
6
7
8
9
10
11
AWS
 |
 EC2
  |
 Ubuntu
  |
 Docker
  |
 Container
  |
 Application
Later, instead of manually managing containers on EC2, we can explore managed container services and orchestration platforms.
14. What I Learned
This small project taught me several things that are easy to miss when learning from tutorials alone.
Cloud does not remove the fundamentals
Even though the server is running in AWS, I still need to understand:
- Linux
- Networking
- Ports
- Processes
- Permissions
- Services
- Logs
AWS provides the infrastructure, but understanding what happens inside the server is still important.
Networking is a major part of DevOps
An application can be running perfectly but still be inaccessible because of:
- Incorrect security group rules
- Wrong port mapping
- Incorrect application binding
- Firewall configuration
- Incorrect IP address
This is why learning networking alongside DevOps is so valuable.
Small projects can teach a lot
I initially thought I needed a large project to practice AWS and DevOps.
But this simple deployment taught me several concepts that I can now build on.
15. What Comes Next?
Running one Docker container manually is only the beginning.
The next question is:
What happens when we need to deploy applications repeatedly?
We don't want to connect to a server manually every time and run commands ourselves.
This is where automation becomes important.
A possible DevOps workflow could look like:
1
2
3
4
5
6
7
8
9
10
11
12
13
14
15
16
17
18
19
Developer
    |
    v
GitHub
    |
    v
CI/CD Pipeline
    |
    v
Build Docker Image
    |
    v
Container Registry
    |
    v
AWS
    |
    v
Application
As I continue learning, I want to explore tools and technologies such as:
- GitHub Actions
- Jenkins
- Amazon ECR
- Amazon ECS
- Kubernetes
- Amazon EKS
- Terraform
- Ansible
- Prometheus
- Grafana
However, I believe it is important to understand the fundamentals before moving to more advanced tools.
Conclusion
My biggest takeaway from this project is that DevOps is not about memorizing commands.
It is about understanding how different technologies work together.
Starting with a simple EC2 instance and a Docker container helped me understand the relationship between cloud infrastructure, Linux, networking, containers and application deployment.
For anyone starting their AWS or DevOps journey, I recommend starting small.
Create a server.
Connect to it.
Run something.
Break it.
Find out why it stopped working.
Fix it.
Then make the project a little more advanced.
That process teaches much more than simply following commands from a tutorial.
This is just one step in my AWS and DevOps learning journey and I am looking forward to building on these fundamentals with more automation, container orchestration and cloud-native technologies.
Keep learning. Keep building. Keep deploying.
AWS Services and Technologies Used
- Amazon EC2
- Amazon VPC
- Security Groups
- Ubuntu Linux
- Docker
- Nginx
- SSH
Enjoyed reading this content? Let the author know!
Your likes, comments, shares, and saves help creators reach more builders.

Loading recommendations
Loading article