
AWS Bedrock with Redshift as Knowledge Base - Data across multiple Schemas
As the name suggests, in this Blog, we are going to focus on Amazon Redshift as a knowledge base, where data is stored across multiple schemas within a database.

Please note that the content presented in this document is designed solely for the demonstration of a Proof of Concept (PoC) and utilizes synthetic data to illustrate its capabilities. It does not incorporate production-grade security measures and should not be implemented as is in a production environment. Also, it assumes that you already have access to LLM models under Amazon Bedrock, needed to execute this proof of concept.
Introduction
Amazon Bedrock Knowledge Bases allows you to connect to structured data stores, which contain data that conforms to predefined schema. Examples of structured data include tables and databases. Amazon Bedrock Knowledge Base can convert user queries into language that is suitable for extracting data from supported structured data stores. It can then use the converted query to retrieve data that is relevant to the query and generate appropriate responses. This enables you to use the existing structured data directly without having to convert it to a different format or generate your own SQL queries.
We’ll be focusing on the following steps:
- Setup Redshift Provisioned Cluster & Loading Sample data
- Setup Bedrock Knowledge Base with Redshift
- Setup permissions for Bedrock Service Role to Query Redshift
- Syncing your Bedrock Knowledge Base with Redshift
- Testing the Bedrock Knowledge Base.
- Cleanup
How Bedrock Structured Data Retrieval Works
Amazon Bedrock Knowledge Bases, when connected to Amazon Redshift as a structured data store, does not inherently understand the relationships within the Redshift database schema and the underlying data. Instead, it uses a combination of methods to interpret and query the data effectively:
- Schema metadata analysis: Bedrock analyzes the schema metadata of your Redshift database to understand the structure of your tables and columns.
- Query pattern analysis: The system examines patterns in queries that have been run against the database.
- Query history: It takes into account the history of queries that have been executed.
Using these elements, Amazon Bedrock Knowledge Bases can convert natural language queries into appropriate SQL queries for your Redshift database. This conversion process allows it to retrieve relevant information without needing to fully understand the intricate relationships within your data model.
When you submit a query to the knowledge base, it uses this accumulated understanding to generate SQL queries that are suitable for extracting the required data from your Redshift database. This approach allows Bedrock to provide relevant responses without relying solely on context from previous queries or requiring a deep, inherent understanding of your specific database relationships.
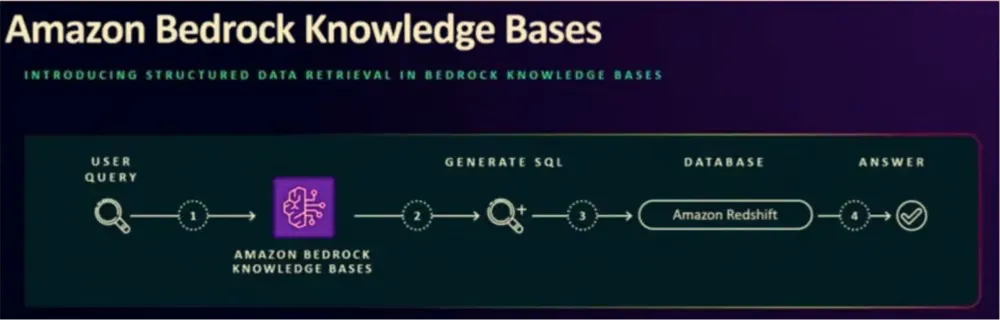
When you submit a query to the knowledge base, it uses this accumulated understanding to generate SQL queries that are suitable for extracting the required data from your Redshift database. This approach allows Bedrock to provide relevant responses without relying solely on context from previous queries or requiring a deep, inherent understanding of your specific database relationships.
It's important to note that the more specific and clear your queries are, the more accurate the responses will be. The system's ability to generate appropriate SQL queries improves over time as it analyzes more query patterns and history.
Remember that while this approach is powerful, it may not capture all the nuances of complex database relationships. For highly specialized or complex queries, you might still need to fine-tune or optimize the process to ensure the most accurate results.
Sample Data and Architecture Diagram
For this blog, we’ll be using the sample data (tickit) provided within Redshift. We will divide the data across multiple schemas within a database. The tickit database track sales activity for the fictional TICKIT web site, where users buy and sell tickets online for sporting events, shows, and concerts. It contains information for each sales transaction, the listing information, event information, etc.

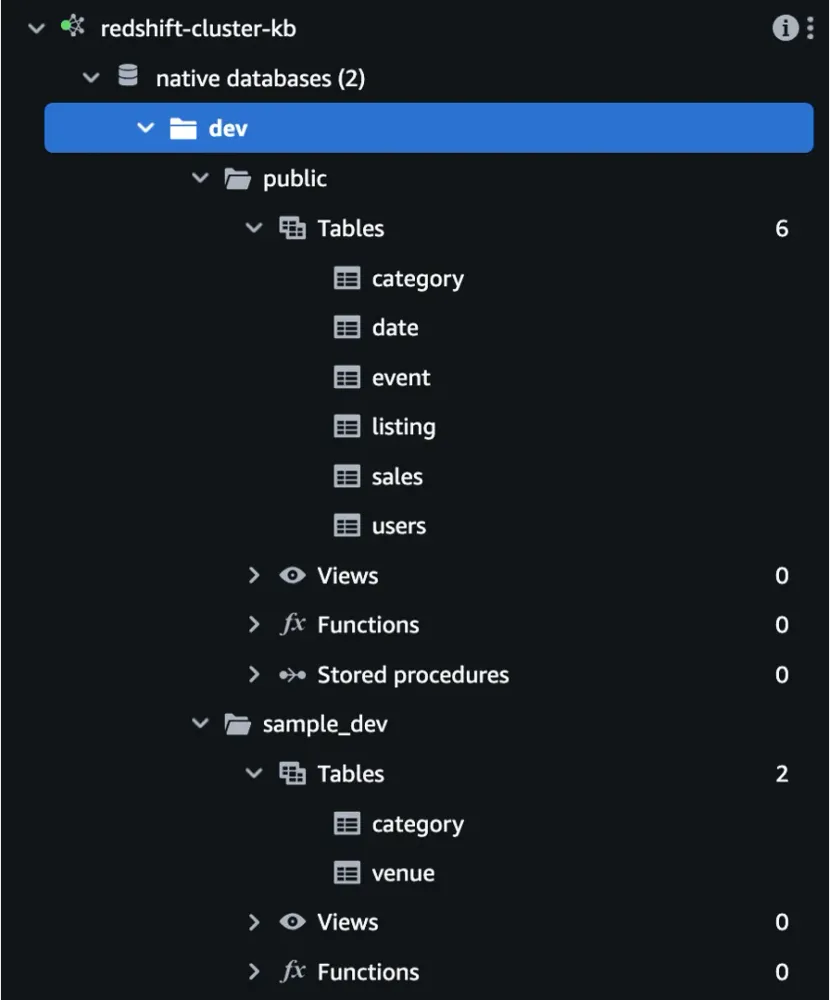
The tables are spread across two (2) different schemas as shown below.
Database | Schema | Table | Remarks |
|---|---|---|---|
| | | |
| | SALES | |
| | USERS | |
| | EVENT | |
| | LISTING | |
| | DATE | |
| | CATEGORY | Duplicate Table without any data |
| sample_dev | CATEGORY | |
| | VENUE | |
We’ll be using Redshift provisioned cluster (Single Node) as the querying engine with the data stored within Redshift. This is how the architecture diagram looks like:

How do we do it? – Step-by-Step Setup Instructions
Step 1: Setup Redshift Provisioned Cluster
1) Sign in to the AWS Management Console and open the Amazon Redshift console at https://console.aws.amazon.com/redshiftv2/ .
2) On the navigation menu, choose Clusters. The clusters for your account in the current AWS Region are listed. A subset of properties of each cluster is displayed in columns in the list.
3) Choose Create cluster to create a cluster.
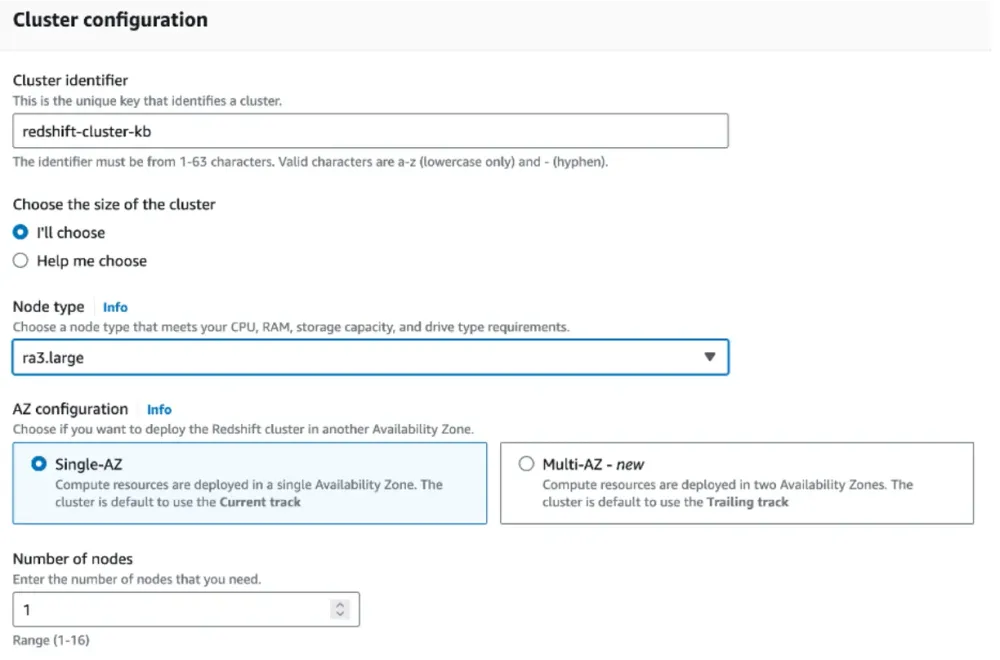
4) Follow the instructions on the console page to enter the properties for Cluster configuration.
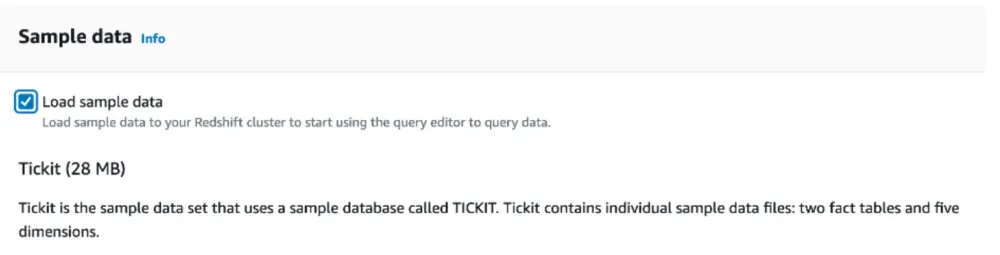
Enable the checkbox to load Sample data. The Sample data gets loaded into public schema automatically during cluster creation.
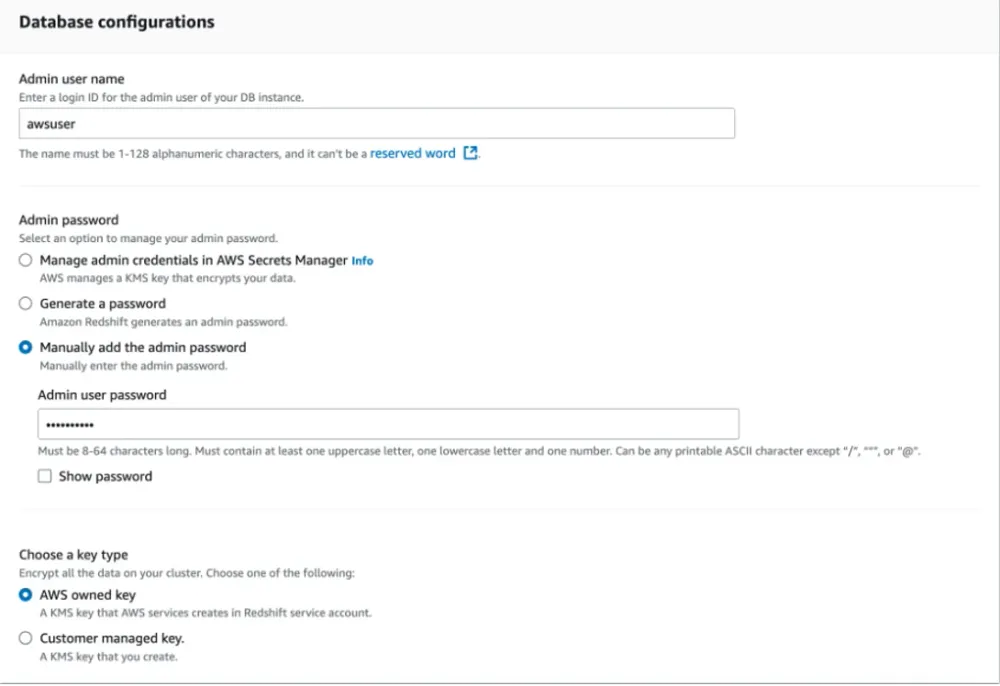
5) In the Database configuration section, specify a value for Admin user name. For Admin password, you can choose from the following options:
For this exercise, we choose Manually add an admin password and enter a password in the provided field.
6) (Optional) Follow the instructions on the console page to enter properties for Cluster permissions. Provide cluster permissions if your cluster needs to access other AWS services for you, for example to load data from Amazon S3.
7) Choose Create cluster to create the cluster. The cluster might take several minutes to be ready to use

8) Once the cluster is created successfully, click on the cluster and select Query Data → Query in query editor v2
9) This will open up Redshift Query Editor.
10) Connect to the cluster using the database username and password specified during the cluster creation time.
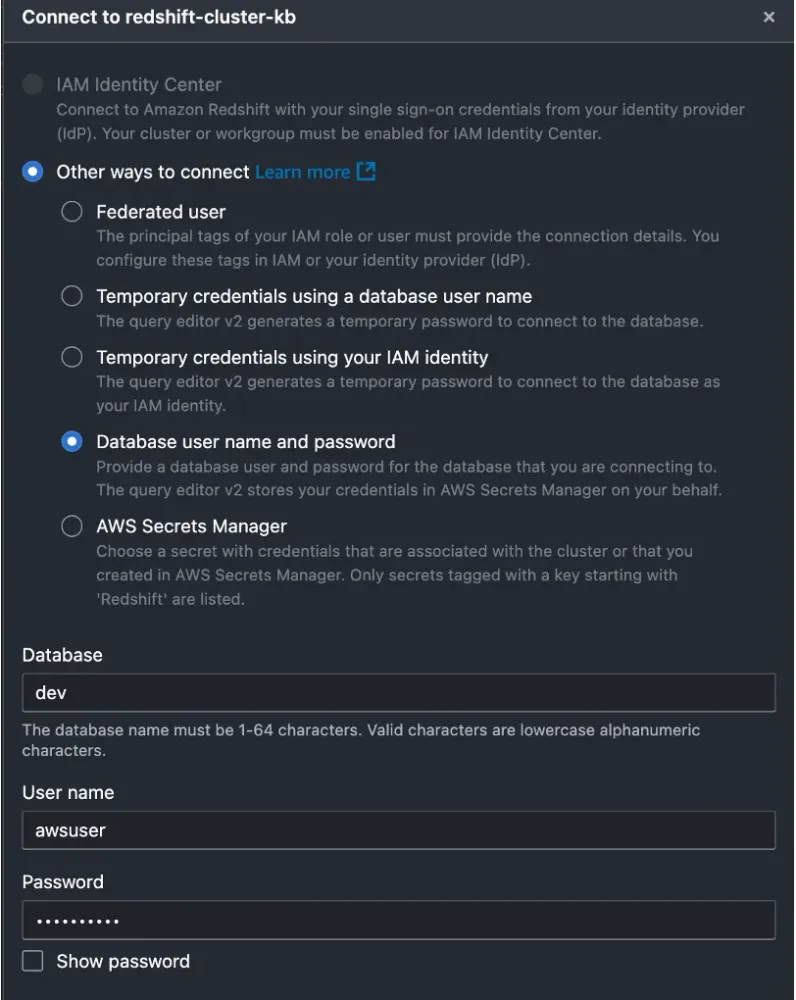
11) Run the following commands to create a new schema and create/load data into tables under new schema.
-- Create New Schema sample_devCREATE SCHEMA sample_dev;
-- Create Table CategoryCREATE TABLE sample_dev.category (    catid smallint NOT NULL ENCODE raw    distkey,        catgroup character varying(10) ENCODE lzo,        catname character varying(10) ENCODE lzo,        catdesc character varying(50) ENCODE lzo) DISTSTYLE KEYSORTKEY (catid);
-- Create Table VenueCREATE TABLE sample_dev.venue (    venueid smallint NOT NULL ENCODE raw    distkey,        venuename character varying(100) ENCODE lzo,        venuecity character varying(30) ENCODE lzo,        venuestate character(2) ENCODE lzo,        venueseats integer ENCODE az64) DISTSTYLE KEYSORTKEY (venueid);
-- Insert data into tablesINSERT Into sample_dev.category select * from public.category; INSERT Into sample_dev.venue select * from public.venue;
-- Delete/Empty Table from public schemaDrop Table public.venue;Delete FROM public.category;
After executing the above SQL statements, we are ready with our target database spread across 2 schemas. Your Redshift editor should look like the following.
 Step 2: Setup Amazon Bedrock Knowledge Base with Redshift
1) In AWS console, search for Bedrock and click on Knowledge Bases under Builder tools
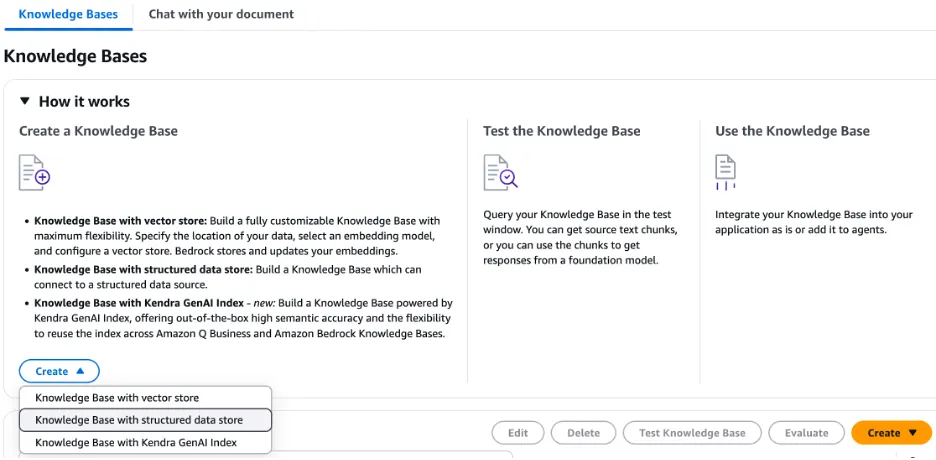
2) Select Create → Knowledge Base with Structured Data Store
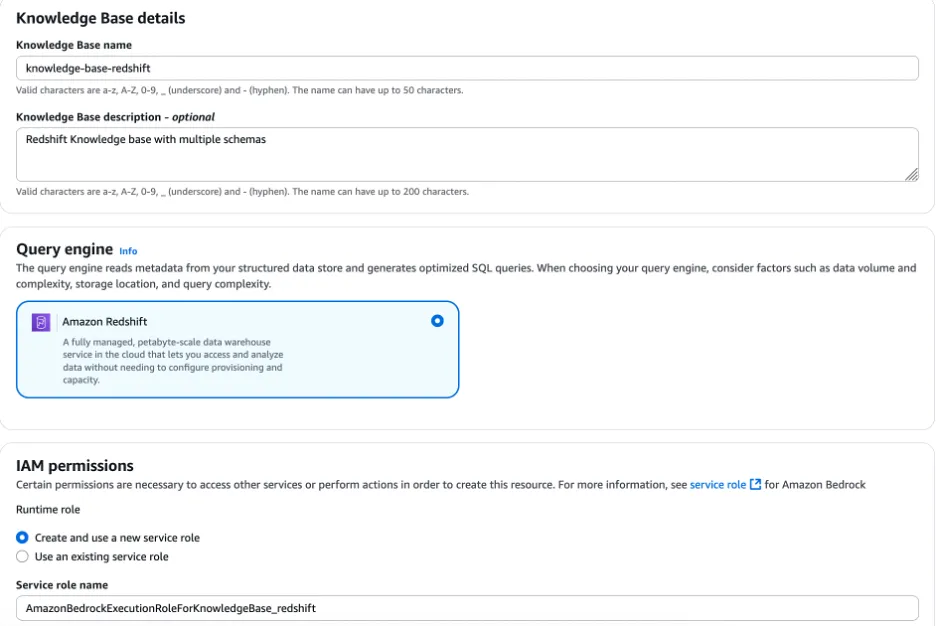
3) Give the knowledge base a name . For the Query Engine, select Redshift.
4) Under IAM Permissions, create a new service role. Alternatively you can use an existing role with the necessary permissions stated here .
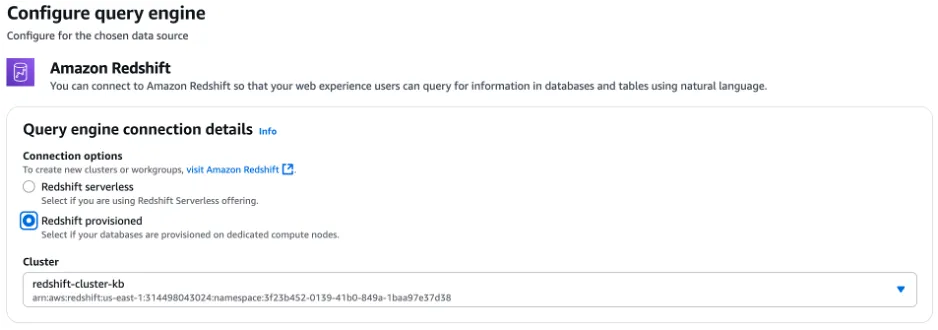
5) Click Next. For the Query Engine, select Redshift Provisioned. Select the Redshift cluster from the dropdown that we created in step 1 above.
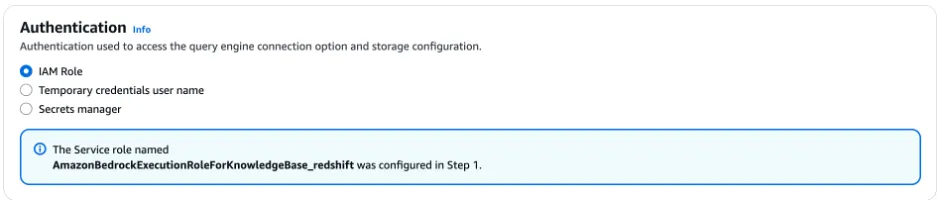
6) For the Authentication, select IAM role. Bedrock Knowledge Base will be using the IAM role from step above to access Redshift.
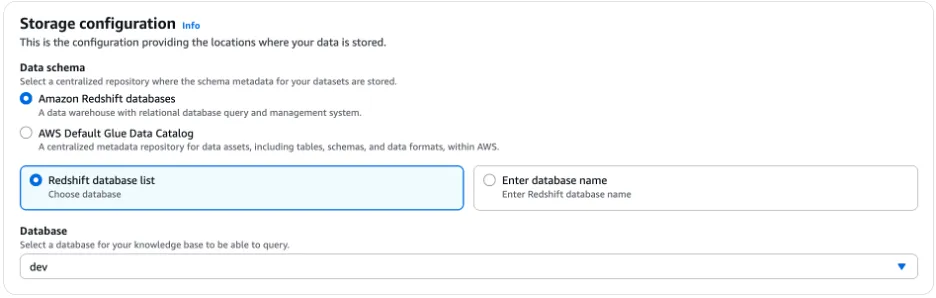
7) For Storage configuration, select Amazon Redshift databases and choose the database under which we have data loaded under two(2) different schemas.
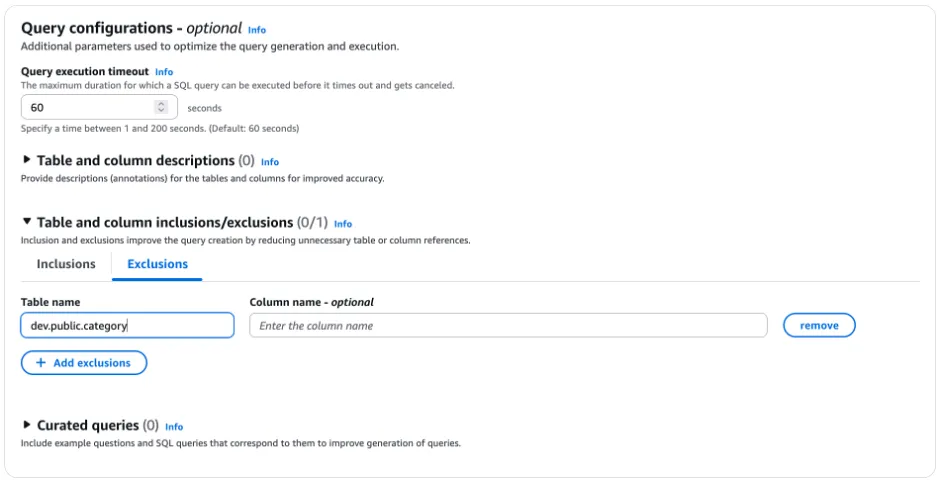
8) For the optional Query Configurations, there are 3 configurations you can enter. We will only add configuration under Table and column inclusions/exclusions. Under Exclusions, add table category, which is available in both the schemas, but contains no records under schema public. We would like to avoid using the table category while generating the SQL queries. Specify the complete name using the format database.schema.table
9) Click Next and review the Knowledge Base details. Click Create Knowledge Base.
10) Before syncing your Knowledge Base, we need to carry of the next step to create and grant permission to the service role which was generated while creating the Knowledge Base. In our case the service role name is AmazonBedrockExecutionRoleForKnoeledgeBase_redshift as mentioned in the above image snippet.
Step 3: Setup database user and grant permissions to Amazon Bedrock execution role
1) Run the following commands in Redshift Query Editor. CREATE USER to create a database user and allow it to authenticate through IAM, replacing
${service-role} with the name of the Amazon Bedrock Knowledge Bases service role you created.If you sync your data store before you do this step, the user will be created for you, but the sync will fail because the user hasn't been granted permissions to access your data store.
CREATE USER "IAMR:AmazonBedrockExecutionRoleForKnoeledgeBase_redshift" WITH PASSWORD DISABLE;
This allows the user to log in using temporary AWS IAM credentials instead of a password. The PASSWORD DISABLE option restricts users from logging in with a password and requires them to use IAM authentication.
2) Grant the Bedrock database user run SELECT statements in your warehouse by running the GRANT command. You can specify which tables/schema you want to grant Bedrock access to.
-- grant access to all tables in a schemaGRANT SELECT ON ALL TABLES IN SCHEMA public, sample_dev TO "IAMR:AmazonBedrockExecutionRoleForKnoeledgeBase_redshift"; -- grant access to specific schemasGRANT USAGE on SCHEMA public, sample_dev to "IAMR:AmazonBedrockExecutionRoleForKnoeledgeBase_redshift";
Step 4: Syncing your Bedrock Knowledge Base with Redshift
1) Back to AWS console for Bedrock.
2) Select the Knowledge Base you created earlier. Under the Query engine section, select the Redshift provisioned Connection type and click on Sync.
3) The process will take some time before its ready for testing.

Step 5: Testing the Bedrock Knowledge Base
1) Select the Knowledge base and click Test Knowledge Base
2) Under Retrieval and response generation, select Retrieval and response generation: data sources and model
3) Click Select model to choose the model of your choice for inference.
4) Under Preview, test with the following prompts.
- What is total Sales till date?
- Total Sales by Category?
- Total Sales by different venues since 2008?
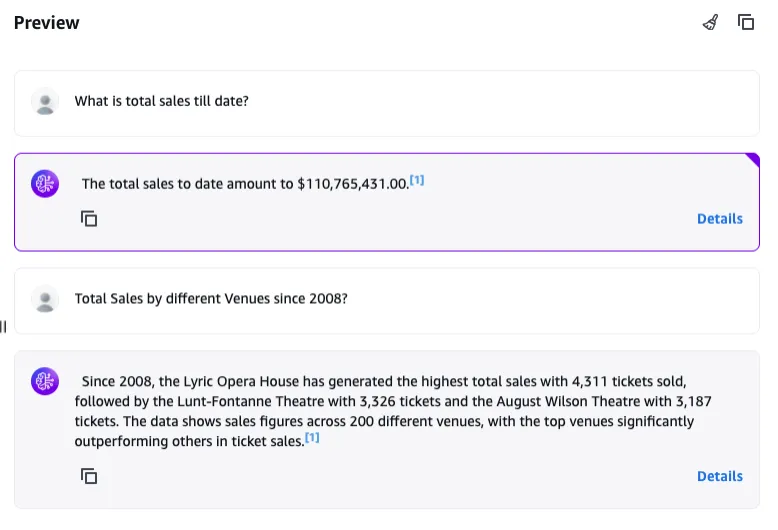
5) You can validate the data by clicking on the Details link which will show the query generated and executed to provide the results.
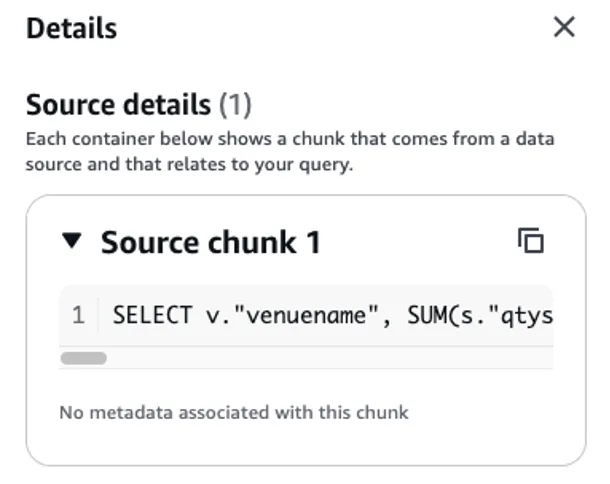
6) For the last question, the query generated by the model is as below. You can observe that the query utilizes tables available across both the schemas to generate the results.
SELECT v."venuename", SUM(s."qtysold") AS "total_sales" FROM public.sales s JOIN public.event e ON s."eventid" = e."eventid" JOIN sample_dev.venue v ON e."venueid" = v."venueid" JOIN public.date d ON s."dateid" = d."dateid" WHERE d."year" >= 2008 GROUP BY v."venuename" ORDER BY "total_sales" DESC;
Step 6: Cleanup
When you’re done experimenting with the AWS Bedrock Knowledge Bases, you can easily clean up all the resources to avoid incurring any additional costs.
- Go to Amazon Bedrock Console, under Knowledge Bases, select the Knowledge Base we created and click Delete, to delete the knowledge base.
- Go to Amazon Redshift Console, click the Redshift cluster that you had created as part of this exercise, select Actions → Delete to remove the Redshift Cluster.
Conclusion
By combining Amazon Bedrock with Redshift as a knowledge base, you can unlock powerful generative AI capabilities over your enterprise’s structured data. Bedrock’s seamless integration allows you to query Redshift using natural language, retrieve relevant information, and generate insightful responses—all without managing complex infrastructure or writing SQL manually.
Author
Anshuman Nanda is a Senior Solutions Architect at Amazon Web Services. He works with startups across Middle-East and Africa. He focuses on Data Analytics and Gen AI architectures, often diving deep through live demos and hands-on solutions.
Legal & Security Disclaimers
Please note that the content presented in this document is designed solely for the demonstration of a Proof of Concept (PoC) and utilizes synthetic data to illustrate its capabilities. It does not incorporate production-grade security measures and should not be implemented as is in a production environment.
Security Awareness Disclaimer For any considerations of adopting these services in a production environment, it is imperative to consult with your company-specific security policies and requirements. Each production environment demands a uniquely tailored security assessment that comprehensively addresses its particular risks and regulatory standards. If in doubt, reach out to your AWS Account team.
You can also refer Best Practices for the AWS Services mentioned in this blog
Enjoyed reading this content? Let the author know!
Your likes, comments, shares, and saves help creators reach more builders.

Loading recommendations
Loading article