
Build and Deploy MCP Server with Amazon Cognito OAuth on Amazon Bedrock AgentCore
Build and deploy a secure MCP Server on Amazon Bedrock AgentCore using Streamable HTTP and Amazon Cognito OAuth/JWT. This walkthrough covers MCP Server development, Cognito User Pool and App Client setup, AgentCore BYO Code deployment, CUSTOM_JWT authentication, IAM permissions, and remote testing with MCP Inspector
Series: MCP Server on AWS (1 article)
- 1Build and Deploy MCP Server with Amazon Cognito OAuth on Amazon Bedrock AgentCore This article

MCP(Model Context Protocol servers) are easy to run locally because the client and server usually communicate within the same machine or trusted environment. However, the architecture becomes more complex when the MCP Server needs to run remotely and be accessed over the network.
At that point, we need to think about how the client will authenticate, how the MCP endpoint will be exposed securely, how requests will be validated before reaching the server, and what permissions the MCP Server should have when calling AWS services.
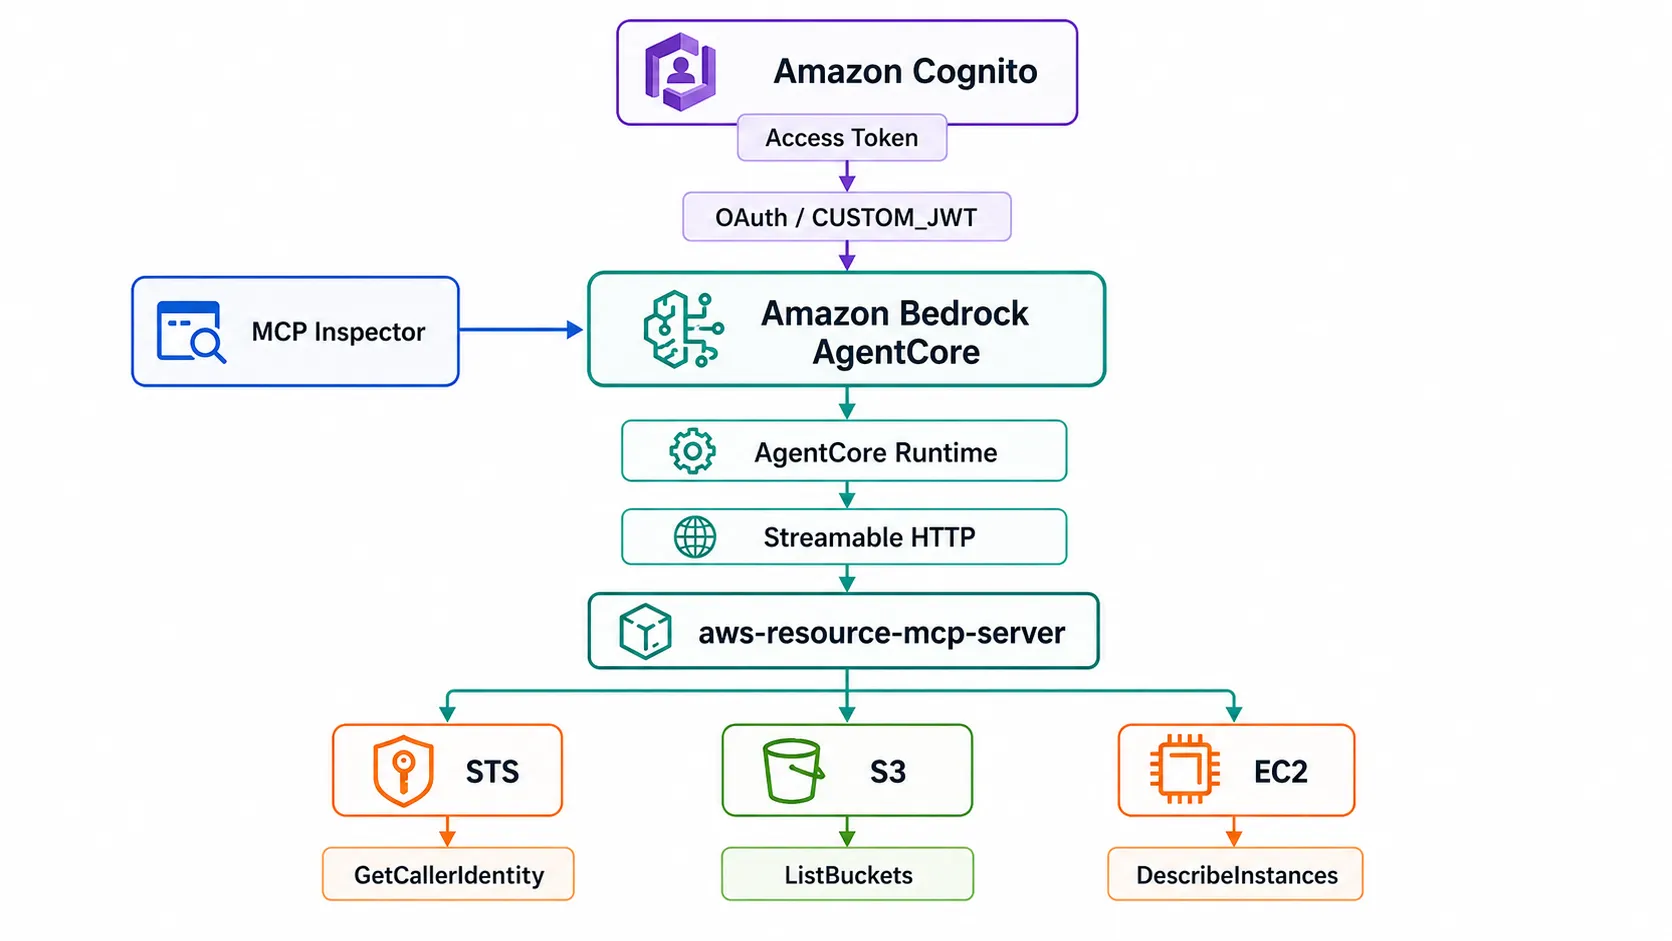
In this implementation, Amazon Bedrock AgentCore provides the managed Runtime for hosting the MCP Server, Amazon Cognito handles user authentication and issues JWT access tokens, and
CUSTOM_JWT is used by AgentCore to validate incoming requests. The AgentCore Runtime IAM role then controls what AWS services the MCP Server is allowed to access, such as AWS STS, Amazon S3, and Amazon EC2.This creates a clear separation between who can access the MCP Server and what the MCP Server can do inside AWS, which is important when moving from a local MCP setup to a more secure remote deployment.
The MCP server exposes three tools:
- get_aws_identity
- list_s3_buckets
- list_ec2_instances

What is Amazon Bedrock AgentCore?
Amazon Bedrock AgentCore is a managed AWS service for building, deploying, and operating AI agents and MCP-based applications at scale.
It provides the runtime environment and supporting capabilities needed to run agentic workloads without managing the underlying infrastructure. AgentCore can expose applications through managed endpoints, integrate with authentication and authorization mechanisms, and use AWS IAM to control access to AWS services.
Key capabilities include:
- Managed runtime for AI agents and MCP Servers
- Secure remote application endpoints
- Authentication and authorization integration
- AWS IAM integration
- Support for scalable agent workloads
- Monitoring and operational capabilities
- Integration with other AWS services
AgentCore helps move AI agents and MCP Servers from local development environments to managed, secure, and scalable deployments on AWS.
Amazon Bedrock AgentCore supports deploying MCP servers remotely and exposes them through a Runtime invocation endpoint.The current AWS deployment flow supports CodeZip packaging which means we can deploy Python source without maintaining a Dockerfile or ECR image ourselves.
What We Are Building
The project is a simple MCP server written in Python.It uses:
- Python
- MCP Python SDK
- boto3
- Streamable HTTP
The server exposes three tools.
get_aws_identity calls AWS STS:
sts:GetCallerIdentitylist_s3_buckets calls:
s3:ListBucketslist_ec2_instances calls:
ec2:DescribeInstancesThe goal is not to create a large MCP implementation, but to have a simple server that clearly demonstrates deployment, authentication, authorization, and remote testing.
Step 1: Create the MCP Server
First, we need an MCP Server that we can run locally and later deploy to Amazon Bedrock AgentCore. For this demo, I am creating a simple AWS Resource MCP Server that uses
boto3 to interact with AWS servicesThe server will expose three MCP tools:
1.get_aws_identity
2.list_s3_buckets
3.list_ec2_instances
2.list_s3_buckets
3.list_ec2_instances
Create a new directory for the AWS Resource MCP Server and Change to the newly created directory

The project directory will be used to store the MCP Server code and Python dependency configuration.
Step 2: Create the MCP Server
Create the MCP Server Python file
mcp_server.py and add the following code1
2
3
4
5
6
7
8
9
10
11
12
13
14
15
16
17
18
19
20
21
22
23
24
25
26
27
28
29
30
31
32
33
34
35
36
37
38
39
40
41
42
43
44
45
46
47
48
49
50
51
52
53
54
55
56
57
58
59
60
61
62
63
64
65
66
67
68
69
70
71
72
73
74
75
76
77
78
79
80
81
82
83
84
85
86
87
88
89
90
91
92
93
94
95
96
97
98
99
100
101
102
103
104
105
106
107
108
109
110
111
112
113
114
115
116
117
118
119
120
121
122
123
124
125
126
127
128
129
130
131
132
133
134
135
136
137
138
139
140
141
import os
import boto3
from mcp.server import MCPServer
mcp = MCPServer(
"aws-resource-mcp-server",
version="1.0.0",
)
AWS_REGION = os.environ.get(
"AWS_REGION",
"eu-west-2",
)
def get_aws_identity() -> dict:
"""
Get the AWS identity used by the MCP Server.
"""
sts = boto3.client(
"sts",
region_name=AWS_REGION,
)
response = sts.get_caller_identity()
return {
"account": response["Account"],
"arn": response["Arn"],
"user_id": response["UserId"],
}
def list_s3_buckets() -> list[dict]:
"""
List Amazon S3 buckets in the AWS account.
"""
s3 = boto3.client("s3")
response = s3.list_buckets()
buckets = []
for bucket in response.get(
"Buckets",
[],
):
buckets.append(
{
"name": bucket["Name"],
"creation_date": (
bucket[
"CreationDate"
].isoformat()
),
}
)
return buckets
def list_ec2_instances(
region: str = AWS_REGION,
) -> list[dict]:
"""
List Amazon EC2 instances
in the specified AWS Region.
"""
ec2 = boto3.client(
"ec2",
region_name=region,
)
paginator = ec2.get_paginator(
"describe_instances"
)
instances = []
for page in paginator.paginate():
for reservation in page.get(
"Reservations",
[],
):
for instance in reservation.get(
"Instances",
[],
):
name = ""
for tag in instance.get(
"Tags",
[],
):
if tag.get("Key") == "Name":
name = tag.get(
"Value",
"",
)
break
instances.append(
{
"instance_id": (
instance["InstanceId"]
),
"name": name,
"instance_type": (
instance["InstanceType"]
),
"state": (
instance[
"State"
]["Name"]
),
"private_ip": (
instance.get(
"PrivateIpAddress"
)
),
"public_ip": (
instance.get(
"PublicIpAddress"
)
),
"region": region,
}
)
return instances
if __name__ == "__main__":
mcp.run(
transport="streamable-http",
host="0.0.0.0",
port=8000,
stateless_http=True,
)The server uses Streamable HTTP and runs on port
8000Step 3: Create pyproject.toml
Create the Python project configuration file and add the following configuration
1
2
3
4
5
6
7
8
9
[project]
name = "aws-resource-mcp-server"
version = "1.0.0"
description = "AWS Resource MCP Server for Amazon Bedrock AgentCore"
requires-python = ">=3.12"
dependencies = [
    "mcp==2.0.0",
    "boto3"
]
pyproject.toml is required for the AgentCore CodeZip deployment.Step 4: Verify AWS Credentials
Export the AWS Region,Profile and Verify that AWS credentials are configured locally.A successful response should return your AWS Account ID and ARN.

The local MCP Server will use these credentials when testing AWS API calls.
Step 5: Start the MCP Server Locally
Start the MCP Server. The MCP endpoint will be available at:
localhost:8000/mcp
Keep this terminal running and open another terminal for testing.
Step 6: Start MCP Inspector
Start MCP Inspector. MCP Inspector will display a local URL similar to:
127.0.0.1:6274
It will automatically open your browser. Enter the server ID, select Streamable HTTP as the transport, and provide the MCP server URL:
http://localhost:8000/mcp
Once the MCP server is added, you can view it in the MCP Inspector

Enable the MCP server and its status will change to Connected

Step 7: Verify the MCP Tools Locally
Open the Tools section in MCP Inspector and you can view the following tools

Run get_aws_identity first.The tool should return the AWS identity currently being used by the local MCP Server

Local testing confirms that the MCP Server is working before deploying it to AgentCore.
Step 8: Create an Amazon Cognito User Pool
Create an Amazon Cognito User Pool for the MCP Server authentication using this command
1
2
3
aws cognito-idp create-user-pool \
  --pool-name aws-resource-mcp-pool \
  --region "$AWS_REGION"
The command returns the User Pool details.Instead of copying the User Pool ID manually, store it in an environment variable
1
2
3
4
5
6
7
export USER_POOL_ID=$(
  aws cognito-idp create-user-pool \
    --pool-name aws-resource-mcp-pool \
    --region "$AWS_REGION" \
    --query 'UserPool.Id' \
    --output text
)
Verify the User Pool ID using this command
echo "$USER_POOL_ID"
Step 9: Create the Cognito App Client
Next, create an App Client inside the User Pool.
For this demo, we will create the App Client without a client secret because the MCP testing flow will use the Cognito username and password to obtain an access token.
1
2
3
4
5
6
7
8
9
10
11
12
13
14
15
16
17
export CLIENT_ID=$(
  aws cognito-idp create-user-pool-client \
    --user-pool-id "$USER_POOL_ID" \
    --client-name aws-resource-mcp-client \
    --no-generate-secret \
    --explicit-auth-flows \
      ALLOW_USER_PASSWORD_AUTH \
      ALLOW_REFRESH_TOKEN_AUTH \
    --access-token-validity 2 \
    --id-token-validity 2 \
    --refresh-token-validity 30 \
    --token-validity-units \
      AccessToken=hours,IdToken=hours,RefreshToken=days \
    --region "$AWS_REGION" \
    --query 'UserPoolClient.ClientId' \
    --output text
)
This App Client enables:
- ALLOW_USER_PASSWORD_AUTH
- ALLOW_REFRESH_TOKEN_AUTH
ALLOW_USER_PASSWORD_AUTH allows Cognito to authenticate the user directly with a username and password, while ALLOW_REFRESH_TOKEN_AUTH allows us to obtain a new access token when the current token expires.
Verify the Client ID using echo "$CLIENT_ID"

Step 10: Verify the Cognito App Client
Verify that the App Client was created with the expected authentication flows.
1
2
3
4
5
6
7
8
9
10
11
12
13
aws cognito-idp describe-user-pool-client \
  --user-pool-id "$USER_POOL_ID" \
  --client-id "$CLIENT_ID" \
  --region "$AWS_REGION" \
  --query 'UserPoolClient.{
    ClientName:ClientName,
    ClientId:ClientId,
    ClientSecret:ClientSecret,
    AccessTokenValidity:AccessTokenValidity,
    TokenValidityUnits:TokenValidityUnits,
    ExplicitAuthFlows:ExplicitAuthFlows
  }' \
  --output json
ClientSecret should be null because we used --no-generate-secret
The AWS CLI supports configuring the access-token, ID-token, and refresh-token validity independently along with their units.
Step 11: Create a Cognito User
Now create a user inside the Cognito User Pool.Set the username
export COGNITO_USERNAME="mahendranselvakumar"Create the Cognito user using below command
1
2
3
4
5
aws cognito-idp admin-create-user \
  --user-pool-id "$USER_POOL_ID" \
  --username "$COGNITO_USERNAME" \
  --message-action SUPPRESS \
  --region "$AWS_REGION"
--message-action SUPPRESS prevents Cognito from sending the default invitation message because we are going to set the user's password manually
Step 12: Set a Permanent Password for the Cognito User
Instead of adding the password directly to the command, enter it securely.
1
2
read -s "COGNITO_PASSWORD?Enter Cognito password: "
echo
The password will not be displayed while typing.

Set the password as permanent using this command
1
2
3
4
5
6
aws cognito-idp admin-set-user-password \
  --user-pool-id "$USER_POOL_ID" \
  --username "$COGNITO_USERNAME" \
  --password "$COGNITO_PASSWORD" \
  --permanent \
  --region "$AWS_REGION"
Using --permanent means the user can authenticate directly without receiving a NEW_PASSWORD_REQUIRED challenge

Step 13: Verify the Cognito User
Verify that the user is enabled and confirmed.
1
2
3
4
5
6
7
8
9
10
aws cognito-idp admin-get-user \
  --user-pool-id "$USER_POOL_ID" \
  --username "$COGNITO_USERNAME" \
  --region "$AWS_REGION" \
  --query '{
    Username:Username,
    Status:UserStatus,
    Enabled:Enabled
  }' \
  --output json
The Cognito user is now ready to authenticate
Step 14: Create the Cognito OIDC Discovery URL
Amazon Bedrock AgentCore needs the Cognito OIDC Discovery URL to validate the incoming access token.
Create the Discovery URL using the User Pool ID
1
export DISCOVERY_URL="https://cognito-idp.${AWS_REGION}.amazonaws.com/${USER_POOL_ID}/.well-known/openid-configuration"
Verify the URL using echo "$DISCOVERY_URL"

Validate the OIDC endpoint using
curl "$DISCOVERY_URL" | jq
We will provide this Discovery URL to the AgentCore
CUSTOM_JWT configurationStep 15: Review the Cognito Configuration
At this point, we have all the Cognito values required for AgentCore.Verify them using below
1
2
3
4
5
echo "AWS Region     : $AWS_REGION"
echo "User Pool ID   : $USER_POOL_ID"
echo "Client ID      : $CLIENT_ID"
echo "Username       : $COGNITO_USERNAME"
echo "Discovery URL  : $DISCOVERY_URL"
Do not print the Cognito password
Step 16: Test Cognito Authentication
Before configuring AgentCore, verify that Cognito can issue an access token
1
2
3
4
5
6
aws cognito-idp initiate-auth \
  --client-id "$CLIENT_ID" \
  --auth-flow USER_PASSWORD_AUTH \
  --auth-parameters \
    "USERNAME=$COGNITO_USERNAME,PASSWORD=$COGNITO_PASSWORD" \
  --region "$AWS_REGION"
Step 17: Store the Access Token
Store only the Cognito Access Token in an environment variable
1
2
3
4
5
6
7
8
9
10
export BEARER_TOKEN=$(
  aws cognito-idp initiate-auth \
    --client-id "$CLIENT_ID" \
    --auth-flow USER_PASSWORD_AUTH \
    --auth-parameters \
      "USERNAME=$COGNITO_USERNAME,PASSWORD=$COGNITO_PASSWORD" \
    --region "$AWS_REGION" \
    --query 'AuthenticationResult.AccessToken' \
    --output text
)
Verify that the variable is populated using
echo ${#BEARER_TOKEN} The value should be much greater than 0
You can also display only the beginning of the token using echo "$BEARER_TOKEN" | cut -c1-30

Do not publish the full token
Step 18: Store the Refresh Token
It is also useful to store the Refresh Token so that we do not need to enter the password again when the Access Token expires.
Generate both tokens using below
1
2
3
4
5
6
7
8
AUTH_RESPONSE=$(
  aws cognito-idp initiate-auth \
    --client-id "$CLIENT_ID" \
    --auth-flow USER_PASSWORD_AUTH \
    --auth-parameters \
      "USERNAME=$COGNITO_USERNAME,PASSWORD=$COGNITO_PASSWORD" \
    --region "$AWS_REGION"
)
Store the Access Token using this command below
1
2
3
4
export BEARER_TOKEN=$(
  echo "$AUTH_RESPONSE" |
  jq -r '.AuthenticationResult.AccessToken'
)
Store the Refresh Token using this command below
1
2
3
4
export REFRESH_TOKEN=$(
  echo "$AUTH_RESPONSE" |
  jq -r '.AuthenticationResult.RefreshToken'
)
Verify that both variables are populated without printing the actual tokens.
1
2
echo "Access Token Length : ${#BEARER_TOKEN}"
echo "Refresh Token Length: ${#REFRESH_TOKEN}"
Step 19: Refresh the Access Token When It Expires
When the two-hour Access Token expires, use the Refresh Token to obtain a new one and Verify the new token using echo "$BEARER_TOKEN" | cut -c1-30
1
2
3
4
5
6
7
8
9
10
export BEARER_TOKEN=$(
  aws cognito-idp initiate-auth \
    --client-id "$CLIENT_ID" \
    --auth-flow REFRESH_TOKEN_AUTH \
    --auth-parameters \
      "REFRESH_TOKEN=$REFRESH_TOKEN" \
    --region "$AWS_REGION" \
    --query 'AuthenticationResult.AccessToken' \
    --output text
)
Step 20: Install AgentCore CLI
Install the AgentCore CLI globally using npm install -g @aws/agentcore

Once the deployment is completed, we can also verify the resources created by AgentCore from the AWS CloudFormation console.

Step 21: Create a Separate AgentCore Project
Now that the MCP Server is working locally and the Cognito configuration is ready, the next step is to prepare the deployment configuration for Amazon Bedrock AgentCore.
We already have the MCP Server source code inside aws-resource-mcp-server/
I do not want AgentCore to create another sample MCP Server or mix the deployment configuration with the MCP application code. To keep the project clean, I am creating a separate AgentCore project that will only contain the AgentCore deployment configuration.
Now create a new AgentCore project using below command
1
2
3
4
agentcore create \
  --name awsresourcemcp \
  --no-agent \
  --output-dir ./awsresourcemcp-oauth
--name awsresourcemcp: define the AgentCore project name
--no-agent: This tells the AgentCore CLI not to generate a new sample agent or MCP Server.
We already created our own MCP Server, so we only need the AgentCore project structure and deployment configuration.
We can also verify the deployed Runtime from the Amazon Bedrock AgentCore console. The Runtime should show the status as Ready, with the
DEFAULT endpoint associated with the deployed version
You should see the AgentCore project configuration, including the
agentcore directory
Keeping the application code and AgentCore deployment configuration separate also makes it easier to update the MCP Server later without accidentally modifying the AgentCore project structure.
Step 22: Add the Existing MCP Server to AgentCore as BYO Code
In the next step, we will connect these two projects by configuring AgentCore to use the existing
aws-resource-mcp-server directory as Bring Your Own Code (BYO).Now add the existing MCP Server to the AgentCore project
1
2
3
4
5
6
7
8
9
10
11
12
agentcore add agent \
  --name awsresourcemcp \
  --type byo \
  --code-location /Users/mahendranselvakumar/Documents/ai-projects/aws-resource-mcp-server \
  --entrypoint mcp_server.py \
  --language Python \
  --protocol MCP \
  --build CodeZip \
  --network-mode PUBLIC \
  --authorizer-type CUSTOM_JWT \
  --discovery-url "$DISCOVERY_URL" \
  --allowed-clients "$CLIENT_ID"
Here, we are providing AgentCore with all the information required to deploy our existing MCP Server.
--type byo: This option tells AgentCore that we already have our application code
--entrypoint mcp_server.py: The application entrypoint is mcp_server.py
--code-location /Users/mahendranselvakumar/Documents/ai-projects/aws-resource-mcp-server: This points AgentCore to the directory containing our MCP Server
--network-mode PUBLIC: This allows the AgentCore Runtime to expose the MCP endpoint through the AgentCore Runtime invocation URL
--allowed-clients "$CLIENT_ID": This allows AgentCore to validate the Cognito JWT before allowing a request to reach the MCP Server.
Step 23: Review the AgentCore Configuration
After adding the MCP Server, AgentCore updates the project configuration.Review the generated configuration before deploying
1
cat agentcore/agentcore.json
The configuration should reference the MCP Server source directory that we provided earlier.
The JWT configuration should also contain the Cognito Discovery URL and App Client ID.
This step is important because it confirms that AgentCore is pointing to our actual MCP Server and not a generated sample application.
Step 24: Validate the AgentCore Project
Before deploying the MCP Server, validate the AgentCore project using agentcore validate command

The validation checks the AgentCore configuration and verifies that the source project contains the files required for deployment.
If the validation succeeds, we can proceed with the deployment.
Step 25: Deploy the MCP Server to Amazon Bedrock AgentCore
Once the validation is successful, deploy the MCP Server using agentcore deploy command
AgentCore will now package the MCP Server source and deploy the required AWS resources.
The deployment process creates the AgentCore Runtime and prepares the MCP Server to run remotely.

Step 26: Verify the AgentCore Runtime
After the deployment is completed, verify that the AgentCore Runtime has been created.
1
2
3
4
aws bedrock-agentcore-control list-agent-runtimes \
  --region "$AWS_REGION" \
  --query 'agentRuntimes[].{Name:agentRuntimeName,ID:agentRuntimeId,ARN:agentRuntimeArn,Status:status}' \
  --output table
Check the Runtime status and It should eventually show READY.The output will also contain Agent Runtime ID and Agent Runtime ARN.
We will need both values in the next steps so export the values.
Store the Runtime ID: export RUNTIME_ID="<RUNTIME_ID>"
Store the Runtime ARN: export AGENT_ARN="<RUNTIME_ARN>"
To verify both variables using echo "$RUNTIME_ID" and echo "$AGENT_ARN"

Always retrieve the latest Runtime ARN after recreating a Runtime.If an older Runtime ARN is used, requests may fail even if the newly created Runtime is working correctly.
Step 27: Verify the DEFAULT Runtime Endpoint
AgentCore exposes the deployed MCP Server using a Runtime endpoint.Verify that the
DEFAULT endpoint has been created.1
2
3
4
5
aws bedrock-agentcore-control \
list-agent-runtime-endpoints \
--agent-runtime-id "$RUNTIME_ID" \
--region "$AWS_REGION" \
--output tableThe endpoint should show DEFAULT and the status should be READY.The
DEFAULT qualifier will later be included in the remote AgentCore MCP URLStep 28: Verify the Cognito Access Token and Check Its Expiration
We already generated the Cognito Access Token and Refresh Token during the Cognito configuration.
Before accessing the AgentCore Runtime, first verify that the tokens are still available in the current terminal session.
We can also validate the Access Token directly against Amazon Cognito.
1
2
3
aws cognito-idp get-user \
  --access-token "$BEARER_TOKEN" \
  --region "$AWS_REGION"
If the token is valid, Cognito returns the user details.
If the Access Token has expired, Cognito will return an authentication error indicating that the token is no longer valid.
If the Access Token Has Expired
If the Access Token has expired, we do not need to authenticate again using the Cognito username and password.
We already stored the Refresh Token, so use it to request a new Access Token.
1
2
3
4
5
6
7
8
9
10
export BEARER_TOKEN=$(
  aws cognito-idp initiate-auth \
    --client-id "$CLIENT_ID" \
    --auth-flow REFRESH_TOKEN_AUTH \
    --auth-parameters \
      "REFRESH_TOKEN=$REFRESH_TOKEN" \
    --region "$AWS_REGION" \
    --query 'AuthenticationResult.AccessToken' \
    --output text
)
Verify that the new Access Token was generated using echo ${#BEARER_TOKEN} and echo "$BEARER_TOKEN" | cut -c1-30
Step 29: URL-Encode the AgentCore Runtime ARN
Before creating the remote MCP endpoint, verify that the AgentCore Runtime ARN is available in the current terminal session.

The Runtime ARN contains characters such as
: and /, which cannot be used directly inside the AgentCore Runtime invocation URL.URL-encode the Runtime ARN:
1
2
3
4
export ENCODED_ARN=$(
  echo -n "$AGENT_ARN" |
  jq -sRr '@uri'
)
Verify the encoded ARN using**** echo "$ENCODED_ARN"

Step 30: Create the AgentCore MCP Runtime URL
Now create the remote MCP Runtime invocation URL.Verify the generated URL using echo "$MCP_URL"
1
export MCP_URL="https://bedrock-agentcore.${AWS_REGION}.amazonaws.com/runtimes/${ENCODED_ARN}/invocations?qualifier=DEFAULT"
This is the public AgentCore Runtime endpoint that MCP clients will use to communicate with our deployed MCP Server.
The
/mcp path is used by the MCP Server inside the AgentCore Runtime. External clients invoke the MCP Server through the AgentCore Runtime /invocations endpoint.Step 31: Test the Remote MCP Server Using curl
Before connecting MCP Inspector, test the remote MCP endpoint using
curl.This helps us verify that the following components are already working before introducing MCP Inspector:
- AgentCore Runtime
- CUSTOM_JWT
- Cognito Access Token
- Remote MCP Endpoint
- MCP tools/list
Now send an MCP
tools/list request.1
2
3
4
5
6
7
8
9
10
11
12
curl -i \
-X POST \
"$MCP_URL" \
-H "Authorization: Bearer $BEARER_TOKEN" \
-H "Content-Type: application/json" \
-H "Accept: application/json, text/event-stream" \
-d '{
"jsonrpc": "2.0",
"id": 1,
"method": "tools/list",
"params": {}
}'
The
Authorization header sends the Cognito Access Token to AgentCore.A successful response should return HTTP/2 200.Step 32: Check the MCP Session Information
The successful response may also contain headers
mcp-session-id: ceda09e9-627d-4d2c-a326-c7db8286d9a7
These headers identify the MCP and AgentCore Runtime session associated with the request.
The exact value will be different for every session.
We do not need to manually configure these values in MCP Inspector. Inspector handles the MCP connection and session flow for us.
Step 33: Start MCP Inspector
Now that the remote MCP endpoint is working with
curl, start MCP Inspector.Open another terminal and run1
npx @modelcontextprotocol/inspector
MCP Inspector will start a local web interface.MCP Inspector allows us to connect to the deployed MCP Server, discover the available tools, and invoke them directly from the browser
Step 34: Configure Streamable HTTP in MCP Inspector
In MCP Inspector, select the transport type Streamable HTTP.For the Server URL, use the AgentCore Runtime URL that we generated earlier.
Display it from the terminal

Copy the complete URL and paste it into the MCP Inspector Server URL field

Step 35: Add the Cognito Access Token to MCP Inspector
The AgentCore Runtime is protected using
CUSTOM_JWT, so MCP Inspector must send the Cognito Access Token with every request.
Open the settings in MCP Server and Add Custom Headers
Add Header name as Authorization and value is Bearer <ACCESS_TOKEN>
Use the token stored in
1
echo "$BEARER_TOKEN"
For this setup, we are not using MCP Inspector's Dynamic Client Registration.The Cognito App Client has already been created, and we generated the Access Token separately.
Step 36: Connect MCP Inspector to AgentCore
After configuring the Server URL and Authorization header, click Connect
MCP Inspector will send the initial MCP request to the AgentCore Runtime.
If the connection is successful, Inspector will display the MCP Server information.

Step 37: Verify the MCP Tools
Open the Tools section in MCP Inspector.You should see the three tools created earlier

If all three tools are displayed, it confirms that AgentCore deployed the correct MCP Server source code.
Test get_aws_identity
Start with the get_aws_identity tool.This tool does not require any input parameters.
The
arn returned by this tool shows the IAM role being used by the AgentCore Runtime.This is important because the MCP Server no longer uses the AWS credentials configured on our local machine.
After deployment, AWS API calls are made using the AgentCore Runtime IAM execution role.
Step 38: Add S3 and EC2 Permissions to the AgentCore Runtime IAM Role
The AgentCore Runtime IAM role needs permission to list S3 buckets and describe EC2 instances.
Create a single IAM policy with both permissions.
1
2
3
4
5
6
7
8
9
10
11
12
13
14
{
  "Version": "2012-10-17",
  "Statement": [
    {
      "Sid": "AllowMCPAWSResourceReadAccess",
      "Effect": "Allow",
      "Action": [
        "s3:ListAllMyBuckets",
        "ec2:DescribeInstances"
      ],
      "Resource": "*"
    }
  ]
}
Locate the IAM role used by the AgentCore Runtime.You can identify the Runtime role from the ARN returned by get_aws_identity
Select the Runtime role and add the policy as an inline policy

After adding the policy, the Runtime IAM role will have the permissions required by both MCP tools
Step 39: Validate S3 and EC2 MCP Tools
Now that the AgentCore Runtime IAM role has the required S3 and EC2 permissions, validate both MCP tools from MCP Inspector.
Open the Tools section in MCP Inspector.
select list_s3_buckets and Click Execute Tool

A successful response should return the S3 buckets available in the AWS account.
select**** list_ec2_instances and Click Execute Tool

A successful response should return the EC2 instance details from the selected Region.
This confirms that the MCP Server can successfully access both Amazon S3 and Amazon EC2 using the AgentCore Runtime IAM role.
Conclusion
In this walkthrough, we built an AWS Resource MCP Server, tested it locally, deployed it to Amazon Bedrock AgentCore, secured the remote Runtime using Amazon Cognito OAuth/JWT, and validated the deployment using MCP Inspector.
The MCP Server exposed three tools:
get_aws_identity
list_s3_buckets
list_ec2_instances
list_s3_buckets
list_ec2_instances
Amazon Cognito handled authentication and provided the Access Token used to invoke the remote MCP Runtime. AgentCore validated the token using
CUSTOM_JWT before allowing the request to reach the MCP Server.The AgentCore Runtime IAM role handled the AWS authorization layer and provided the permissions required to access AWS STS, Amazon S3, and Amazon EC2.
One of the key things I learned from this implementation is that authentication and AWS authorization should be treated as two separate layers. Cognito controls who can access the MCP Runtime, while the AgentCore Runtime IAM role controls what the MCP Server can do inside AWS.
Using BYO code with CodeZip also made it possible to deploy the existing MCP Server without maintaining a separate Dockerfile, ECR image, or manual container build process.
Finally, MCP Inspector helped validate the complete remote flow, from Cognito authentication to MCP tool discovery and AWS API execution.
This setup provides a good foundation for building more secure and production-ready remote MCP Servers on Amazon Bedrock AgentCore.
Series: MCP Server on AWS (1 article)
- 1Build and Deploy MCP Server with Amazon Cognito OAuth on Amazon Bedrock AgentCore This article
Enjoyed reading this content? Let the author know!
Your likes, comments, shares, and saves help creators reach more builders.

Loading recommendations
Loading article