
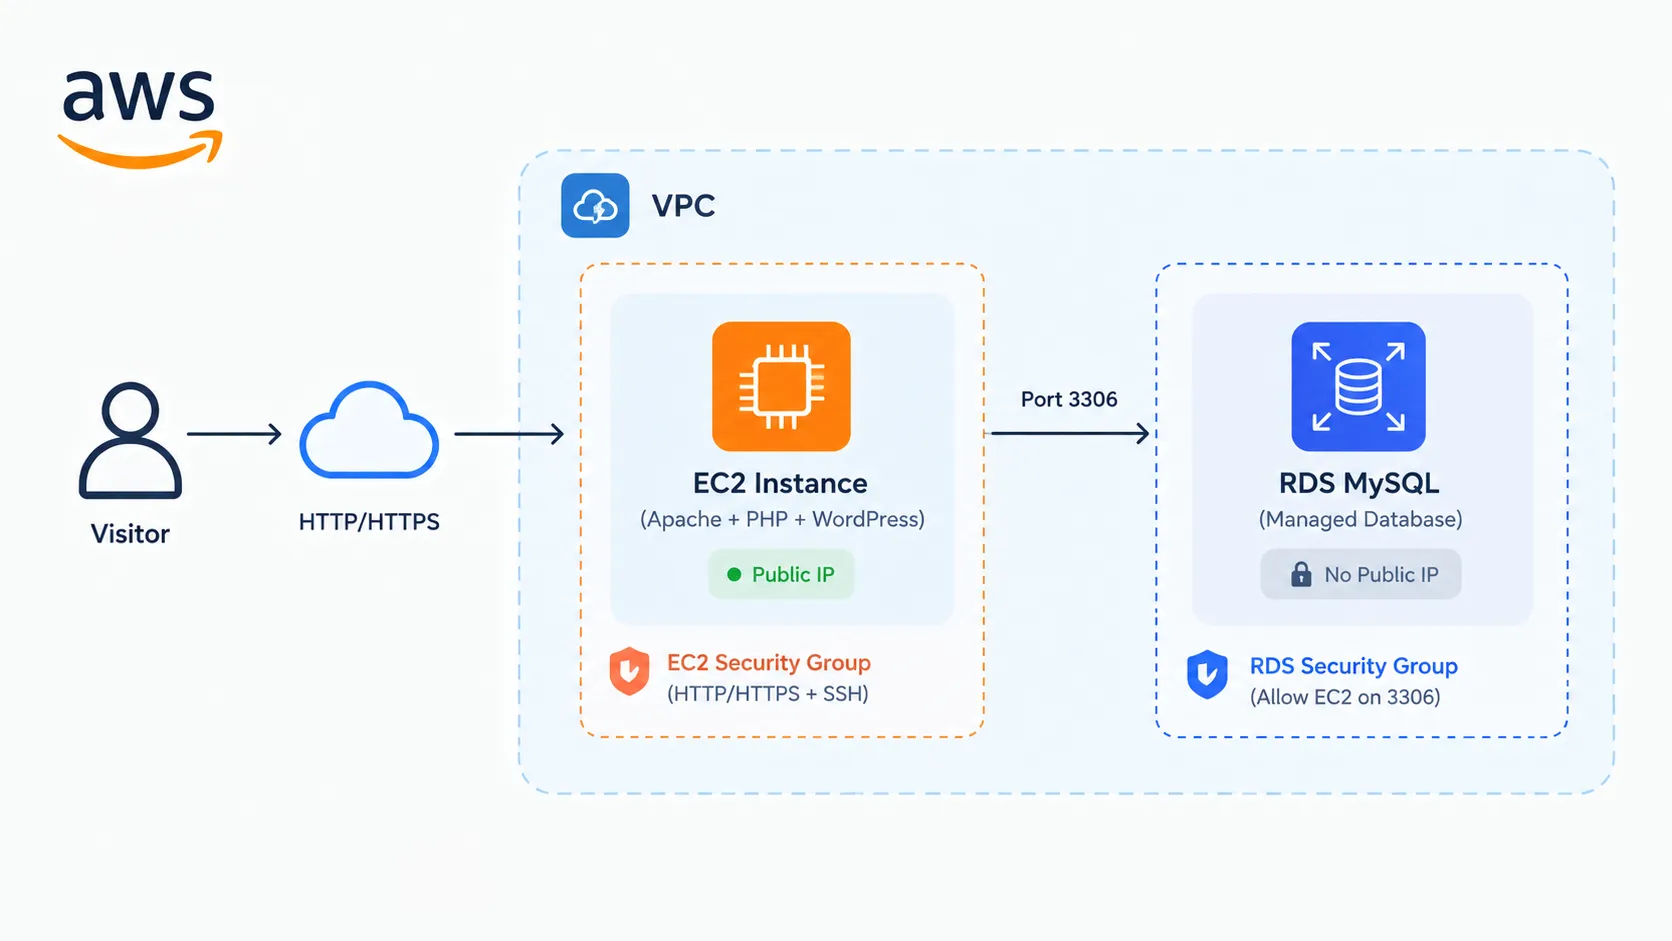
Deploying WordPress on AWS: Part 2 – Connect EC2 to RDS
Launch an EC2 instance, configure security groups, and connect it to RDS — plus the region mismatch mistake that breaks the connection.
Series: Deploying WordPress on AWS: A Beginner's Journey (2 articles)
- 2Deploying WordPress on AWS: Part 2 – Connect EC2 to RDS This article

Why This Guide Exists
This is Part 2 of the "Deploying WordPress on AWS: A Beginner's Journey" series. In Part 1 , we launched a free-tier MySQL database on Amazon RDS. Now we'll launch the EC2 instance that will run our web server, and connect it securely to that database.
This step trips up almost every beginner at least once not because any single step is hard, but because two silent mismatches (region and firewall rules) can each block the connection without giving you an obvious error message.

EC2 vs. RDS: What's Actually Talking to What
Before diving into setup, it helps to see how these two pieces fit together.

EC2 is a general-purpose server you manage yourself — it runs Apache, PHP, and WordPress, and you're responsible for its OS updates, storage, and software. RDS is a managed database service — AWS runs and maintains the actual MySQL engine for you (patching, backups, failover), and you only ever talk to it through the database protocol, never SSH into it directly.
That's also why RDS has no public IP by default in this setup — it's designed to be reached only from inside the same network (VPC), specifically from resources your security group explicitly allows, like your EC2 instance on port 3306. EC2 is the thing serving your website to the internet; RDS is the thing quietly holding your data behind it.
Step 1: Launch Your EC2 Instance
- Open the EC2 Dashboard and click Launch instance (orange). Name it eg: wordpress-webserver.
- Choose an Ubuntu AMI. Ensure it is set to Ubuntu Server 24.04 LTS (or the latest LTS version). Look closely for the text "Free tier eligible" right beneath the name. If it doesn't say that, do not select it.
- Under Instance type, select t2.micro or t3.micro — these are covered under the EC2 free tier (750 hours/month). Verification: Ensure the green "Free tier eligible" label is visible next to the instance type.
- Key Pair (Login)
- You cannot log into your server with a traditional password; AWS requires a secure cryptographic key. Click Create new key pair.
- Key pair name: Type
wordpress-key.
- Key pair type: RSA.
- Private key file format: Select .pem (works for OpenSSH, Mac/Linux terminals, and modern Windows PowerShell).
- Click Create key pair. Crucial: This will instantly download a file named
wordpress-key.pemto your local machine — this is what lets you SSH into the instance later. . Save it carefully; AWS will never let you download it again.
- Under Network settings, allow SSH traffic from your IP, and check Allow HTTP & HTTPS traffic from the internet so your website will be reachable once WordPress is live.
- Click Launch instance.

⚠️ Beginner Mistake #1: Losing the .pem Key File There's no way to re-download your private key after this step. If you lose it, you lose SSH access to the instance entirely, and the only fix is launching a new instance. Save it somewhere you won't accidentally delete.
Step 2: Check Your Region Before Going Any Further
Before doing anything else, look at the Region selector in the top-right corner of your console.

⚠️ Beginner Mistake #2: Launching EC2 in a Different Region Than RDS AWS resources cannot talk to each other over the private network if they're in different regions. If your RDS database is sitting in one region and your EC2 instance launches in another, they will be completely isolated from each other, and no security group rule will fix that. There's no error message warning you about this at launch time; you'll only discover it when the connection quietly times out.
If this happens, you have two options:
- Delete and recreate the database in EC2's region — generally the cleaner fix since the database is usually still empty at this stage.
- Terminate and relaunch the EC2 instance in the database's region — an option if you'd rather keep the database where it is.
Either way, both resources need to live in the same region before moving forward.
Step 3: Find Your EC2 Security Group ID
- In the EC2 console, select your running instance.
- Open the Security tab in the details pane at the bottom.
- Copy the Security Group ID — it starts with
sg-. You'll need this in the next step. For our case:sg-0e99b301ed6ec8a05

Step 4: Open the RDS Security Group and Add an Inbound Rule
Instead of opening your database to a specific IP address, you'll configure it to accept traffic from any resource inside your EC2 instance's security group. This is a common AWS pattern called security group nesting.
- Go to the RDS Dashboard → Databases → your database (wordpress-db).
- Under Connectivity & security → Security Group Rules, click the linked VPC security group for your database, for our case,
wordpress-db-sg(the firewall we created in Part 1). This will redirect you to the main Security Groups configuration window.
- Select it, open Inbound rules, and click Edit inbound rules.
- Click Add rule and configure:
Field | Configuration to Select / Type | What it Does |
|---|---|---|
Type | Choose MYSQL/Aurora (Port 3306) | Automatically opens up the MySQL network port. |
Source | Choose Custom | Allows you to specify an explicit target network. |
Search Box | Paste the EC2 Security Group ID you copied in Step 3 (e.g., sg-0e99b301ed6ec8a05). | Restricts database access only to resources inside that group. |
Description | Type Allow traffic from WordPress EC2 webserver | Helps identify this rule later on. |
Click Save rules.

⚠️ Beginner Mistake #3: Using a Specific IP Address Instead of the Security Group Restricting access to a single IP (like your home network) works until that IP changes, or until you try connecting from EC2 instead — which uses a completely different IP. Pointing the rule at the EC2 security group itself means it keeps working no matter what IP either resource ends up with.
Step 5: Install the MySQL Client and Test the Connection
SSH into the newly created Ubuntu EC2 instance from your local machine's terminal.
5a. Lock Down Your Key Permissions
Linux requires your private key (.pem file) to be strictly private. If its permissions are too open, SSH will reject it with a glaring "UNPROTECTED PRIVATE KEY FILE!" error.
Open your terminal, navigate to wherever you saved the key (usually your Downloads folder), and run:
Plain text
cd ~/Downloadschmod 400 wordpress-key.pem
This changes the file permissions so that only you have read access, and everyone else has zero access.
5b. Get Your Server's Public IP
- Go back to your AWS Management Console.
- In the EC2 Dashboard, click Instances (running).
- Click the checkbox next to your
wordpress-webserverinstance.
- In the details tab at the bottom, look for Public IPv4 address and click the small copy icon next to it.
5c. Run the SSH Command
Back in your terminal, use the
ssh command. Since you launched an Ubuntu image, the default built-in administrative user account is always ubuntu .Plain text
ssh -i wordpress-key.pem ubuntu@your-ec2-ip
(Replace
your-ec2-ip with the IP you just copied.)The very first time you connect to this instance, your terminal will show a fingerprint warning like this:
Plain text
The authenticity of host '54.x.x.x (54.x.x.x)' can't be established.ED25519 key fingerprint is SHA256:gX...Are you sure you want to continue connecting (yes/no/[fingerprint])?
This is normal security behavior for a first connection. Type
yes and hit Enter.Success looks like your terminal prompt changing from your local machine's name to something like
ubuntu@ip-172-31-x-x:~$ . You're now in the command line of your cloud server.
5d. Install the MySQL Client and Test the Database Connection
Before installing anything or configuring Apache, our first task inside the server is to make sure all the system packages are fresh and up to date.
Run this command to pull down the latest package definitions and upgrade any aging software on the base OS:
Plain text
sudo apt update && sudo apt upgrade -y
Now install the client tools needed to test the database connection:
Plain text
sudo apt install mysql-client-core -y
⚠️ Beginner Mistake #4: Assuming the Package Name Is Always
mysql-client
On newer Ubuntu versions, the correct package is mysql-client-core , not mysql-client . If a command from an older tutorial fails with "package not found," check whether the package name has simply changed for your OS version.⚠️ Beginner Mistake #5: Regional Mirror Outage Blocking Package Installs
The problem:
When installing
mysql-client-core , the install failed repeatedly with 503 Service Unavailable errors. The cause was AWS's regional Ubuntu package mirror ( ap-southeast-1.ec2.archive.ubuntu.com ) — which Ubuntu uses by default for faster in-region downloads — being temporarily down. Two of the three packages needed ( libtcmalloc-minimal4t64 and libgoogle-perftools4t64 ) simply weren't reachable through that mirror, no matter how many times the install was retried.What didn't immediately work:
The first fix attempt — editing
/etc/apt/sources.list to point at the main Ubuntu mirror ( archive.ubuntu.com ) instead of the regional one — didn't actually change anything. That's because on newer Ubuntu releases (24.04+), package sources live in a different file: /etc/apt/sources.list.d/ubuntu.sources , using the newer "deb822" format. sources.list itself was empty or unused, so editing it had no effect.What actually fixed it:
Once the correct file was targeted, the fix worked:
Plain text
sudo sed -i 's|http://ap-southeast-1.ec2.archive.ubuntu.com/ubuntu|http://archive.ubuntu.com/ubuntu|g' /etc/apt/sources.list.d/ubuntu.sourcessudo apt update && sudo apt install mysql-client-core -y
This rewrote every reference to the regional mirror to point at the global Ubuntu archive instead, bypassing the outage entirely.
apt update then pulled fresh package lists from a working source, and the install completed successfully.Takeaway: if
sudo apt update shows only Hit: lines still referencing the broken mirror after editing sources.list , check whether your Ubuntu version actually stores sources in /etc/apt/sources.list.d/ubuntu.sources instead — this is the default on Ubuntu 24.04 and newer.Now test the connection using your RDS endpoint (found on your database's Connectivity & security tab):
Plain text
curl -o global-bundle.pem https://truststore.pki.rds.amazonaws.com/global/global-bundle.pemmysql -h <your-rds-endpoint> -P 3306 -u admin -p --ssl-mode=VERIFY_IDENTITY --ssl-ca=./global-bundle.pem
Enter your master password when prompted. If everything is configured correctly, you'll land on the
mysql> prompt. Run SHOW DATABASES; and you should see wordpress listed — confirming both the connection and the initial database name from Part 1 worked as expected.
What's Next
Your EC2 instance and RDS database can now talk to each other securely. In Part 3, we'll install Apache and PHP, download WordPress, and connect it to this database through the browser-based setup screen.
Series: Deploying WordPress on AWS: A Beginner's Journey (2 articles)
- 2Deploying WordPress on AWS: Part 2 – Connect EC2 to RDS This article
Enjoyed reading this content? Let the author know!
Your likes, comments, shares, and saves help creators reach more builders.

Loading recommendations
Loading article