
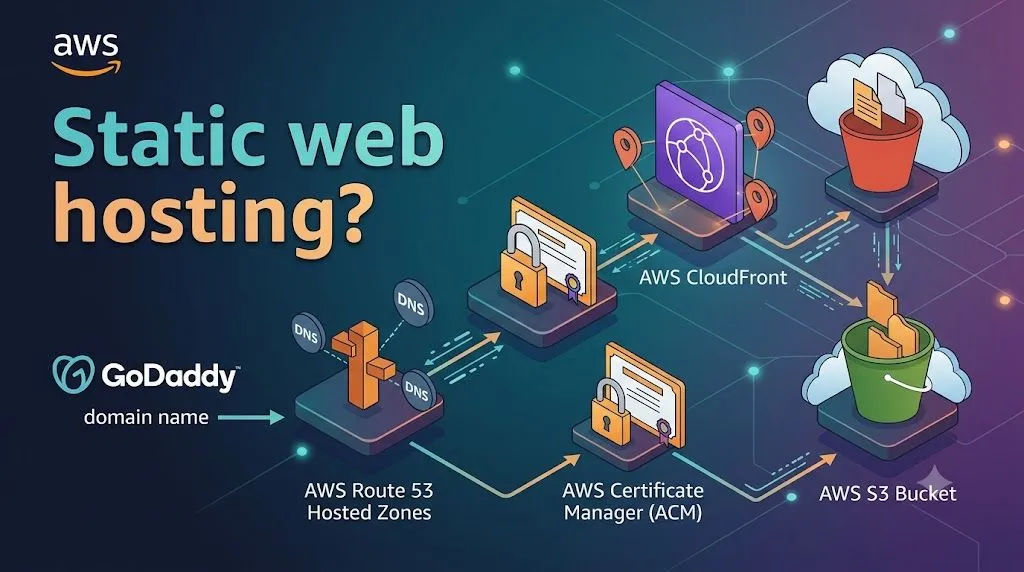
Modern Static Web Hosting in AWS: A Step by Step Guide
Learn how to host a high-performance static website on AWS. This step-by-step guide walks beginners and intermediate developers through setting up an S3 bucket, accelerating content delivery with CloudFront, and configuring custom domains via Route 53 using third-party domain provider

Many developers (corporate or freelancers) focuses on shipping products by building and testing codes leaving the underlying infrastructure unknown to them. The rapid changes in technology results a rapid changes in developers ability requirement. As one among these developers, It's hard for me to cope up and don't know the what, how and why.
In this article, we will be focusing on the infrastructure and leave the development to your chosen AI.
AWS Services
- AWS S3 Bucket
- AWS Route 53
- AWS Cloudfront
- AWS Certificate Manager
- GoDaddy - Domain Provider
Let's define the services above.
- What is AWS S3?
We will use this service to host our static web app.
- What is AWS Route 53?
We will use this service as DNS routing to make our static web hosted in S3 be accessible publicly via Domain name.
- What is AWS Cloudfront?
We will use this service for faster delivery of our static content to every user across globe.
- AWS Certificate Manager?
This service provides SSL/TLS certificate that we will be use to secure our static web.
- What is Go Daddy?
We will use the domain name provided by GoDaddy that we will be link to AWS Route 53.
Let's get started!

Before we dive on the steps, it's important to familiarize first on how the end-to-end flow from the point the user access the web.
User type the URL in the address bar and hit enter
- Route 53 resolves the domain to Cloud front.
- Browser request page via HTTPS
- Cloudfront uses ACM certificate
- Either served cache content or fetches securely to private s3 origin ensuring fast, secure global content delivery.
Here we go!

Step 1. Go Daddy
A domain name is required, If you don't have existing domain. You can procure a cheapest domain name in GoDaddy. Once you have it, you only need to remember your domain name.
Step 2. S3 Bucket
Login to your AWS Console -> Search and Go to AWS S3 -> Explore and click create bucket

Fill up the details on the form. Choose Account Regional Namespace, this will make your bucket unique in your chosen region. Choose a bucket name, you can use your domain name. (e.g., sampledomain.com).

Scroll down to Object Ownership and choose ACLs disabled (recommended). Under Block Public Access settings for this bucket, ensure Block all public access remains checked. This keeps your bucket completely secure and private from the public internet.

Click Create bucket. Once created, open the bucket, click Upload, and upload your application files (e.g.,
index.html, main.js, style.css).Navigate to**** Property Tab. Scroll down and look for Static website hosting. Click Edit and provide the details on the form. Under Static web hosting, choose Enable. Make sure the Hosting type selected is Host a static website. In the index document, input the index name of your app (e.g., index.html). Click Save.


Step 3. Route 53
Search and go to AWS Route 53 -> Navigate to Hosted Zones -> Click create hosted zones.

In Domain name, put your domain name procured from GoDaddy (e.g., sampledomain.com). Put your description for easy identification of your hosted zones. Under Type, make sure you selected Public hosted zone. Click Create.
Once created, find your Name Servers under Hosted zone details. Those name servers will be configured to your GoDaddy.

Go back to your GoDaddy Account. Click Domain -> DNS -> Nameservers -> Change Nameservers -> Choose I'll use my own nameservers. Paste all the nameservers from your Hosted Zone. Make sure the name from your hosted zones is similar to what you paste in GoDaddy. Click Save.

Step 4. AWS Certificate Manager
Search and navigate to AWS Certificate Manager -> Under region, choose us-east-1. The certificate requires to be in this region. Click Request a certificate -> Under Certificate type choose Request a public certificate -> Click Next.

In Fully qualified domain name, put your domain name(e.g., sampledomain.com). If you want to include a wild card certificate, you can add another domain and put the wildcard domain (e.g., *.sampledomain.com). Choose Disable export under Allow export. This option will remain our certificate free. Leave the rest default value. Click Request.

Still in your created certificate, click Create records in Route 53 under Domain. If no record found, this means that your Route 53 does not have the domain. Ensure that the domain name is correct. Otherwise continue to create the record. This will automatically create a CNAME in your route 53. Go back you Route 53 to verify the created record.
Step 5. AWS Cloudfront
Navigate to AWS Cloudfront -> Create distribution -> Under Choose a plan, choose Free.
Under distribution name, input your desired name (e.g., distribution-web-app). Ensure Single website or app was selected under Distribution type. Click Next.

In origin type, choose Amazon S3. In Origin, click browse and select your web s3 bucket.

Scroll to Settings, look for Cache setting and choose Customize cache settings. Make sure the cache policy selected is caching optimized. Click Next until Review and create form.

Review the details and click Create distribution.

Once created, click on your distribution name and navigate to the Origins tab. Select the origin name and click edit. Choose Origin access control settings (recommended). Under Origin access control, choose your existing control or or click Create new OAC if there is no existing control. (Note: This forces all traffic to route securely through CloudFront rather than bypassing the CDN and accessing the bucket directly). Click Save changes.
Still in your distribution, navigate to General -> Click Edit

Under Customer SSL certificate, choose the certificate you made in AWS certificate manager. Under Security Policy, choose TLSv1.2_2021. Look for the Default root object field and type
index.html.Click Save changes.
Still in General Tab, click Add domain. Input your domain names. (e.g., sampledomain.com or *.sampledomain.com). Click Next.

Your TLS version will auto populated based on the certificate added in the earlier step. Click Next, review the changes and click Add Domains.

Step 6. AWS S3 Bucket Policy
Go back to your CloudFront distribution dashboard. You will see a banner at the top saying "The S3 bucket policy needs to be updated". Click Copy policy. Next, open your S3 bucket in a new tab, navigate to the Permissions tab, scroll down to Bucket policy, click Edit, and paste the copied JSON snippet. This policy explicitly allows your specific CloudFront distribution to securely fetch objects from your private bucket. The policy looks like the below snippet.

If you happen to not able to see the policy mentioned above, you may use this snippet to manually input to the bucket policy.
1
2
3
4
5
6
7
8
9
10
11
12
13
14
15
16
17
18
19
20
{
	"Version": "2008-10-17",
	"Id": "PolicyForCloudFrontPrivateContent",
	"Statement": [
		{
			"Sid": "AllowCloudFrontServicePrincipal",
			"Effect": "Allow",
			"Principal": {
				"Service": "cloudfront.amazonaws.com"
			},
			"Action": "s3:GetObject",
			"Resource": "<YOUR BUCKET ARN>/*",
			"Condition": {
				"StringEquals": {
					"AWS:SourceArn": "<YOUR AWS CLOUDFRONT ARN>"
				}
			}
		}
	]
}
To get your <YOUR BUCKET ARN>, Navigate to your Bucket -> Properties and look for Amazon Resource Name (ARN) under Bucker overview.
To get your <YOUR AWS CLOUDFRONT ARN>, Navigate to your Cloudfront -> Open your distribution -> look for ARN under Details.
Step 7. AWS Route 53 Host zones record creation
Navigate to your host zones and click create record. Leave the record name for the root domain. Choose A under record type. Toggle on the Alias - > On your Route traffic to, select Alias to Cloudfront distribution -> Choose your created distribution under choose distribution dropdown. Click create record.

If you have subdomain, just click Add another record.
Step 8. Testing of your static web app.
Go to Cloudfront -> open your distribution -> click your domain under Alternate domain names
or
Open a web browser -> Enter your static web domain name.
Cost Consideration
| AWS Service | Cost |
|---|---|
| AWS S3 bucket | pay-as-you-go based on your storage usage |
| AWS Route 53 (Host Zone) | 0.50 USD/month per first 25 hosted zones. 0.10 USD beyond 25 hosted zones |
| AWS Certificate Manager | free (standard public) |
| AWS Cloud Front | pay-as-you-go based on your traffic |
| Go Daddy Domain | as low as 0.016 USD depends on the promotion. |
Congratulation! You're able to deploy a static web using AWS services implementing security and integrating CDN.
When running this architecture, your foundational storage costs (S3) and distribution costs (CloudFront) fall comfortably within the standard AWS Free Tier allocations for typical developer demonstration traffic. By managing your infrastructure directly via CloudFront OAC, your source files remain safe, secure, and private from public traversal.
Enjoyed reading this content? Let the author know!
Your likes, comments, shares, and saves help creators reach more builders.

Loading recommendations
Loading article