
How I Took a Next.js App to Production Level on AWS
How a Simple Next.js practice project evolved into a production ready website!

Hi there!
Today Marks the 7th Day of My AWS Journey, it feel like it was just yesterday that i found this event and was up and ready to learn.
If you haven't already, check out my my blog at praneel.tech/blog , where i documented my entire journey on the Day of!
But For anyone else new here, this is my story of How a simple Next.js Practice Project changed into a globally hosted, production-ready personal website powered by all things AWS.
THE WHOLE JOURNEY
Day 0 - The Vercel Days(Before i knew what i was getting into)
Before this challenge even started, this project was a learning project that was a Next.js site Waiting to Be Hosted Online, Just as i had finished my Next.js Page Routing tutorial, i thought to myself "I should definitely host this".
The original plan was pretty Straight-Forward : Polish the project, add a dark mode toggle, put it up on GitHub and maybe host it somewhere,this stayed as is on the Back-Burner while i worked on other projects, weeks had past by but no progress, just stagnant.
Enter AWS Builder Challenge #2: Build a Website on the Cloud.
Seeing those words, it felt like the perfect opportunity to what i had set out for and more.
Day 1: Secure Foundations, IAM Users
The Challenge Had Started and i began with setting up my AWS Free Account,It showed me Why Security Shouldn't be rushed,mistakes can be easily made.
What i accomplished on Day 1:
What i accomplished on Day 1:
- Enabled MFA(Multi Factor Auth) on the root account
- Created a Dedicated IAM admin User(don't use root account, heard many nightmares)
- Set a Budget cap of $5 per month and alerts to prevent overspending
The verification felt tedious at first but it was very thorough. Went through Payment Verification,ID checks, etc. The emphasis on security-first thinking set the tone for everything that followed. Ana's guides were incredibly detailed, every click was explained, which I appreciated as someone new to AWS.
My Aha! Moment of today: Security and cost controls come first.

My IAM admin user configuration

The $5 budget alert that kept me from accidentally spending my college fund on AWS services.
Day 2: Private Cloud Storage, S3
The next step was to create a private S3 bucket, The Bucket will store the Websites files.The steps really hit home in a Cyber Security Perspective, The "Tea App" incident came to mind, where a misconfigured bucket was set to public and leaked sensitive data of its users.
What i accomplished on Day 2:
- Created a Private Bucket with
Block Public Accessenabled - Uploaded a sample image into an
/imagesfolder - Tested the "Object URL" and got an
"Access Denied"Page - Sent the Object URL to friends to try it out!
The "Access Denied" Message meant my Private Bucket was properly Secured, This Truly was my first step towards hosting a secure website, and it felt great that i was on the right track!
My Aha! Moment of today: Misconfigured buckets can leak sensitive data.
Day 3: Building the Website Files
With My Private Bucket ready, it was time to build the project!, The Challenge provided a Simple template to follow, so i made changes, i also started working again on my Next.js Website with the hopes of using that for real life use
What i accomplished on Day 3:
- Replaced the placeholder text with my own info
- Added my Profile Photo
- Previewed It Locally on My System
- Went on to also add a dark mode toggle (which i then also added to the next.js project)
Once I Uploaded the files to my S3 Bucket, I tested the "Object URLs" and as expected, i saw the
"Access Denied" Which confirmed that everything is secure. I then Proceeded to Work on the Next.js Project which fired me up even more! The more i developed it the more it felt it was coming alive!My Aha! Moment of today: Personalization can make anything feel truly yours

My private S3 bucket with Block Public Access enabled, notice how security was the priority from day one.
Day 4 : Global Distribution with CloudFront
Who would want to use a website that loads slowly around the world? CloudFront Solves just that!
What i accomplished on Day 4:
- Created a CloudFront distribution
- Connected it to my Private S3 bucket
- Set the root objects to
/index.html - Tested the global URL and my site loaded!
While the Private Bucket was still returning
"Access Denied", the website was up and functionalMy Aha! Moment of today: A CDN is what makes a website truly global

The CloudFront distribution that made my site globally available.
AND WE'RE LIVE!!!
I Had just finished all the changes i wanted to add to my Next.js Project (for now):
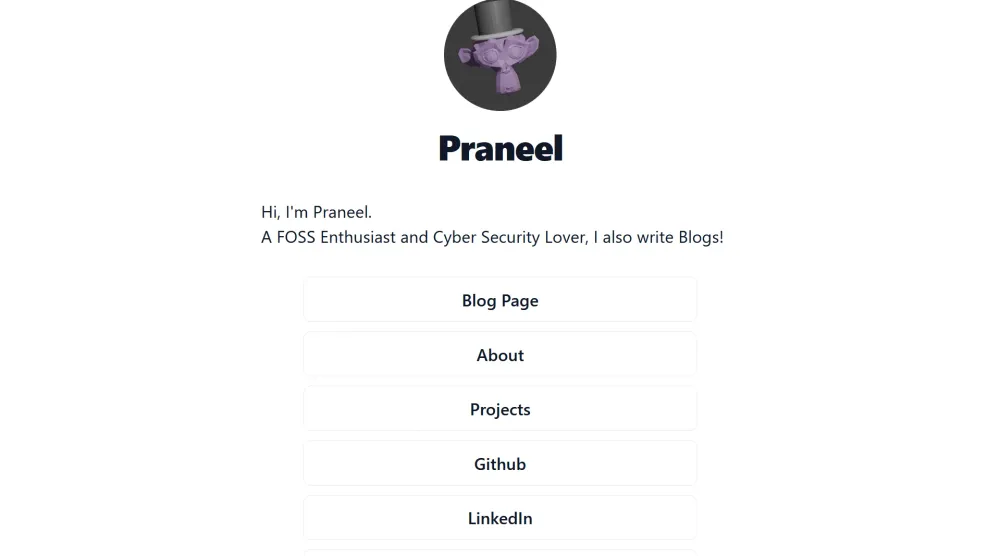
- Landing Page with a link-tree style links,
- A blog page where i can write blogs in markdown and post them
- An About Page where I Can Write about myself
- A Project Page where i can showcase my projects
- And Links to my GitHub and Other Socials
- A Functional 404 page
- A Secret Countdown(Try to find out what its for ;) )
I then finally manage to deploy my Next.js site fully on S3 + CloudFront! To do this I had to :
- Export my Next.js site into static files using
output: "export"which then created the files in the/outdirectory - Upload the files manually to my S3 Bucket
- Set the root object to
/index.html - Set my Error Page to
/404.html

light mode

Aaaaand we are live! (dark mode ;) )
Of course there were definitely hiccups along the way, nothing truly can be perfect. I had to fix the cache invalidation error and URL mismatching (the
/countdown vs /countdown.html). I then wrote a CloudFront function that rewrites the URLs properly (serverless computing!).This was truly the first time i could say "My site is live!", it felt great really, even though it was not dynamic as it was before, uploading changes was a hassle and resetting the cache was troublesome, it was live
Here's the static Website that's hosted on S3 + CloudFront .
Day 5: Amplify + GitHub = Professional Deployment
if i were to mention the Aha! moment of the entire challenge period, it definitely has got to be AWS Amplify!
Remember how i had to keep manually convert my Next.js files into static ones? Yeah, Amplify Does Dynamic Sites, and Guess what? It supports Next.js Out of the Box! I can continue writing blogs in markdown!
What i accomplished on Day 4:
- Connected Amplify to my GitHub
- Automated building & deploying on every
git push - Not Having to worry about cache invalidation and URL mismatches because it does it all for me!
- Not Having to Build
/outfiles no more! - Unlocked Automation Time!
This truly was a HUGE Quality-Of-Life Upgrade. I went from having to spend 10 minutes building files, uploading to S3 Bucket and then trigger cache invalidation and etc, to
git push and its updated in 2 minutes!I decided not to delete my old S3+CloudFront Site , it was part of the journey- i cant just delete it like that! It taught me so much about how things work under the hood and if i had gone straight to Amplify, i wouldn't have learned so much about .sh scripts, AWS CLI and S3 Buckets and its limitations. That context made me appreciate Amplify even more!
My Aha! Moment of today: AWS AMPLIFY

The Amplify deployment dashboard showing successful builds, this is where the magic of automated deployments happened.
BONUS: Free Domains for Students with GitHub Student Pack
I also explored how to get a free domain using the GitHub Student Developer Pack and connect it to Amplify using Route 53. This was a game-changer, no more clunky default URLs!

The DNS configuration at Route 53 that connected my custom domain to Amplify, turning a random URL into praneel.tech .
Going from
https://main.d1svqt6bqz4ait.amplifyapp.com/ to praneel.tech made the project feel like a real website. I wrote a detailed guide about this process because I know how confusing domain setup can be for students. Here's the link! Day 6 - Contact Form with Lambda + SNS
This was the most Challenging day by far. The article was about adding a contact form on the website, i was definitely excited, but that meant stepping into AWS Lambda and SNS for the first time. This was my introduction to serverless computing, and it was... very intense.
What i accomplished on Day 6:
- Created an SNS topic and confirmed my email subscription (after it unsubscribed me thrice still not sure why its happening)
- Wrote and deployed a Lambda function to send emails
- Generated a Function URL (after debugging a confusing error about duplicate statement IDs)- Integrated the form into my Next.js site, adapting sample HTML code
And of course, I making classic mistakes, a typo in my environment variable name (
.NEXT_PUBLIC_CONTACT_LAMBDA_URL instead of NEXT_PUBLIC_CONTACT_LAMBDA_URL). That one dot broke everything until I caught it 15 minutes later.The lesson? The smallest details can cause the biggest headaches. But by the end of the day, my form worked! filling it out now sends me an email, and it feels like magic every time someone fills it (pss: you should fill it too! ) .
My Aha! Moment of today: Details matter, and Lambda + SNS can make static sites interactive.

The SNS topic that handles email notifications from my contact form. simple but effective.

My contact form Lambda function in action! serverless computing felt amazing the first time it worked.
Beyond the Challenge (The Automation Rabbit Hole)
One thing I'm especially excited about: I've also started using an EC2 instance to run n8n, which helps me automate parts of my workflow, the blog post creation. It's a small step into the world of automation, but it already feels powerful.
This project isn't just a static site anymore. It's a real system with multiple moving parts, powered by different AWS services. Each piece taught me something new about how the cloud works.
This leads us to Today, When i am writing this:
- A live Personal Website that is minimalistic, hosted Entirely on AWS with all my Links in one place
- Hosted Source Code on GitHub with a Valid OSI License (MIT License)
- Global Availability, and Ability to Modify
- Automatic deployments to Amplify
- A working Contact Form Page
- A Custom Domain Pointing to my Site
- Hosting n8n and automating parts of my blog workflow
- Real world Experience with 8 Different AWS Services !
"What are they?" I'm glad you asked!
- IAM - for secure identity and access management
- S3 - to store my website files
- CloudFront - to distribute my site globally
- Amplify - for GitHub-connected deployments
- Route 53 - for domain and DNS management
- Lambda - to process contact form submissions
- SNS - to send email notifications
- EC2 - to host my personal n8n automation workflows
My Design Philosophy
I Wanted to make Something clean and usable, something minimalist in style nothing too flashy and screams Portfolio Website, One for sure requirement was to have dark mode and light mode and have its own charm, it should had to have everything i need in one place and should be easily accessible on mobile as well as desktop, and should be according to the users device that it switches, it should be customizable and can be modified to the persons liking. Since i Wanted a Blog page , An About Me page and a Projects Page, I added those too! and it worked out since now i am using it as my real life page!
Tips for Future Builders (What I Wish I'd Known)
- Don't skip security - Set up IAM users, MFA, and budget alerts on Day 1. Future you will thank present you.
- Do it manually first - Understanding S3 + CloudFront made me appreciate Amplify more. The hard way teaches you why the easy way exists.
- Check the small stuff - Typos in environment variables can cost hours. I learned this the hard way with that extra dot.
- Think about UX - Small features (dark mode, custom 404s) make a big difference in how your site feels.
- Stay curious - Explore beyond the guides.
- Document everything - Your future self (and others) will appreciate the breadcrumbs you leave behind.
The Final Project
You can check it out at the live site here : praneel.tech .
Check Out the GitHub Page ! If you love it , star it, fork it! :)
Final Thanks (The People Who Made This Possible) A huge thank you to:
- AWS and its teams for providing these amazing services and making them accessible to students
- Ana for the clear, detailed daily articles that guided me every step of the way,seriously, those guides were lifesavers
- Ben for conducting the AWS Builder Challenge and giving us all a reason to build something real
- You, the reader - for following along on my journey and celebrating this milestone with me This challenge reminded me why I love building things: it's not just about the final product, it's about everything you learn along the way. Every error message, every successful deployment, every "wait, how does this work?" moment, they all add up to something bigger than the sum of their parts.
🚀 Onward to the next challenge!
Enjoyed reading this content? Let the author know!
Your likes, comments, shares, and saves help creators reach more builders.

Loading recommendations
Loading article