

Training & Optimization Skills: available via Agent Toolkit
The AWS AI/ML skill is now core to the Agent Toolkit for AWS. This article covers two new capabilities: serverful tuning and inference optimization.

Agentic Model Customization, Part 2: Serverful Training and Inference Optimization with the AWS AI/ML Skill
In Part 1 , we showed how purpose-built agent skills guide developers through model customization on Amazon SageMaker AI. Starting from a single natural-language prompt, the agent planned the workflow, fine-tuned Qwen3-0.6B with SageMaker AI serverless model customization to rewrite clinical medication instructions in plain language, and evaluated the result with metrics tailored to the use case.
How the AWS AI/ML skill in the Agent Toolkit for AWS guides your coding agent from a standard SageMaker AI training job, for traditional ML or generative AI, to a deployment configuration tuned for latency, throughput, or cost.
Since then, the SageMaker AI skills have moved to a new home and gained new capabilities:
- A single, supported integration point. The SageMaker AI skills have moved from AWS Labs and are released as the unified AWS AI/ML skill, a core skill in the Agent Toolkit for AWS . The toolkit replaces the previous AWS Labs skills and plugins, with a consistent install and update path for every agent. The skill is also pre-installed in SageMaker Studio JupyterLab, for use with Kiro or your coding agent of choice.
- Composability. Because the AI/ML skill sits alongside the toolkit's other AWS skills, such as Amazon EC2 and Amazon Bedrock, your agent can select, train, deploy, and optimize models on SageMaker AI while working across the rest of your AWS environment in a single natural-language workflow.
- More capabilities. New and extended capability areas include MLflow experiment tracking, JumpStart model deployment and model recommendations, end-to-end model customization, SageMaker processing jobs, serverful training for traditional ML and generative AI, and inference optimization.
In this post, we focus on the last two. We pick up the medication-simplification use case from Part 1 and show two things. First, the agent trains models with standard SageMaker AI training jobs: a traditional ML model with XGBoost, and a generative AI fine-tune with your own training script. Second, the agent finds the best way to serve the fine-tuned model and measures how the deployed endpoint actually performs.
Everything shown in this post is real output from the agent and from SageMaker AI, captured in a test account in
us-east-1.Getting started
Install the Agent Toolkit for AWS
Follow the installation instructions in the Agent Toolkit for AWS repository for your agent (for example, Kiro, Claude Code, Codex). The AWS AI/ML skill is installed with the toolkit's core skills, at
skills/core-skills/aws-ai-ml.If you're working in SageMaker Studio JupyterLab, the skill is already installed. Open your coding agent and start prompting.
Prerequisites
- An AWS account with access to Amazon SageMaker AI
- AWS credentials configured locally (or a SageMaker Studio space), and
AWS_DEFAULT_REGIONset to your working Region - An IAM role that SageMaker AI can assume as an execution role (the
AmazonSageMakerFullAccessmanaged policy covers the SageMaker AI operations the skill uses) - Service quota for the instance types you plan to use. The examples in this post use
ml.m5.xlargeandml.g5.xlargefor training and theml.g5family for inference.
Tip: The agent checks before it spends. Before it starts anything that bills, such as a training job, a recommendation job, or load against a live endpoint, it summarizes what it's about to run and waits for your explicit approval.
Part A: Serverful training, for traditional ML and generative AI
In Part 1, SageMaker AI serverless model customization managed the compute for us. That's still the simplest path for supervised fine-tuning (SFT), direct preference optimization (DPO), and reinforcement learning (RLVR, RLAIF). Sometimes, though, you need a standard SageMaker AI training job:
- You're training a traditional ML model, such as XGBoost, LightGBM, CatBoost, or scikit-learn, on tabular data.
- You want to run your own training script, a custom container image, or an AWS Marketplace algorithm.
- You want to pick the exact instance type and count, or run on capacity you've reserved.
The AWS AI/ML skill's new training jobs capability handles all of these with the SageMaker Python SDK v3
ModelTrainer. You don't need to know which API fits, the agent routes based on the outcome you describe:| What you ask for | Where the agent routes |
|---|---|
| "Fine-tune a model for my use case" (SFT/DPO/RLVR/RLAIF), with no compute requirements | Serverless model customization (Part 1) |
| Traditional ML from SageMaker JumpStart (XGBoost, LightGBM, CatBoost, scikit-learn, …) | Training jobs → ModelTrainer.from_jumpstart_config |
| Your own script, container image, or Marketplace algorithm on instances you choose | Training jobs → ModelTrainer |
| "Why did my training job fail?" | Training jobs → evidence-first troubleshooting |
Walkthrough 1: Train an XGBoost churn classifier with JumpStart
We start with traditional ML. Our customer churn dataset is already prepared in Amazon S3, with numeric features, the label in the first column, and separate
train/ and validation/ folders.The training jobs capability also supports published SageMaker HyperPod recipes and training plans for larger distributed workloads. To keep things simple, this post sticks to standard training jobs.
Whichever branch the agent picks, it follows the same pattern:
- Gather inputs. It checks the conversation and your project files first, and asks only for what it can't find.
- Run preflight checks. It verifies the region, that the execution role trusts SageMaker AI, that your data is in the same region, that the image, algorithm, or model exists (with a pinned version, never
latest), and that you have service quota for the instance you asked for. If quota is short, it tells you the requested and current values and explains how to request an increase. It never silently downsizes. - Summarize and wait for approval. You see the model, data, instance type and count, and max runtime. The agent links to SageMaker AI pricing instead of guessing at a dollar figure. Note: the agent does not consider private pricing agreements that may override public pricing.
- Generate and launch. It writes an executable Jupyter notebook or Python file to your project and submits the job asynchronously, reporting the job name and ARN right away. Every job has a max runtime, so a runaway job can't bill you indefinitely.
🗨️ Sample user prompt: "I have a customer churn dataset prepared for XGBoost at s3://amzn-s3-demo-bucket/churn/jumpstart-input/ (train/ and validation/ folders, label in the first column, no header). Train an XGBoost classifier on SageMaker using JumpStart. Use ml.m5.xlarge and cap the job at 1 hour."
The agent routes to the training jobs capability and picks the JumpStart traditional ML branch. Rather than guessing a model ID, it looks up the exact SageMaker JumpStart model and version,
xgboost-classification-model version 2.2.0, and confirms that ml.m5.xlarge is a supported training instance for it.After approval, the agent writes the notebook to the project, built on
JumpStartConfig and ModelTrainer.from_jumpstart_config, and the job is submitted:
1
2
Training Job Name: churn-xgboost-bde6490a21-20261002110005
Training Job ARN:  arn:aws:sagemaker:us-east-1:111122223333:training-job/churn-xgboost-bde6490a21-20261002110005
Walkthrough 2: When a training job fails, ask the agent why
In this scenario, the agent monitored the job through Starting → Downloading → Training but about three minutes after creation, it reported that the job had failed. Training jobs may fail for many reasons: IAM, data format, quota, out-of-memory, a bug in the container, or capacity. The agent's troubleshooting is evidence-first and read-only. It doesn't relaunch, stop, change quota, or modify IAM without your approval.
🗨️ Sample user prompt: "My training job churn-xgboost-… failed. What happened?"
DescribeTrainingJob: status, secondary status transitions, andFailureReason- Only that job's own CloudWatch log streams, rather than a broad log search
- For performance or out-of-memory questions, the job's CPU, memory, disk, and GPU metrics for its exact time window, so it doesn't guess utilization from log lines
It then classifies the failure (submission/config, quota, IAM, data, OOM, container or algorithm, training configuration, capacity, or service) and responds in a consistent format. The response includes the failure signature, the decisive evidence, and fixes ordered from lowest risk.
Agent: Failure signature:AlgorithmError.transfer_learning.pyexited with status 1, raisingFileNotFoundErrorwhile it read the training CSV.Root-cause category: Data (wrong channel path). Infrastructure, IAM, and quota were all fine: the instance came up, the image and all channels downloaded, and the script started.Evidence
- Decisive container log lines:
2
3File "transfer_learning.py", line 53, in prepare_data
df_train = pd.read_csv(
FileNotFoundError: [Errno 2] No such file or directory: '/opt/ml/input/data/training/train/data.csv'
- The training channel holds
train/train.csvandvalidation/validation.csv. The JumpStart XGBoost classification script reads a fixed filename,train/data.csv, and per the model's hub training-data format,validation/data.csvtoo. Your folders are laid out correctly, but the files have the wrong names.Repair steps, lowest risk first
- Copy the data into a new prefix with the expected filenames, so the original objects are untouched, and relaunch with everything else unchanged.
- Alternatively, add
data.csvcopies next to the existing files. That changes your existing dataset prefix, so I'd avoid it.- Change your data-prep step to write
data.csvfrom now on.I haven't relaunched or changed anything. No support case is needed: this is a customer-actionable data-path issue.
If no fix you can make yourself turns up, the agent drafts an AWS Support case for you to review. The draft includes the job ARN, the failure window, sanitized evidence, and every check it already performed.
We replied "Apply the fix and relaunch." The agent copied the files to a new prefix as
train/data.csv and validation/data.csv and asked for approval again before submitting. Three minutes later:🗨️ Sample user prompt: "How did it do?"
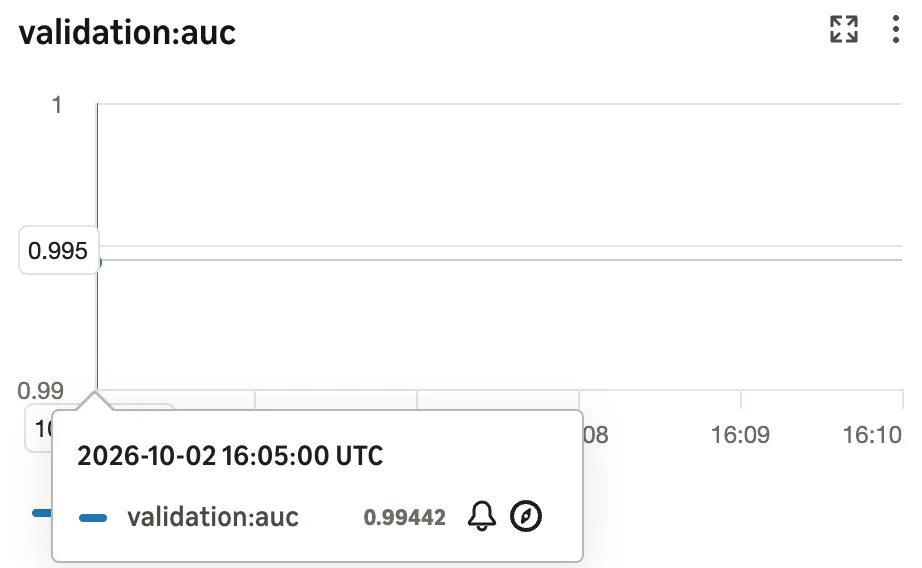
Agent: It did well on the validation set.
- Validation AUC was 0.93636 at round 0 and peaked at 0.99453 at round 166. Training stopped at round 196, 30 rounds after the best round, which matches
early_stopping_rounds=30; thenum_boost_round=5000cap wasn't reached.- A train AUC of 1.0 means the trees fit the training set perfectly. The validation AUC stayed at about 0.994, so the model still generalizes to held-out data. Before you rely on it, score your untouched test split to confirm.

Walkthrough 3: Fine-tune Qwen3-0.6B with a standard training job and your own script
In Part 1, we fine-tuned Qwen3-0.6B for medication-instruction simplification using serverless customization. This time we want full control: our own Hugging Face training script, a single GPU instance we pick, and the full fine-tuned weights left uncompressed in S3 so we can optimize the deployment afterward.
🗨️ Sample user prompt: "I want to fine-tune Qwen3-0.6B to rewrite clinical medication instructions in plain language. Last time I used serverless customization, but this time I want a standard SageMaker training job with my own training script in ./src, on a single ml.g5.xlarge, capped at 2 hours. My data is at s3://amzn-s3-demo-bucket/med-instructions/. Keep the output weights uncompressed in S3 so I can optimize the deployment afterwards."
The request mentions fine-tuning, but it also names a standard training job, a custom script, and an explicit instance. So, the agent selects the bring-your-own-source branch of the training jobs capability rather than serverless customization.
The agent then reads
src/train.py and src/requirements.txt from the project to learn what the script expects (a training channel with train*.jsonl and validation*.jsonl files, and hyperparameters such as --model_id and --epochs). It asks only for the output location and hyperparameters, then runs its preflight checks. Two of those checks worth calling out:- Image pinning. The SDK's image lookup returned the floating tag
pytorch-training:2.6-gpu-py312. The skill requires a versioned image, so the agent resolved that tag's digest in Amazon ECR and pinned the fully versioned tagpytorch-training:2.6.0-gpu-py312-cu126-ubuntu22.04-sagemaker-v1.28.
- Uncompressed output. By default, SageMaker AI packages training output as
model.tar.gz. To honor "keep the output weights uncompressed," the agent setCompressionType=NONEon the job's output configuration and listed that change against its template in the summary.
Agent: Confirmation summary
- Job type: SageMaker Training job (serverful), BYO source on a pinned AWS PyTorch DLC
- Model:
Qwen/Qwen3-0.6B, downloaded from Hugging Face bytrain.pyat runtime (full fine-tune, bf16, assistant-only loss)- Image:
763104351884.dkr.ecr.us-east-1.amazonaws.com/pytorch-training:2.6.0-gpu-py312-cu126-ubuntu22.04-sagemaker-v1.28- Source:
src/→ entrytrain.py, withrequirements.txtinstalled in the container- Hyperparameters:
model_id=Qwen/Qwen3-0.6B,epochs=3,lr=1e-5,batch_size=8- Input: channel
training←s3://amzn-s3-demo-bucket/med-instructions/- Output:
s3://amzn-s3-demo-bucket/med-serverful/output/with CompressionType=NONE- Compute: 1 ×
ml.g5.xlarge, 30 GB volume, on-demand. Quota: 1 available, 1 requested- Max runtime: 7200 s (2-hour hard stop)
- Wait behavior: asynchronous. I'll report the job name and ARN right after submission, then monitor
- Cost: see SageMaker pricing (ml.g5.xlarge training, billed per second up to the 2-hour cap)
Shall I generate the notebook and submit this training job?
After approval, the agent generates the notebook from its custom-training template and launches the job asynchronously. The agent keeps watching the job, waiting a few moments for
ml.g5.xlarge capacity, which the agent noted is normal and isn't billed, and then ran straight through:1
2
3
4
5
15:59:51 InProgress Pending Training job waiting for capacity
16:10:05 InProgress Pending Preparing the instances for training
16:11:07 InProgress Downloading Downloading the training image
16:14:11 InProgress Training Training image download completed. Training in progress.
16:16:14 Completed Completed Training job completedThe agent also surfaced the sample generations our script printed after training. Here's the clinical instruction from Part 1, rewritten by the fine-tuned model:
Clinical input: "Administer 500mg amoxicillin PO TID x 10d. Contraindicated with concurrent allopurinol administration. Monitor for hypersensitivity reactions including urticaria and angioedema."Fine-tuned model output: "Take one 500mg amoxicillin capsule by mouth 3 times a day for 10 days. Do not take this with allopurinol. Call your doctor right away if you get a rash, hives, or swelling of your face, lips, or tongue."

The full fine-tuned weights are now in S3 in Hugging Face format, which is exactly what the inference optimization workflow needs next.
Part B: Inference optimization, for latency, throughput, and cost
Getting a model onto an endpoint is only half the job. The other half is answering questions like Which instance should I use? Will it meet my latency target? What will it cost per token? Inference optimization in the AWS AI/ML skill, part of its model deployment capability, provides two workflows for this:
| Workflow | Question it answers | Works with |
|---|---|---|
| Deployment recommendations | "What's the best instance and serving configuration for this model?" | Open-weight base or fully fine-tuned models in Hugging Face format in S3, or from SageMaker JumpStart |
| Benchmarking | "How does my endpoint actually perform?" | SageMaker AI real-time endpoints |
Walkthrough 4: Get deployment recommendations for the fine-tuned model
The agent infers what it can, including the execution role, the output location, and the tokenizer (
Qwen/Qwen3-0.6B). It then asks one decision at a time:- The model source: a JumpStart model ID, or an S3 URI with your own Hugging Face–format weights. It infers the tokenizer and execution role for you. (For a gated JumpStart model, or one that's only on the Hugging Face Hub, it can stage the weights to your S3 first.)
- Your performance target:
- Cost: the cheapest instance that meets baseline performance
- Latency: the lowest time to first token (TTFT), best for interactive chat
- Throughput: the most output tokens per second, best for batch workloads
- Options:
- Instance types: candidates to evaluate, or let the service choose.
- Advanced optimization: on by default. The service tries kernel tuning (up to 30% better TTFT and throughput) and speculative decoding. With optimizations, a job takes 2–10 hours instead of 30–60 minutes, and the agent tells you this up front.
- Inference framework: vLLM or LMI, or let the service pick.
- Workload profile: typical input and output token lengths and concurrency, or a dataset of real prompts in S3.
The agent generates a notebook built on
ModelBuilder(model_path=…).generate_deployment_recommendations(…), then presents the results as a ranked table. It always pulls the cost column from the AWS Pricing API and never estimates it:| # | Instance type | Serving config | TTFT p50 (p90) | Output throughput | Optimizations | On-demand price |
|---|---|---|---|---|---|---|
| 1 | ml.g5.xlarge | vLLM 0.29.0 | 29.8 ms (64.7 ms) | 1,552.8 tok/s | None | $1.408/hr |
| 2 | ml.g5.xlarge | vLLM 0.30.0 | 40.7 ms | 1,437.6 tok/s | None | $1.408/hr |

Each recommendation is backed by a deployable ModelPackage that bundles the weights, the serving container, environment variables, and any optimization artifacts. To deploy one, say "Deploy the top recommendation."
Walkthrough 5: Benchmark the endpoint and compare runs
Optimization is opt-in. If you only say "deploy my model," the agent deploys it. It enters an optimization workflow only when you mention performance, cost, latency, throughput, or benchmarking, or ask for help choosing an instance.
With the endpoint in service, we measure it:
- Inspects the endpoint. It confirms the Region, reads the container configuration to determine the request format (OpenAI ChatCompletions-compatible containers work out of the box, and custom formats use a request template), and infers the tokenizer from the model behind the endpoint.
- Checks safety first. A benchmark sends real load. If the endpoint wasn't created in the current session, the agent warns you, suggests benchmarking a dedicated copy if it serves production traffic, and waits for your go-ahead.
- Picks the workload source that matches your question: synthetic traffic for a standard check or load test, a curated dataset in S3, or real traffic replayed from SageMaker Data Capture.
- Reports results in a consistent format, starting with a one-line headline and then the supporting metrics. It also reports the input and output sequence lengths, because latency is only comparable across runs at matching lengths.
The agent won't overstate results. The tail percentile it reports depends on the sample size: p99 only with roughly 1,000 or more requests, p90 for smaller runs, and p50 alone below about 200.
Optimization is iterative, so the agent can line runs up side by side:
It produces a single delta table where + always means better (higher throughput or lower latency) and calls out the metrics that moved most. Ask for cost framing, and it pairs throughput with live on-demand pricing to express cost per million tokens.
Region availability: The inference optimization workflows are currently available in us-east-1, us-west-2, us-east-2, ap-northeast-1, eu-west-1, ap-southeast-1, and eu-central-1. See SageMaker AI Region availability for the latest list.
🗨️ Sample user prompt: "I fine-tuned Qwen3-0.6B with a SageMaker training job to simplify medication instructions for a patient-facing portal. The full weights are in S3 at s3://amzn-s3-demo-bucket/med-serverful/output/…/output/model/. Before I deploy it, find me the lowest-latency instance and serving configuration."
The agent:
- Performance target: Cost (the cheapest instance that meets baseline performance), Latency (the lowest time to first token, TTFT, best for interactive use), or Throughput (the most output tokens per second, best for batch). A patient portal is interactive, so we chose latency.
- Instance types: up to three candidates to evaluate, or let the service choose. We picked
ml.g5.xlarge,ml.g5.2xlarge, andml.g5.4xlarge. - Optimization: on by default. The service tries kernel tuning (up to 30% better TTFT and throughput) and speculative decoding. The agent warns up front that a job with optimizations can take 2–10 hours, compared with 30–60 minutes without. We asked for both runs: a quick baseline without optimizations, and an optimized run.
- Workload: the agent infers a traffic profile from the use case and states the values it picked:
Agent: For the workload, here's what I inferred from your use case (patient-portal rewrites of medication instructions, interactive):
- Input tokens: mean 85, stddev 10 (prompts are about 70–100 tokens including the system prompt)
- Output tokens: mean 65, stddev 10 (plain-language rewrites are about 50–80 tokens)
- Streaming: on, so TTFT is measured the way an interactive UI would see it
- Request count: 100
How many concurrent users should I simulate?
We answered "about 8," and the agent confirmed everything in a single summary before it ran anything:
Agent: Here's the recommendation job I'll set up. OK, or would you like to change anything?
- Model (S3 weights):
s3://amzn-s3-demo-bucket/med-serverful/output/…/output/model/(tokenizerQwen/Qwen3-0.6B). Full Hugging Face-format weights, not a LoRA adapter, so it's eligible for recommendations- Execution role: the role the training job ran with
- Performance target: latency (
ttft-ms)- Instance types:
ml.g5.xlarge,ml.g5.2xlarge,ml.g5.4xlarge- Optimization: two jobs.
…-baselineruns with optimization off, and…-optimizedruns with optimization on. Framework: auto-selected- Workload: synthetic, input 85 ± 10 tokens, output 65 ± 10 tokens, concurrency 8, 100 requests
Each job deploys the model on every candidate instance, replays the workload, and ranks the configurations. The baseline runs in about 30–60 minutes and the optimized run takes longer, so the agent tells you how to check back. It reconnects to the jobs by name rather than resubmitting them.
For the top configuration, at 8 concurrent users, end-to-end request latency was 306.6 ms (p50) and 471.8 ms (p99), with an inter-token latency of 4.39 ms and 24.7 requests per second.

More in the Agent Toolkit for AWS
This post covered serverful training and inference optimization. The AWS AI/ML skill also includes:
- Model customization: end-to-end serverless fine-tuning, from use case definition through training and evaluation (Part 1 )
- JumpStart model deployment: deploy pre-built JumpStart models and get guided recommendations on the right model for your use case.
- MLflow: experiment tracking and model lifecycle management with SageMaker AI managed serverless MLflow
- Processing jobs: data preparation and ETL on managed compute
For the full list of skills and capabilities, see the Agent Toolkit for AWS on GitHub .
- Before deployment, serverful training covers traditional ML with JumpStart and generative AI fine-tuning with your own script on the instances you choose.
- After deployment, inference optimization provides data-backed instance and serving recommendations, plus consistent, comparable benchmarks.
Throughout, the agent checks before it spends, shows its evidence, and leaves the decisions to you. And because the AI/ML skill is part of the Agent Toolkit for AWS, the same conversation can continue into the rest of your AWS environment.
Clean up
To avoid ongoing charges, delete the endpoints you may have created. Training and recommendation jobs stop billing when they finish, but their artifacts stay in S3 until you remove them.
Conclusion
In Part 1, a coding agent guided us through serverless fine-tuning. In Part 2, the AWS AI/ML skill extends that guidance on both sides of the model:
Get started by installing the Agent Toolkit for AWS , or open your coding agent in SageMaker Studio JupyterLab and try one of the prompts above.
Resources
Enjoyed reading this content? Let the author know!
Your likes, comments, shares, and saves help creators reach more builders.

Loading recommendations
Loading article