
Connecting S3 and PostgreSQL: Zero-ETL Solution using Tiger Data
This is a community post discussing how to implement automatic synchronization between S3 and PostgreSQL using Tiger Data's S3 source connector.


Authors:
Mrinali Umashankar, Partner Solutions Architect, AWS
Vinodh Krishnamoorthy, Sr. Solutions Architect, AWS
Supporting Authors:
Vineeth Pothulapati, Senior Product Manager, Tiger Data
Nicole Bahr, Staff Product Marketing Manager, Tiger Data
Tiger Data's S3 source connector feature has gained traction among developers for its ability to streamline S3 to PostgreSQL synchronization. This approach addresses common pain points in traditional ETL pipelines, particularly the challenges of data staleness and complex batch processing. This feature is designed to provide near real-time data updates while minimizing resource overhead, making it an attractive option for organizations or individuals looking to optimize data workflows.
In this tutorial, I will focus on implementing automated S3 to PostgreSQL synchronization using Tiger Cloud's S3 source connector. As a purpose-built solution for time-series and analytics data ingestion, this feature offers significant improvements in its efficiency, ease of integration with existing S3 infrastructure, and support for various data types and formats.
Key Features:
Intelligent schema inference - Automatically maps your CSV or Parquet files structure to Postgres tables without manual configuration.
Streamlined initial import - Efficiently handles the bulk loading of your existing data in one go.
Real-time synchronization - Maintains an up-to-date copy of your data through continuous monitoring and updates.
Smart file tracking - Prevents data duplication and ensures comprehensive coverage by intelligently monitoring processed files.
Prerequisites
Before diving in, ensure you have:
- AWS account with necessary S3 permissions
- S3 bucket containing either compressed or raw CSV or parquet data
Step-by-Step Implementation
1. Sign Up for Tiger Cloud
I start by creating a Tiger Cloud account, which offers a 30-day free trial.
- Visit Tiger Cloud and click "Sign Up"
- Complete the sign-up process
- Verify the email address
- Access the Tiger Cloud console
The free trial includes all the features I need, including source connector for S3, so I can fully test my data pipeline without any upfront costs.
2. Create A Tiger Cloud Service
Once I'm logged into the Tiger Cloud console, I create a new service:
Service Creation Steps:
- Click "Create Service" from the dashboard
- Select Service Type: Real-Time Data
- Select the region to match the source files S3 bucket source files location for optimal performance
- Choose appropriate compute size based on your CPU/memory requirements
- Select Production environment
- Enable High Availability (HA) during setup for production workloads
- Select no connectivity pooling or VPCs
- Select “Create Service”
Within a minute, my Tiger Data service is up and running.
Save The Configuration:
- Download the database configuration
- Copy the “Connection string” listed below
- Select “service overview” to see your service live
Connect Your Service:
- From the dashboard view, select “Connectors” tab
- Next under the “source connectors” section create your S3 Connector
- Configure S3 Bucket Connection I provide the S3 bucket name where my data is stored (e.g.,
my-sensor-data-bucket)
- Select Authentication Method I choose between two authentication options:
- IAM Role (recommended for private buckets and production use):
- Tiger Data provides seamless assistance with IAM role creation
- Follow the provided instructions to create a role with read-only access to my specific bucket
- Principal:
arn:aws:iam::142548018081:role/tigerdata-s3-connections
- ExternalID:
<projectId>/<serviceId>(automatically provided)
- Required permissions:
s3:GetObjectands3:ListBucket
- Public bucket access (for syncing data from public S3 buckets)

- Define File Type and Pattern: I select the file type I want to sync:
- CSV or Parquet support
- Provide glob pattern to match specific files:
-
sensors/*- All files in sensors folder
-
sensors/**/*.csv- All CSV files recursively
-
logs/2024/*/data.parquet- Specific pattern matching
- For CSV files, I can configure advanced settings:
- Skip headers option
- Custom delimiter specification

- Preview Matching Files: I click the search icon to preview the first 5 files that match my glob pattern. This helps me verify that the pattern captures the right files before proceeding.
- Schema Mapping and Table Configuration: S3 Source Connector analyzes the first matching file and infers the schema:
- Select “Create a new table for your data”
- Review schema mapping: I can see how file columns map to PostgreSQL data types
- Customize data types: Use dropdown menus to adjust column types as needed
- When satisfied with schema mapping and data types, select “continue”
- Table naming: I can change the default table name (which uses the first file name) to something more meaningful
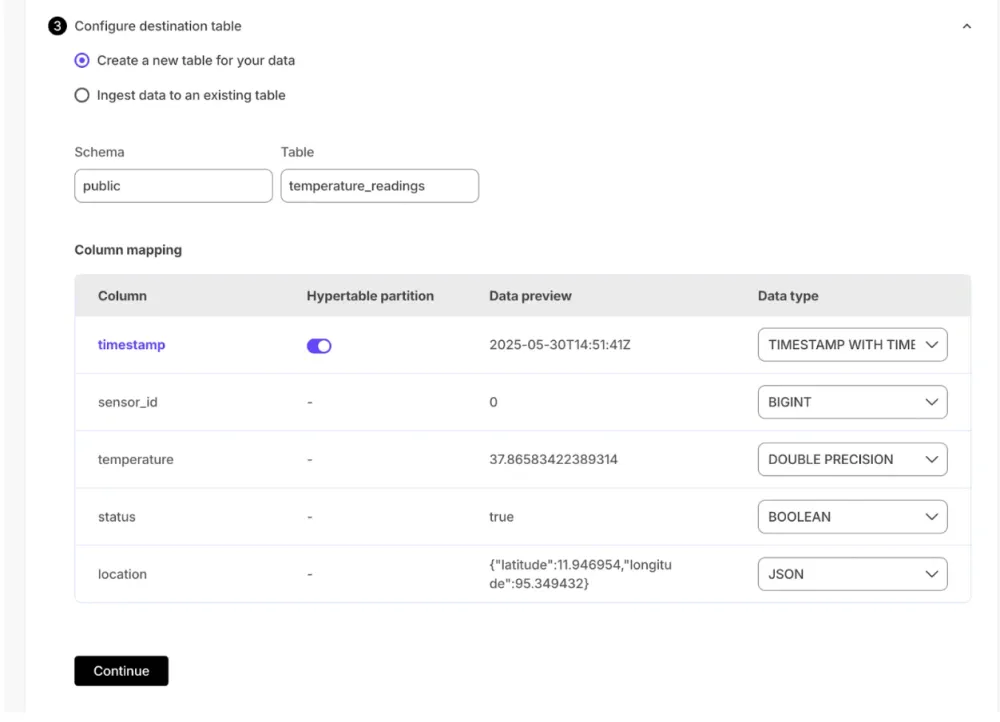
- On Conflict Behavior: During S3 bucket configuration, you can also specify the insert behavior when conflicts occur. Currently, there is support for “on conflict do nothing.” This prevents failures when duplicate records exist in your files. In the future, there will be additional options for handling conflict scenarios.

- Set Polling Interval: I configure how often S3 source connector checks for new files:
- Default: 1-minute interval for real-time sync experience
- Custom: I can use cron expressions to set my preferred schedule
- This determines how frequently the system monitors my S3 bucket for new data

- Click "Start connector" to begin the data synchronization process.
Monitoring Connector for S3
1. View Running Connector
Once started, I navigate to the connector management screen where I can see my newly created connector for S3 in "running" state alongside any other connector processes.
2. Detailed Connector View
By clicking on my connector, I can expand it to see comprehensive details:
- Summary metrics at the top:
- Files imported so far
- Total data size cumulatively imported
- Glob pattern being used
- Target table name
- Sync interval information:
- Next pull time: Calculated based on the polling interval I set
- Last pull time: Shows when connector last polled the S3 bucket and synced with the latest state
- On-demand sync: I can click the refresh icon beside last pull time to perform an immediate sync with S3, bypassing the next scheduled pull time if needed

3. Import Logs and Status
The expanded view shows detailed import logs.
- File processing queue: Files queued, in-progress, and completed
- Error handling: Any files with errors are clearly marked
- Error details: I can expand error entries to view complete error information
- Processing history: Complete timeline of all import activities
File Import Lifecycle: Users can now track per-file history, including when a file was added to the queue, when it entered processing, and the timestamp at which import completed.

4. Configuration Management
At the bottom of the source connector page, I can view all configuration settings. At any time, I can:
- Pause the running connector
- Update any configuration parameters
- Resume with new settings
This flexibility allows me to adjust the sync process as my data patterns or requirements change.
Performance Optimization
For performance optimization, select “SQL editor” tab across the top, and then run the following commands.
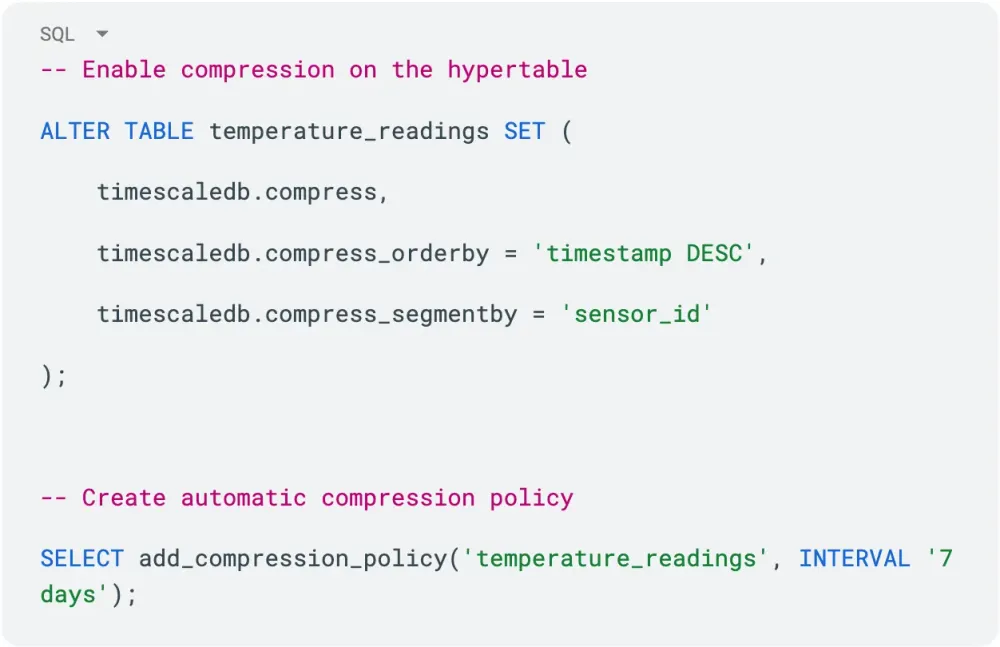
Setting Up Hypercore
For improved query performance and a smaller data footprint, I enable Tiger Data's column store engine.
By storing historical data in a highly compressed, columnar format, Tiger Data significantly reduces disk usage while enabling faster analytical queries. This is especially effective for large-scale time-series and event data, where columnar storage shines for scan-heavy operations and aggregate workloads.
Implementing Continuous Aggregates
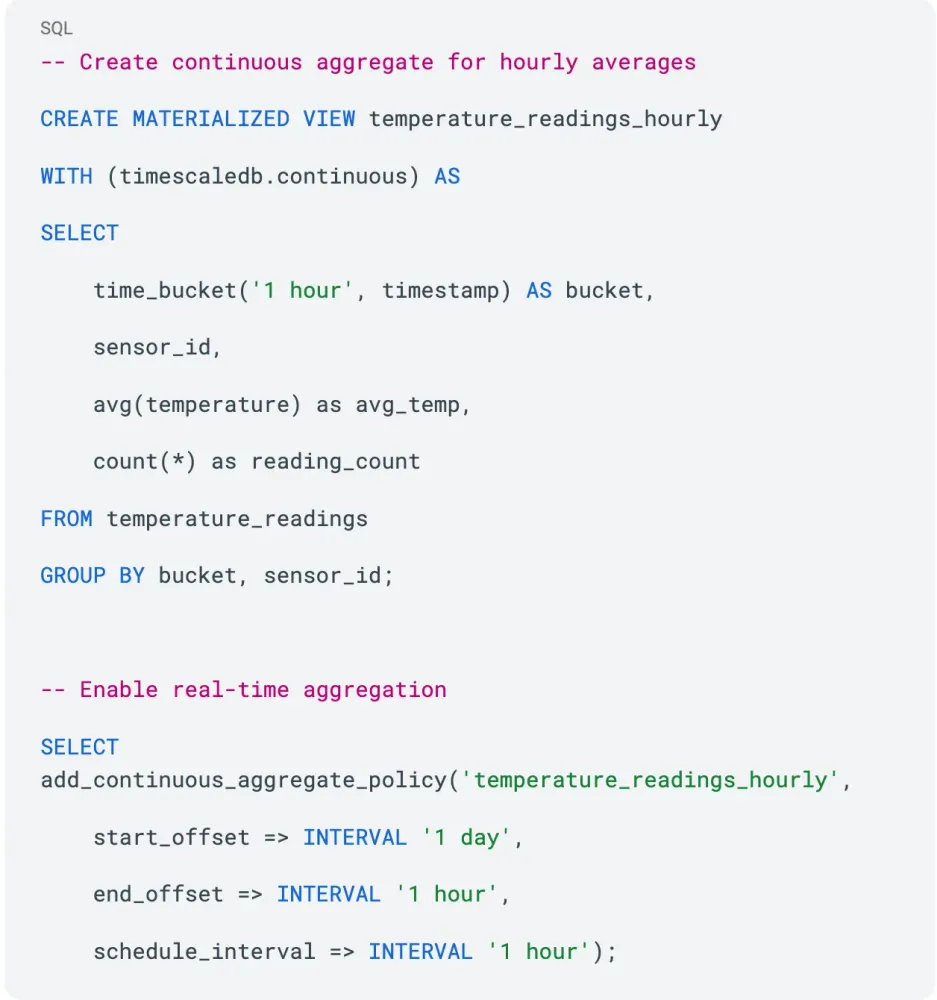
To accelerate analytical queries and improve dashboard responsiveness, I use continuous aggregates.
These materialized views automatically precompute and store aggregated results over time buckets, reducing the overhead of repeatedly scanning raw data. In the example below, I define a continuous aggregate that calculates hourly average temperatures and reading counts for each sensor. A policy is also set to keep the materialized view up to date in real time—ensuring fast, near-fresh query results for recent data without sacrificing performance.
Key benefits I've experienced:
- No ETL maintenance overhead - S3 Source Connector handles all the complexity
- Real-time data availability - minutes instead of hours for data freshness
- Cost-effective scaling - pay only for what I use in Tiger Cloud
- Familiar SQL interface - no need to learn new query languages or APIs
Conclusion
This tutorial demonstrates how straightforward it is to set up zero-ETL synchronization between Amazon S3 and PostgreSQL using Tiger Data's source connector feature. The steps outlined here work for various data formats stored in S3 and can be adapted to different PostgreSQL setups with Tiger Cloud. This approach eliminates the need for complex ETL pipelines, enabling near real-time data analytics directly from your S3 data lake. I've found it particularly effective for IoT telemetry, financial data streams, and any scenario where S3 serves as your data landing zone.
See the resources below to learn more about the features, best practices for S3 integration, and how to get started with advanced analytics using Tiger Cloud. Whether you're working with real-time analytics over time-series data, looking to implement vector search, or seeking to optimize your existing PostgreSQL workflows, these tools provide a powerful foundation for modern data architectures.
Resources
Enjoyed reading this content? Let the author know!
Your likes, comments, shares, and saves help creators reach more builders.

Loading recommendations
Loading article