
Accelerate Deep Research Workflows with Amazon Bedrock AgentCore Application
Learn how to deploy and customize AgentCore Deep Research, an open-source sample application powered by Amazon Bedrock AgentCore. The app iteratively queries diverse data sources and generates structured research reports with citations and diagrams. It includes a scalable backend and React frontend deployed to AWS, over 10 configurable data connectors, and a modular architecture you can extend with your own tools.

Problem
Research analysts across industries spend hours manually collecting, filtering, and synthesizing information from disparate data sources. Is cryptocurrency a strong investment for Q2 2026? Which vendor best meets compliance and cost requirements for a new supplier onboarding? What are the most critical biomarkers for early detection of pancreatic cancer? Whether in finance, life sciences, or research, these questions span different domains, but they all require the same process: querying multiple databases, cross-referencing findings, and compiling results into a coherent report.
AgentCore Deep Research is an open-source sample application built on Amazon Bedrock AgentCore that automates this workflow. It connects to multiple external and internal data sources, iteratively queries and cross-references them, and generates structured research reports with inline citations and diagrams. In this post, we show you how to deploy the application to your AWS account, walk through its architecture, use it for research tasks, and extend it with your own data source connectors.
AgentCore Deep Research builds on the Fullstack AgentCore Solution Template (FAST) , a starter project for agent applications on AgentCore. If you're not yet familiar with FAST, we recommend reading this companion blog post first.
How it works
Given a research question, the agent follows a structured four-step workflow.

Figure 1: AgentCore Deep Research takes a user query, iteratively queries multiple data sources, and generates a structured research report with inline citations.
- Scaffold - The agent analyzes the research question, identifies three key themes, and creates a report skeleton with section headings and placeholders.
- Research - The agent runs 4-6 searches across enabled data sources, assesses source quality, and performs follow-up searches to fill gaps or resolve conflicting findings.
- Write - The agent populates each report section one at a time using the
editortool, adding inline citations for every factual claim. - Verify - The agent reads the entire report, checks that every section has real content, spot-checks evidence quality, and fixes any remaining gaps.
An optional step 5 generates data visualizations when the report contains quantitative data, using AgentCore Code Interpreter for sandboxed Python execution with
matplotlib.The output is a structured Markdown report (also available as PDF) with an executive summary, background, three key findings, cross-cutting analysis, and conclusions. Every factual claim includes an inline citation linking back to the source.
Architecture overview
The following diagram shows how the application components fit together. The infrastructure deploys as a single AWS Cloud Development Kit (AWS CDK) stack with three nested stacks.

Figure 2: AgentCore Deep Research architecture built on Amazon Bedrock AgentCore.
The frontend is a React application hosted on AWS Amplify Hosting with a split-pane interface: chat on the left and a live-updating research report on the right. Amazon Cognito handles user authentication with OIDC, plus machine-to-machine OAuth2 for agent-to-Gateway communication.
The deep research agent runs on AgentCore Runtime , built with the Strands Agents SDK and powered by Large Language Models on Amazon Bedrock . It streams responses back to the frontend in real time. AgentCore Gateway exposes multiple AWS Lambda -backed data source tools, and the agent discovers and calls these tools automatically.
AgentCore Memory stores conversation history for multi-turn research sessions. AgentCore Code Interpreter provides a sandboxed Python environment for generating charts and data visualizations. Metrics and logs go to Amazon CloudWatch , and traces go to AWS X-Ray .
Built-in data sources
The sample app ships with 11 configurable data source tools, each implemented as a Lambda function behind AgentCore Gateway. The following table lists each tool with its category and description.
| Category | Tool | Description |
|---|---|---|
| Web Search | Nova Web Grounding | Web search using Amazon Nova with citations |
| Web Search | Tavily Web Search | Web search with relevance scoring and domain filtering |
| Science | ArXiv Search | Academic paper search by topic, author, or keywords |
| Science | PubMed Search | Peer-reviewed biomedical and life sciences literature |
| Healthcare | OpenFDA Drug Search | FDA drug label database (indications, warnings, interactions) |
| Healthcare | ClinicalTrials.gov | Clinical study search by condition, intervention, or phase |
| Finance | SEC EDGAR | Company filings (10-K, 10-Q, 8-K) by ticker or keyword |
| Finance | AlphaVantage | Commodity prices, economic indicators, market news |
| Finance | FRED Economic Data | 800K+ economic time series from the Federal Reserve |
| Internal | S3 Text Reader | Read text files and PDFs from Amazon Simple Storage Service (Amazon S3) |
| Internal | Knowledge Base Search | Query Amazon Bedrock Knowledge Bases |
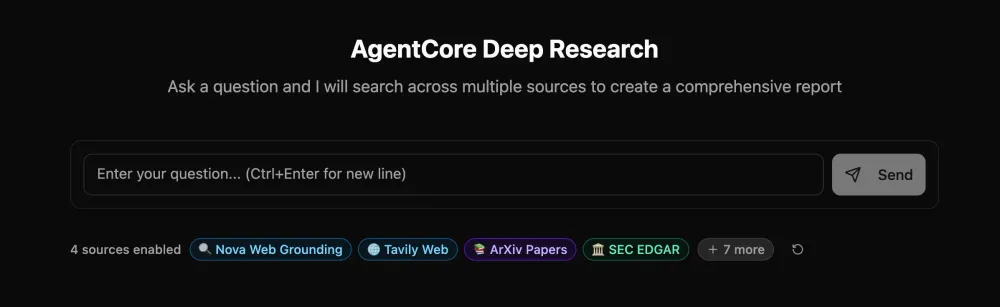
Users can toggle individual data sources on or off directly in the UI before submitting a query, so the agent only searches the sources relevant to the research question.
Prerequisites
Before deploying, make sure you have the following installed:
- Node.js 20 or later
- Python 3.10 or later
- Docker
- AWS Command Line Interface (AWS CLI) configured with appropriate credentials
- AWS CDK (
npm install -g aws-cdk) - uv (Python package manager)
The AWS Identity and Access Management (IAM) user or role you use must have permissions to create the AWS resources described in this post. Follow the principle of least privilege when providing permissions.
You also need access to language models on Amazon Bedrock . If you haven't already, enable model access in the Amazon Bedrock console for your target region.
Deploy the application
The deployment consists of three steps: clone the repository, configure the tools and settings, and deploy the CDK stack.
Step 1: Clone the repository
1
2
git clone https://github.com/aws-samples/sample-agentcore-deep-research.git
cd sample-agentcore-deep-research
Step 2: Configure your deployment
Copy the example configuration and customize it:
1
2
cd infra-cdk
cp .config_example.yaml config.yaml
Edit
config.yaml to set your stack name and optionally enable additional tools:1
2
3
4
5
6
7
8
9
10
11
12
13
14
15
16
17
18
19
20
21
stack_name_base: deep-research
admin_user_email: your-email@example.com # auto-creates user and emails credentials
backend:
pattern: strands-deep-research
deployment_type: docker
model_id: global.anthropic.claude-sonnet-4-6
tools:
arxiv:
enabled: true
default_on: true
nova:
enabled: true
default_on: true
tavily:
enabled: true # set to true if you have a Tavily API key
default_on: true
required:
api_key: tvly-xxx # get your key from https://tavily.com/
# ... other tools configured similarlyThe
enabled field controls whether a tool is deployed, default_on controls whether it's toggled on by default in the UI, and required fields like api_key are stored in AWS Secrets Manager during deployment. Tools that don't require API keys work out of the box.Step 3: Deploy the stack
From the
infra-cdk directory, install dependencies and deploy:1
2
3
npm install
npx cdk bootstrap # only required once per account/region
npm run deployThe
npm run deploy command runs cdk deploy to create the backend infrastructure, and then automatically deploys the frontend to AWS Amplify Hosting. It creates the Amazon Cognito User Pool, builds and pushes the agent container to Amazon Elastic Container Registry (Amazon ECR) , and provisions the AgentCore Runtime, Gateway, Memory, and all tool Lambda functions. Deployment takes approximately 10-15 minutes.When complete, you can find the application URL in the AWS Amplify console or in the CDK stack outputs:
1
App URL: https://main.d1234567abcdef.amplifyapp.com
Use the application
If you provided
admin_user_email in the configuration, you'll receive an email with temporary credentials. Open the Amplify URL, sign in, and change your temporary password when prompted.Figure 3: The AgentCore Deep Research welcome screen with configurable data source toggles.

Figure 3: The AgentCore Deep Research welcome screen with configurable data source toggles.
Try these sample queries to verify the deployment:
- "Is gold a good hedge against inflation in 2026?" - financial research using EDGAR, AlphaVantage, and web search
- "What are the latest advances in GLP-1 receptor agonists for weight management?" - life sciences using PubMed, ClinicalTrials.gov, and OpenFDA
- "Compare transformer and state space model architectures for long-context language modeling" - academic research using ArXiv and web search
The agent streams its progress in real time. Once it starts writing the report, the UI switches to a split-pane layout with the chat on the left and the live-updating report on the right.
Call the agent with the API
Beyond the web interface, you can invoke the agent programmatically through AgentCore Runtime. This is useful for integrating deep research into existing workflows, pipelines, or applications. The repository includes test scripts that demonstrate the API with streaming. The following code snippet shows the core pattern using the
boto3 client:1
2
3
4
5
6
7
8
9
10
11
12
13
14
15
16
17
18
19
20
21
22
23
24
25
import json
import boto3
client = boto3.client("bedrock-agentcore-runtime", region_name="us-east-1")
response = client.invoke_agent_runtime(
agentRuntimeArn=runtime_arn,
payload=json.dumps({
"prompt": "What are the latest advances in quantum error correction?",
"runtimeSessionId": session_id,
"enabledSources": ["arxiv", "nova"],
}),
payloadContentType="application/json",
sessionId=session_id,
authContext={
"authToken": access_token,
"authTokenType": "ACCESS_TOKEN",
},
)
for event in response["payloadStream"]:
if "chunk" in event:
chunk = json.loads(event["chunk"]["bytes"].decode("utf-8"))
if "data" in chunk:
print(chunk["data"], end="", flush=True)The
enabledSources field controls which data sources the agent uses, and the s3FileUris field passes Amazon S3 file paths for the agent to read and analyze. See the test scripts in the repository for complete examples.Extend with custom tools
You can add your own data source connectors to the application. Each tool is a standalone Lambda function behind AgentCore Gateway. This section walks through the structure.
Tool structure
Each tool consists of two files: a Lambda handler and a tool specification.
1
2
3
gateway/tools/your_tool/
  your_tool_lambda.py    # Lambda handler
  tool_spec.json         # MCP tool schema
Define the tool specification
The tool specification defines the MCP schema that the agent uses to understand what the tool does and how to call it. The following example shows a specification for a hypothetical internal API search tool:
1
2
3
4
5
6
7
8
9
10
11
12
13
14
15
16
17
18
19
20
[
  {
    "name": "internal_api_search",
    "description": "Search the company internal knowledge base for policies, procedures, and technical documentation.",
    "inputSchema": {
      "type": "object",
      "properties": {
        "query": {
          "type": "string",
          "description": "Search query for finding relevant internal documents"
        },
        "max_results": {
          "type": "integer",
          "description": "Maximum number of results to return (default 10)"
        }
      },
      "required": ["query"]
    }
  }
]
Implement the Lambda handler
The Lambda handler receives tool arguments as the event and returns results in a standard format:
1
2
3
4
5
6
7
8
9
10
11
12
13
14
15
16
17
18
19
20
21
22
import json
import logging

logger = logging.getLogger()
logger.setLevel(logging.INFO)

def handler(event, context):
    """Lambda handler for AgentCore Gateway tool."""
    logger.info(f"Received event: {json.dumps(event)}")

    try:
        query = event.get("query", "")
        max_results = event.get("max_results", 10)

        # Your tool logic here: call an API, query a database, etc.
        results = your_search_function(query, max_results)

        return {"content": [{"type": "text", "text": results}]}

    except Exception as e:
        logger.error(f"Error: {str(e)}")
        return {"error": f"Internal server error: {str(e)}"}
Register the tool in CDK
Add the new tool Lambda and Gateway target in the CDK backend stack, following the pattern of existing tools. Then add the tool key to
config.yaml under tools: and redeploy with npm run deploy. The agent automatically discovers the new tool through MCP and can use it in research tasks.For a complete walkthrough with working examples, see the sample tool in the repository.
Local development with Docker Compose
For faster iteration during development, you can run the agent and frontend locally using Docker Compose while still connecting to deployed AWS resources (Gateway, Memory, Secrets Manager):
1
2
cd docker
docker compose up
This starts the agent container on port 8080 and the frontend dev server on port 3000 with hot reload. See LOCAL_DEVELOPMENT.md for details on environment variables and authentication setup.
Clean up
To remove all resources created by the deployment, run the following command:
1
2
cd infra-cdk
npx cdk destroy --force
This deletes the AWS resources including Amazon S3 buckets, Amazon ECR images, and the AgentCore Runtime. If you leave resources running, you might incur charges. Amazon Bedrock AgentCore is pay per use.
Conclusion
In this post, we showed you how to deploy and use AgentCore Deep Research, an open-source sample application that automates multi-source research on Amazon Bedrock AgentCore. The modular architecture with Lambda-backed tools behind AgentCore Gateway makes it straightforward to connect new data sources, while the structured agent workflow and inline citations provide transparency into the research process.
To get started, clone the repository , deploy to your AWS account, and try a research query relevant to your domain. From there, add your own data connectors and customize the agent workflow for your use case. To learn more about Amazon Bedrock AgentCore, see the AgentCore documentation . For expert assistance with deploying and customizing the solution, the AWS Generative AI Innovation Center and AWS Professional Services can help.
We welcome your feedback and contributions on the GitHub repository .
Authors
Nikita Kozodoi, PhD is a Senior Applied Scientist at the AWS Generative AI Innovation Center, where he builds AI and agentic solutions for enterprise customers across industries, inlcuding Nasdaq, Ryanair and adidas. He holds a PhD in machine learning with publications at NeurIPS, KDD and ECML workshops, and has presentations at over 25 tech conferences.
Aiham Taleb, PhD, is a Senior Applied Scientist at the Generative AI Innovation Center, working directly with AWS enterprise customers to leverage Gen AI across several high-impact use cases. Aiham has a PhD in unsupervised representation learning, and has industry experience that spans across various machine learning applications, including computer vision, natural language processing, and medical imaging.
Jack Butler is an Applied Scientist at AWS, leading innovative projects at the AWS Generative AI Innovation Centre with a background applying large language models and applied AI research across a wide variety of enterprise and startup customers.
Liza Zinovyeva, PhD is an Applied Scientist at AWS Generative AI Innovation Center and is based in Berlin. She helps customers across different industries to integrate Generative AI into their existing applications and workflows. She is passionate about AI/ML, finance and software security topics. In her spare time, she enjoys spending time with her family, sports, learning new technologies, and table quizzes.
Enjoyed reading this content? Let the author know!
Your likes, comments, shares, and saves help creators reach more builders.

Loading recommendations
Loading article