

Building a Serverless remote MCP Server on AWS - Part 1
Build a serverless MCP server on AWS Lambda and Amazon API Gateway that any LLM can access remotely

If you've been working with LLMs lately, you've probably heard about the Model Context Protocol (MCP) . It's a standardized way for LLMs to access external tools and data. I recently built a remote MCP server on AWS Lambda, and I wanted to share what I learned.
This is part 1 of a 2-part series where I'll walk through how I implemented a serverless MCP server. In this post, I'll focus on the core implementation and architecture. Part 2 will cover security considerations.
What's MCP and Why Should You Care?
MCP is pretty straightforward, it's a protocol that lets LLMs call external tools. Think of it as a standardized API contract between LLMs and tool providers.
As a developer, this means you can build tools once and have them work with any MCP compatible LLM. No need to recreate tool specific logic AI application you want to develop.
STDIO vs. Streamable HTTP: Why This Matter
Most MCP examples you'll find use STDIO transport, which works great for local tools like those used with Claude Desktop or coding assistants. But MCP also supports Streamable HTTP transport, which is what we're implementing in this article and it's a game-changer.
Streamable HTTP lets us expose our MCP server to the world as a service. You are essentially creating an "MCP as a Service", let’s call it MCPaaS 😎. This opens up exciting business possibilities:
- You can expose your core business functionality as MCP tools that any compatible AI application can use
- Your users can incorporate your tools into their AI workflows seamlessly
- You can monetize access to specialized tools through subscription models
- Enterprise customers can integrate your tools into their existing AI systems without custom development
This is where the protocol is headed, toward a world of interconnected, specialized AI tools that can be composed and reused across different LLMs and applications.
The current MCP specification uses "Streamable HTTP" as a single transport that can optionally upgrade to SSE streaming. For our implementation we’ll focus on the raw HTTP use case. The combination of Amazon API Gateway and AWS Lambda is perfect for this scenario. It gives us exactly what we need: the ability to expose our tools as HTTP endpoints that clients can invoke on demand.
We get the benefits of serverless (pay-per-use, auto-scaling, zero management) while providing a simple, standard way for clients to access our tools.
Project Structure
Our MCP server implements the Streamable HTTP transport to comply with the current MCP specification :
- POST /mcp - The main endpoint for JSON-RPC 2.0 requests and responses
- GET /mcp - For establishing Server-Sent Events (SSE) streaming connections
- DELETE /mcp - For explicitly terminating sessions using the
Mcp-Session-Idheader
Since we're implementing a stateless HTTP-only server, we handle these methods as follows:
- POST: Processes all MCP tool calls and returns standard HTTP responses
- GET: Returns 405 Method Not Allowed (we've chosen not to implement SSE streaming for this stateless implementation)
- DELETE: Returns 405 Method Not Allowed (not needed, no sessions to terminate in stateless mode)
Our implementation structure using Express.js:
plaintext
/├── src/│ ├── routes/ # Defines the three required MCP routes│ ├── controllers/ # Implements the route handlers│ ├── services/ # Contains the MCP protocol implementation│ ├── middleware/ # Validates MCP headers and handles errors│ ├── app.ts # Express application setup│ └── lambda.ts # AWS Lambda entry point└── lib/└── lambda-mcp-server-stack.ts # AWS CDK infrastructure
This structure cleanly separates the routing layer from the MCP protocol implementation, making it easy to maintain and extend with additional tools.
The Core Components
AWS Lambda Handler
Let's start with the AWS Lambda handler - this is the entry point for all requests:
JavaScript
// src/lambda.tsimport serverless from 'serverless-http';import { APIGatewayProxyEvent, APIGatewayProxyResult, Context } from 'aws-lambda';import app from './app';const serverlessHandler = serverless(app);export const handler = async (event: APIGatewayProxyEvent, context: Context): Promise<APIGatewayProxyResult> => {const result = await serverlessHandler(event, context);return result as APIGatewayProxyResult;};
The handler uses the
serverless-http package to adapt our Express app for AWS Lambda. When Amazon API Gateway receives a request, it passes the event to this handler, which then routes it through our Express application and returns the response.Express App
Next, our Express app sets up the middleware and routes:
JavaScript
// src/app.tsimport express, { Express } from 'express';import { errorHandler } from './middleware/error-handler';import { validateMcpHeaders } from './middleware/mcp-headers';import mcpRoutes from './routes/mcp';export const createApp = (): Express => {const app = express();// Parse JSON request bodiesapp.use(express.json());// Validate MCP headersapp.use(validateMcpHeaders);// Route all /mcp requests to our MCP routesapp.use('/mcp', mcpRoutes);// Global error handler for JSON-RPC errorsapp.use(errorHandler);return app;};export default createApp();
This setup is straightforward - we parse JSON bodies, validate headers, route MCP requests to our handlers, and add error handling.
MCP Service and Tools
I've separated the MCP service implementation from the tool definitions to make the codebase more maintainable. First, let's look at the MCP service:
JavaScript
// src/services/mcp-service.tsimport { StreamableHTTPServerTransport } from "@modelcontextprotocol/sdk/server/streamableHttp.js";import { McpServer } from "@modelcontextprotocol/sdk/server/mcp.js";import { Request, Response } from "express";import appConfig from "../config/app-config";import { registerTools } from "./mcp-tools";export class McpService {async handleRequest(req: Request, res: Response): Promise<void> {const server = new McpServer({name: appConfig.server.name,version: appConfig.server.version});// Register all tools from the dedicated tools fileregisterTools(server);const transport: StreamableHTTPServerTransport = new StreamableHTTPServerTransport({sessionIdGenerator: undefined,enableJsonResponse: true,});res.on('close', () => {transport.close();server.close();});await server.connect(transport);await transport.handleRequest(req, res, req.body);}}export default new McpService();
The key part here is using
StreamableHTTPServerTransport instead of the STDIO transport that most local MCP examples use. This is what enables our MCP server to be accessible over HTTP and function as a service.Notice how the service now imports and uses a
registerTools function from a separate file. This is where all our tool definitions live. As a sports person and for the sake of this demo, I have implemented a series of health and fitness related tools.JavaScript
// src/services/mcp-tools.tsimport { McpServer } from "@modelcontextprotocol/sdk/server/mcp.js";import { z } from "zod";export function registerTools(server: McpServer): void {// BMI Calculatorserver.tool("calculate-bmi","Tool used to calculate the BMI of the user when requested to do so",{weightKg: z.number(),heightM: z.number()},async ({ weightKg, heightM }) => ({content: [{type: "text",text: String(weightKg / (heightM * heightM))}]}));// Additional fitness related tools}
This separation of concerns makes it easy to add new tools without modifying the core MCP service. Adding tools is as simple as defining them in the
mcp-tools.ts file.Routes and controller
The routes and controller files are all about routing the request to the McpService.
JavaScript
// routes/mcp/index.ts// ...router.post('/', handlePost);router.get('/', handleGet);router.delete('/', handleDelete);// ...// controller/mcp/index.ts//...export const handlePost = async (req: Request, res: Response): Promise<void> => {try {await mcpService.handleRequest(req, res);} catch (error) {//...}
Middlewares
I have implemented 2 middlewares for header validation and error handling that I omitted for sake of brevity.
Infrastructure with CDK
I used CDK to define the AWS resources. Here's the stack:
JavaScript
export class LambdaMcpServerStack extends cdk.Stack {constructor(scope: Construct, id: string, props?: cdk.StackProps) {super(scope, id, props);const mcpFunction = new nodejs.NodejsFunction(this, 'mcpFunction', {runtime: lambda.Runtime.NODEJS_22_X,memorySize: 1024,architecture: lambda.Architecture.ARM_64,entry: path.join(__dirname, '../src/lambda.ts'),handler: 'handler',})const mcpApi = new apigatewayv2.HttpApi(this, 'mcpApi', {corsPreflight: {allowOrigins: ['REPLACE_WITH_ORIGIN'],allowHeaders: ['Content-Type', 'X-Amz-Date', 'Authorization', 'X-Api-Key', 'X-Amz-Security-Token', 'X-Amz-User-Agent'],allowMethods: [apigatewayv2.CorsHttpMethod.GET, apigatewayv2.CorsHttpMethod.POST]}})// Create a Lambda integration for the mcpFunctionconst mcpIntegration = new integrations.HttpLambdaIntegration('mcpFunctionIntegration', mcpFunction)// Add a catch-all route that forwards any request to the mcpFunctionmcpApi.addRoutes({path: '/{proxy+}',integration: mcpIntegration})new cdk.CfnOutput(this, 'mcpApiUrl', {value: mcpApi.apiEndpoint})}}
The Amazon API Gateway setup is particularly important here because it's what enables our MCP server to be accessible over HTTP, turning our tools into a service that any MCP-compatible LLM can use remotely. This is the foundation of the "MCPaaS" approach I mentioned earlier.
Deployment
Deploying is straightforward with CDK:
JavaScript
# Install dependencies$ npm install# Deploy MCP server$ cdk deploy
After deployment, CDK will output the API Gateway URL where your MCP server is accessible.
Testing Your MCP Server
Using the MCP Inspector
The MCP project provides an excellent tool for testing MCP servers called the MCP Inspector. It's a web-based interface that makes it easy to discover and test your tools.
To use it, simply run:
npx @modelcontextprotocol/inspector@0.14.2 This will start a local web server and open a browser window with the MCP Inspector interface. Here's how to test your server:
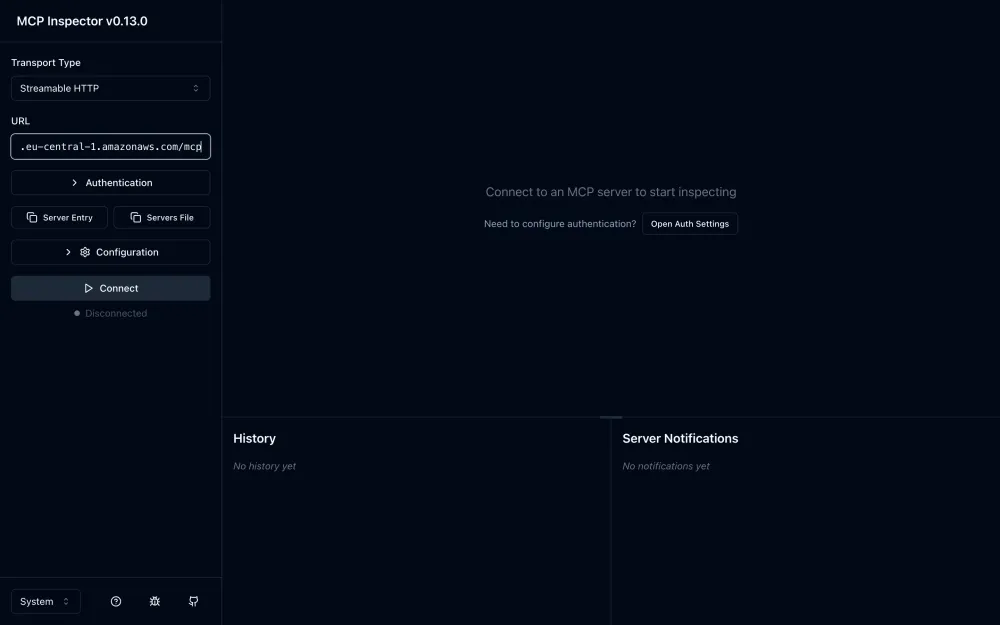
1. Connect to your MCP server
Enter your MCP endpoint (Amazon API Gateway URL + /mcp) in the connection field and click "Connect".
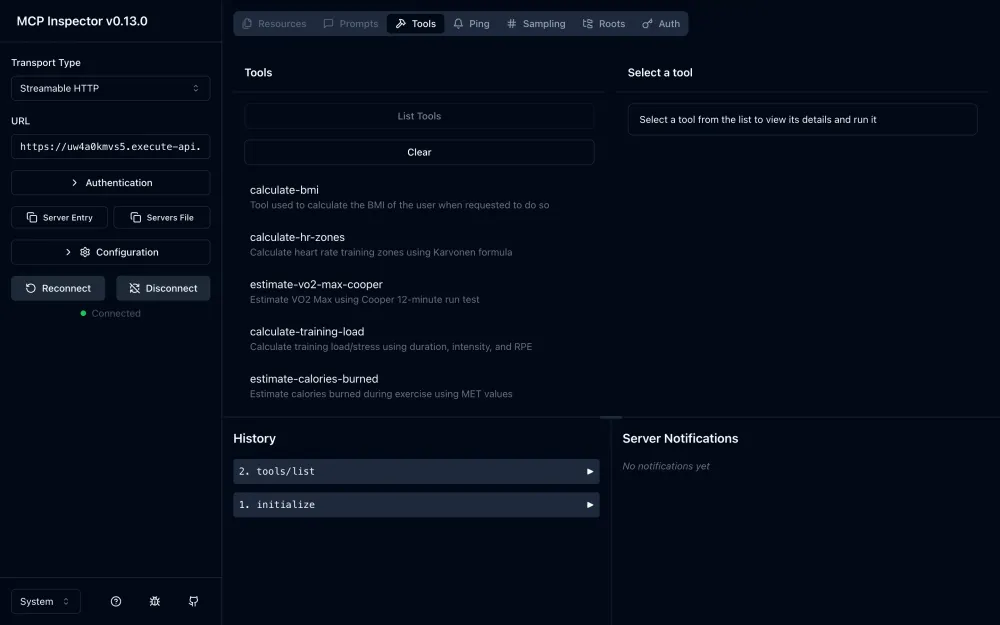
2. Discover available tools
Once connected, click on "List Tools" to see what tools are available on your server. You should see all tools appear in the list.
3. Test the VO2 Max calculator
Click on the estimate-vo2-max-cooper tool (or any other tool), enter the required parameters (distance run over 12min, gender and age), and click "Run". You'll see the calculated VO2 max result appear in the response section.
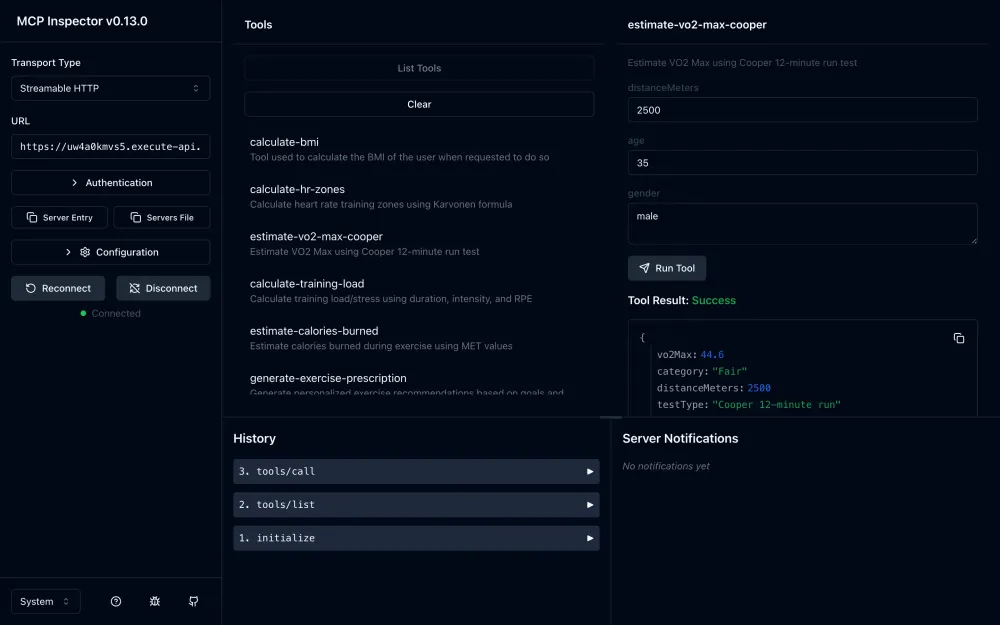
The MCP Inspector is invaluable for testing and debugging your MCP server. It provides a visual interface for exploring your tools and testing them with different parameters.
Testing with Claude Desktop
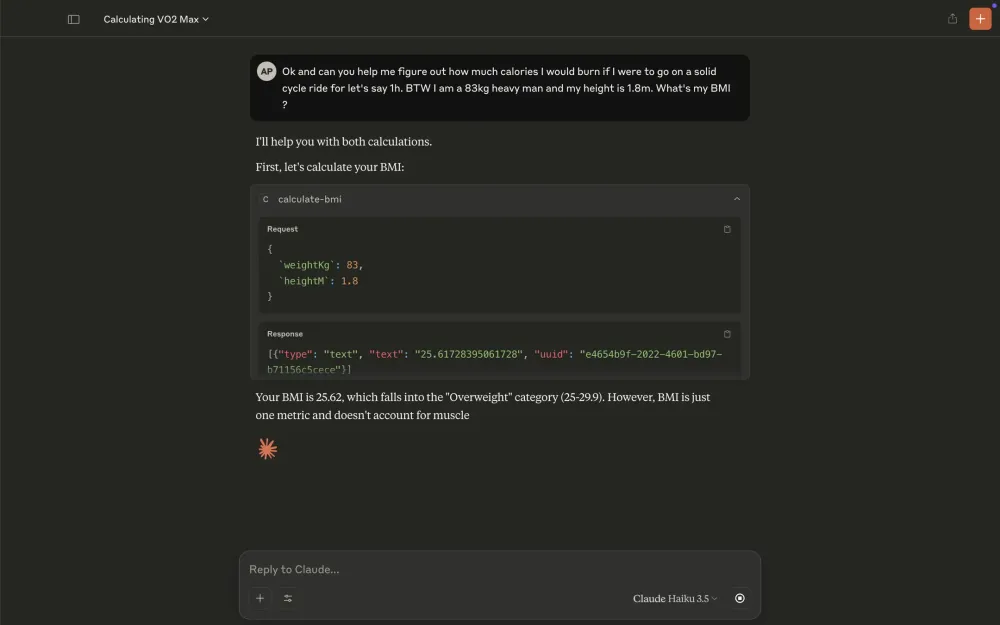
Now that we’ve validated that the remote MCP server is successfully working, we can use the URL of our MCP server to test it with Claude as it supports remote MCP servers as integrations.
Below, you will see a screenshot of a conversation with Claude, helping me figure out some key fitness metrics about myself leveraging the MCP server we just created. (Notice how Claude calls me overweight 🤣).
Conclusion
Building an MCP server on AWS Lambda is a great way to extend LLM capabilities without managing servers or spending a lot of money. The official MCP SDK makes implementation relatively straightforward, and the serverless approach keeps costs down.
What excites me most about this approach is how it transforms MCP from a local tool protocol into a globally accessible service. By leveraging Streamable HTTP transport and serverless architecture, we're creating the foundation for an ecosystem of specialized AI tools that can be composed and reused across different LLMs and applications.
For businesses, this means you can expose your domain expertise as MCP tools, allowing customers to integrate your specialized functionality directly into their AI workflows. Whether you're offering financial analysis, medical diagnostics, legal research, or any other specialized capability, MCP provides a standardized way to make that functionality available to AI systems.
For this implementation, we have purposefully created a public-facing MCP server, which allows any MCP-compatible client to access the tools we've exposed. In the next part, we'll explore how to secure these exposed tools and make the MCP server private, which is crucial when offering it as a service to customers.
What's Next?
In Part 2, I'll cover security considerations for your MCP server, including:
- Authentication and authorization
- Input validation beyond basic types
- Rate limiting
- Monitoring and logging
Resources
If you want to learn more about MCP and serverless:
Author
Alexis is a Senior Solutions Architect at Amazon Web Services. He works with startups across Middle-East and Africa. He focuses on serverless and GenAI architectures, often diving deep through live demos and hands-on solutions.
Legal & Security Disclaimers
Please note that the content presented in this document is designed solely for the demonstration of a Proof of Concept (PoC) and utilizes synthetic data to illustrate its capabilities. It does not incorporate production-grade security measures and should not be implemented as is in a production environment.
Security Awareness Disclaimer For any considerations of adopting these services in a production environment, it is imperative to consult with your company-specific security policies and requirements. Each production environment demands a uniquely tailored security assessment that comprehensively addresses its particular risks and regulatory standards. If in doubt, reach out to your AWS Account team.
Generative AI Disclaimer. The cover image for this article was generated with Amazon Nova Canvas.Relevant Security Resources
Enjoyed reading this content? Let the author know!
Your likes, comments, shares, and saves help creators reach more builders.

Loading recommendations
Loading article