

AWS Account Setup: My 10-Step Checklist After 14 Years
How I would set up my AWS account if I stared from scratch today with 14 years of 20/20 hindsight.

I still remember setting up my first AWS account in 2010, with no real understanding of what this "cloud" thing was other than "a VM hosted by someone else". Needless to say, I learnt a few things along the way since then. I would put this list of the ones with the biggest impact in chronological order if I could remember the exact order, so here is my best guess:
- Using AWS for more than "just another VM"
- Infrastructure as Code (IaC) (Bash scripts again -> CloudFormation -> Ansible -> Chef -> Terraform )
Somewhere in the middle of these should also be when I understood how to use multiple AWS accounts together to split specific workloads into different ones. Looking back, the biggest TIL (Today-I-Learned) was to focus on using whichever IaC you prefer consistently, and to divide your infrastructure into chunks that makes sense to you.
The steps in this post are documented in terraform-samples on GitHub , along with the Terraform modules used.
What are the first 10 things I would do in a new account today?
To get right to the point, let's list them along with the why:
- Enable MFA on my root user - the first step everyone should take when creating a new AWS account. You should not use your root user for day-to-day activity, and set up another non-root user as a first step.
- Enabling AWS Cost Explorer - allows you to see exactly which resources / services in which region with the cost and projected costs.
- Enabling IAM Identity Center - will enable AWS Organizations as well, then set the AWS access portal URL to a friendly name. Allows you to easily remember the URL to log into your AWS account with.
- Enabling Cost Optimization Hub - at some point, you always want to take a look at resource consumption vs what you have set up, and then optimize for your specific workload.
- Use IaC - Set up Terraform to use S3 to store the state file, and create your infrastructure.
- CI/CD pipeline for Terraform - allows previewing changes, and then applying them by merging the PR.
- AWS CloudTrail - Enabling CloudTrail across all AWS accounts to track all changes and help with troubleshooting
- Set up a Budget + Alert - Set up an AWS Budget with an alert when it reaches 75% of certain amount so you can be notified if you spin up resources that could cost more than you had planned.
- Centrally managing users - Creating an Admin and a Developer group in Identity Center with a user in each, then expanding the groups as needed.
- Local access - Setting up my local AWS CLI config to use the new user, along with the other tools used when building on AWS.
I'm sure there are more items that should be in this list, let me know in the comments below which ones you would definitely include. I wanted to include setting up multiple AWS accounts from the start, but decided that not everyone needs / uses that.
Some of you may already be getting ready to comment "Why do you only create users / groups in step 9 and not earlier, you know you shouldn't be using the root users!!!!" - don't worry, we'll get to that, just read on.
Make sure to pay attention to step 3 and set the friendly name for your access portal URL, we'll use this later to configure our AWS CLI to allow access to our account.
Chicken and Egg
For the first 4 steps in the list, there is (almost) no way to complete them without clicking in the AWS Console, but then you run into the Catch 22 where you want to create all your infrastructure as code, but you need some infrastructure for this. Instead of creating some temporary infrastructure, or creating it by hand, I'd rather do it in a way where I know what was created in a repeatable manner and not have to rely on remembering to document it somewhere. This starts with my initial Terraform state file. There are a number of backends you can use, my preference has always been an S3 bucket with a DynamoDB table for locks (to prevent concurrent
plan and apply commands being run). In theory all you really need is the S3 bucket, but it is highly recommended to enable versioning on it, encrypt it at rest, and also have that DynamoDB table for locking.To address this, I decided to create a reusable Terraform module that will do the initial "bootstrapping" for me. This allows defining all the resources I need to store the state file, and also creates the Terraform config to use this location. "But wait, that sounds like you need to do a lot of manual steps to move the state file...". Yes and no, let me show you.
Enter stage left: AWS CloudShell
We don't have any user other than the root one at this point, and I really don't want to set up IAM users or IAM Identity Center by hand. Instead, we will be using CloudShell to get us to a point where we have our infrastructure in a git repo (we'll use GitHub for this), along with a CI/CD pipeline to create our users for us. To do this, click on the CloudShell icon (top-right of the AWS Console, it is a small square with
>. in it), and then we need to take care of the following:- Change the region to the one where you want to create your infrastructure
- Install Terraform
- Create a new git repo and set up access to it
- Add a GitHub PAT to allow accessing the repo from CodeBuild
Install Terraform
To install Terraform, run the following in CloudShell:
Bash
# Uses Terraform 1.9.7, but feel free to use whichever version you needcd /tmp/ && \wget https://releases.hashicorp.com/terraform/1.9.7/terraform_1.9.7_linux_amd64.zip && \unzip terraform_1.9.7_linux_amd64.zip && \sudo mv terraform /usr/bin && \rm LICENSE.txt terraform_1.9.7_linux_amd64.zip && \cd -
Configure Git
Next, configure
git :Bash
git config --global user.name "Your Name"git config --global user.email "Your email"
You will need a way to authenticate with GitHub to allow pushing code to our repo, there are a number of ways to do this, I prefer to create a new SSH key in CloudShell. We will be doing a cleanup by deleting the CloudShell instance after setup, if we did forget to do that, it will be done automatically in 120 days of not using it. Which we will be since this is still the root user, and we aren't going to continue using it, right? To generate a new SSH key, you can run the following:
Bash
ssh-keygen -t ed25519cat ~/.ssh/id_ed25519.pub
Now copy the output of the 2nd command, and head over to GitHub. Add the SSH key to your user under settings -> ssh and gpg keys , with a name you'll remember, e.g. "Temp AWS TF setup". If you don't yet have a repo to store the Terraform code in, create one now. Afterwards, create a PAT ( Personal Access Token - the fine-grain one that is currently in beta ) with the following permissions:
- Repository access: All repositories - you can lock it down to just the single repo you are using to bootstrap your AWS account, but useful to allow for future pipelines for other repositories.
- Repository permissions:
- Contents: Read-only - used to read the source code for running in CodeBuild
- Metadata: Read-only - automatically set when selecting read-only for Contents
- Pull requests: Read and write - used to write a comment with the result of the build, and the
terraform planoutput for any pull request
- Webhooks: Read and write - CodeBuild will create a webhook to trigger the relevant build when code is committed / merged to the
mainbranch, or a new pull request is opened
Copy the PAT, and replace
your GitHub PAT in the following command that you will run in CloudShell - this stores the PAT in Systems Manager Parameter Store so that we can access it later when setting up our CI/CD pipeline for Terraform:Bash
aws ssm put-parameter \--name "/cicd/github_token" \--value "your GitHub PAT" \--type "SecureString" \--overwrite
Clone Your Repo
You should be able to clone your repo now with the following - remember to replace your username / organization name and the repo name:
Bash
# Replace the values below so the URL looks something like githube.com/myusername/my-repo without the <>.git clone git@github.com/<github org|username>/<repo name>
Create State File Backend
Now we can create the infrastructure with for our state file. The module we'll be using assumes the infrastructure code will be in the
terraform sub-directory, so create it after changing into the folder of the newly cloned repo with:Bash
mkdir terraform
Change into the
terraform directory, and add the following to bootstrap.tf after creating the file:Terraform
module "bootstrap" {source = "github.com/build-on-aws/terraform-samples//modules/bootstrap-aws-account"state_file_aws_region = "us-west-2"state_file_bucket_name = "name-for-the-state-file-bucket"}
Remember to change the
state_file_aws_region and state_file_bucket_name to values for your setup - the region where you want to create this infrastructure, and a unique name for the bucket. Now run the following, after the 2nd command, review the list of infrastructure that will be created, and enter yes to create it:Bash
terraform initterraform apply
This will create the S3 bucket (with versioning and encryption), DynamoDB table for locking, and an IAM policy allowing access to the state file resources - we'll use this in the next step when we set up CI/CD pipeline.
You will notice that new files for
terraform.tf and providers.tf were created, you can have a look inside each. The terraform.tf defines the S3 bucket and DynamoDB table to use, and the providers.tf specifies the version of Terraform to use, and versions of the providers (AWS and local). Currently our state file is only stored locally in CloudShell, run the following to copy it to the S3 bucket:Bash
terraform init -migrate-state
Congrats! We now have the backend configured! Let's make sure we don't lose this configuration:
Bash
git add .git commit -m "Create Terraform backend resources"git push
CI/CD Pipeline
We want to be able to review any infrastructure changes before we merge them, and make sure there aren't any syntax issues as well. To set up a pipeline using CodeBuild, we'll use a 2nd module. Add the following to the bottom of the
bootstrap.tf file - here are the variables you need to set:-
github_organization- either your GitHub username, or the GitHub organization name
-
github_repository- name of the repo
-
aws_region- region for the AWS resources
-
state_file_iam_policy_arn- generated policy to allow access to state file resources, used for the IAM Roles for the CodeBuild projects
Terraform
# Change values as needed:module "bootstrap_cicd_aws_codebuild" {source = "github.com/build-on-aws/terraform-samples//modules/bootstrap-cicd-aws-codebuild"github_organization = "your org | github username"github_repository = "your repo name"aws_region = "us-east-2"state_file_iam_policy_arn = module.bootstrap.state_file_iam_policy_arncodebuild_terraform_version = "1.9.7"}
This will use the GitHub PAT we stored in Parameter Store to set up GitHub access for CodeBuild, which in turn will create a webhook in the GitHub repo to trigger CodeBuild when there is a new commit, PR, or update to a PR. It creates 2 CodeBuild jobs, one for PRs that will check the syntax, formatting, and generate the
plan to be added as a comment to the PR to allow reviewing. The other CodeBuild job will run apply when there is a commit on the main branch, e.g. when you merge a PR. To create these, run the following:Terraform
# Pulls the new modulesterraform initterraform apply
Our CI/CD pipeline is now ready, let's commit the changes before we test it:
Bash
git add .git commit -m "Adding the CI/CD pipeline"git push
Creating IAM Identity Center Users and Groups
We'll be using our new pipeline to create our users and groups. First, let's create a new branch:
Bash
git checkout -b add-identity-center
There are 4 main components when using IAM Identity Center:
- Groups - a group that users can belong to
- Users - the users that are linked to at least 1 group
- Permission sets - IAM policies specifying access to resources, either AWS-provides, or user-created
- Account Assignments - linking a group to the permission set in a specific AWS account
In this setup, we are only using 1 AWS account, but if you had multiple accounts, you would be able to assign an IAM policy per account to each group for each account. I'd recommend having the same policy in each account, and then decide which ones to use per AWS account for each group. To illustrate, let's say we have an Admin group and 2 AWS accounts. It would make sense to add the
AdministratorAccess AWS-managed IAM policy for both of those accounts, but there may be a scenario where no-one is allowed full admin access to one of these accounts. In that case you would want to specify a different IAM policy, I'll write a follow-up post to dive into this in much more detail and link it here when published.For now, let's set up an
Admin and a Developers group. The Admin one will have full access via AdministratorAccess , and the Developers one will only have read-only access via the ViewOnlyAccess IAM policy. We'll also add 2 users, Mary Major who has admin access, and John Doe that only has read-only access as part of the Developers group. Create a new file called identity-center.tf , and add the following:Terraform
#--------------------## Retrieve account id#--------------------#data "aws_caller_identity" "current" {}locals {# Group definitionssso_groups = {Admin = {group_name = "Admin"group_description = "Admin IAM Identity Center Group"},Developers = {group_name = "Developers"group_description = "Dev IAM Identity Center Group"}}# User definitionssso_users = {marymajor = {group_membership = [local.sso_groups.Admin.group_name]user_name = "marymajor"given_name = "Mary"family_name = "Major"email = "marymajor@example.com"},johndoe = {group_membership = [local.sso_groups.Developers.group_name]user_name = "johndoe"given_name = "John"family_name = "Doe"email = "johndoe@example.com"}}# Permission sets definitionspermission_sets = {AdministratorAccess = {description = "Provides AWS full access permissions."session_duration = "PT4H"aws_managed_policies = ["arn:aws:iam::aws:policy/AdministratorAccess"]tags = { ManagedBy = "Terraform" }},ViewOnlyAccess = {description = "Provides AWS view only permissions."session_duration = "PT3H"aws_managed_policies = ["arn:aws:iam::aws:policy/job-function/ViewOnlyAccess"]tags = { ManagedBy = "Terraform" }}}# Account assignmentsaccount_assignments = {Admin = {principal_name = local.sso_groups.Admin.group_nameprincipal_type = "GROUP"principal_idp = "INTERNAL"permission_sets = ["AdministratorAccess"]account_ids = [data.aws_caller_identity.current.account_id]},Developers = {principal_name = local.sso_groups.Developers.group_nameprincipal_type = "GROUP"principal_idp = "INTERNAL"permission_sets = ["ViewOnlyAccess"]account_ids = [data.aws_caller_identity.current.account_id]}}}module "aws-iam-identity-center" {source = "aws-ia/iam-identity-center/aws"# Use local variables for groups, users, permission sets, and account assignmentssso_groups = local.sso_groupssso_users = local.sso_userspermission_sets = local.permission_setsaccount_assignments = local.account_assignments}
Update the users and email addresses to suit your needs - this will need to be an email address you have access to as we'll be resetting the password in the next part. Instead of running
terraform apply in CloudShell, let's use our new pipeline. Commit the changes to the branch we created, and then push the changes with:Bash
git add .git commit -m "Adding Identity Center"git push --set-upstream origin add-identity-center
If you go to your repo in the GitHub website, you should see a message pop up asking if you want to create a pull request from this new branch, do that by following the instructions. After a few seconds you should see a message in the PR that CodeBuild job is currently running, and when it completes, it should print out a message similar to this:
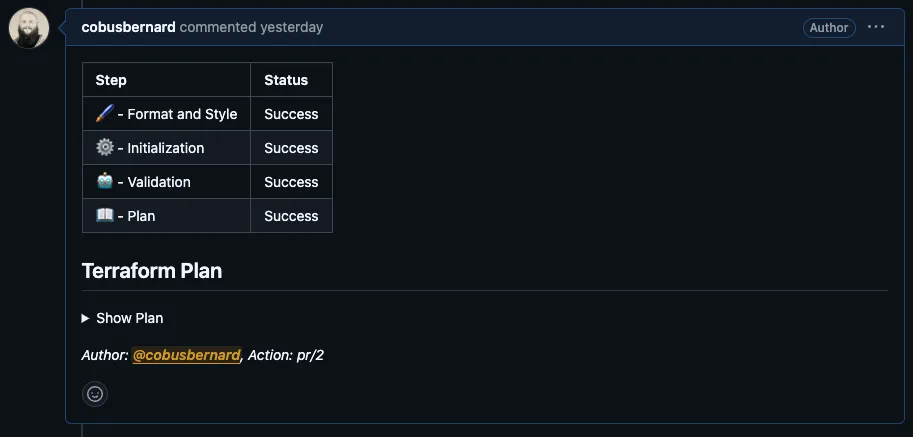
You can click on
Show Plan to expand and see all the resources that will be created. After reviewing the changes, merge the PR. If you navigate back to the main branch of your repo on GitHub, you will see a yellow/orange dot next to the commit - this indicates the CodeBuild job is running. When it has completed successfully, it will add a green checkmark like this: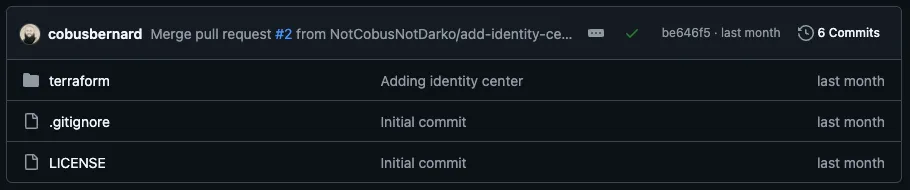
Home Stretch - Adding CloudTrail and a Budget with an Alert
At this point, we can switch to using our own development environment. Since we created our Identity Center user without specifying a password, we need to use the reset password mechanism to access that user. We do want to confirm we can access our account before we log out as the root user. First, go to your Identity Center instance and copy the access portal URL, then open a private / incognito window in your browser (or open a different browser) and open that URL. Enter your email address, and when asked for the password, click on "forgot password". Following the email instructions - just make sure you open up the link in the private / incognito window and not your main browser where you are logged in as the root user. Once the password has been reset and you are logged in, install the latest version 2 of the AWS CLI , and then run
aws configure sso locally. It will ask for the following:- SSO Session name - name for the session, this can be used later when setting up multiple AWS accounts, or multiple roles to assume, for now, set it a short string identifying this AWS account
- SSO start URL - open up IAM Identity Center and copy the URL that you set earlier and paste it in
- SSO region - set it to the same one used in the Terraform code
- SSO registration scopes - set this to
sso:account:access
It will open up the browser to authenticate. Once the process has completed, let's make sure everything is working as expected. First, let's clone our infrastructure repo locally with (changing the values to yours):
Bash
git clone git@github.com/<org|github uername>/<repo name>
Then change to the repo folder and then into the
terraform directory. Run the following to install the providers, modules, and set up access to the state file:Bash
terraform init
If everything is configured correctly, it should successfully complete. We can now add CloudTrail and a Budget (with an Alert), but first, we need a new branch to create a PR from:
Bash
git checkout -b add-cloudtrail-budget-alert
CloudTrail uses an S3 bucket to store the logs in, and it should be a different from the one for the state file. We'll create it using another module, create a new file called
cloudtrail.tf , and add the following (and update the values with your ones):Terraform
module "bootstrap_cloudtrail" {source = "github.com/build-on-aws/terraform-samples//modules/bootstrap-cloudtrail"aws_region = "us-west-2"cloudtrail_bucket_name = "name for your S3 bucket to store the trails"cloudtrail_name = "friendly name for the trail"}
Next, we create
budget.tf and add the following - feel free to uncomment the last 3 lines to change to values you want, those are the defaults for the module:Terraform
module "budget_billing_alert" {source = "github.com/build-on-aws/terraform-samples//modules/aws-billing-budget-notification"budget_email_address = "your-email-address@example.com"# budget_alert_amount = 10# budget_alert_currency = "USD"# budget_alert_threshold_percentage = 75}
Just as a sanity check, let's do a local
plan after we pull down the new modules with init :Bash
terraform initterraform plan
Again, it should completely successfully. Let's commit this to our branch, and push it to GitHub:
Bash
git add .git commit -m "Adding CloudTrail and a Budget + Billing Alert"git push --set-upstream origin add-cloudtrail-budget-alert
Then go to GitHub in your browser, and create the PR. While we wait for the build job to validate the changes, we can delete our CloudShell instance, log out of the root account, and back in with our new user.
Clean up CloudShell, log out as root, and in as user
You can close the private / incognito window as we'll be logging back in using our primary browser soon. But first, click on the `Actions" dropdown for CloudShell, and then
Delete - this will remove all the changes we made (SSH key, checked out code, terraform, etc). Remember to also delete the temporary SSH key from your GitHub account at this point. Copy the portal access URL from Identity Center again, then log out of the account. Afterwards, paste in the login URL, and log back in. Now is a good time to go check on that PR we created, and merge it if there weren't any errors.So, What's Next?
This was just the start of how I would manage my AWS account(s), I'm planning to do a number of follow-up pieces, so ping me in the comments if you have specific requests. At the moment, I'm looking at the following (in no particular order):
- Deep dive into how the modules were built
- Using GitHub Actions instead of CodeBuild for the CI/CD pipeline
- Setting up multiple AWS accounts, with Identity Center access to each
- Creating new GitHub repos for projects / services with the base Terraform in each to start with a CI/CD pipeline similar to this post's one
- Managing my personal DNS domains and mail with Route53 and Terraform
- Setting up Traefik as a reverse proxy for my home lab using Route53 for DNS to make it easy to spin up containers with friendly URLs that have SSL certs
- Tips to speed up my workflow when using Terraform for AWS infrastructure
- Overview of how to build Terraform modules and the different ways to host them
- Building out a module to create an ECS cluster to use with multiple AWS accounts (dev, test, prod, etc)
Final Thoughts
This is one way to approach setting up your new AWS account, and is my opinionated take on it. I would love to hear of anything you would do differently, or if I missed a critical step for a new account. Feel free to add a comment below, of ping me on any of the following:
Enjoyed reading this content? Let the author know!
Your likes, comments, shares, and saves help creators reach more builders.

Loading recommendations
Loading article