
Optimize IP with Subnet Selection for Pods in Amazon EKS Auto Mode
Learn how to prevent IP address exhaustion in Amazon EKS Auto Mode by implementing Selection for Pods with secondary VPC CIDR ranges, ensuring reliable container deployments at scale.

Optimize IP with Subnet Selection for Pods in Amazon EKS Auto Mode
Introduction
IP address exhaustion in Amazon Elastic Kubernetes Service (EKS) Auto Mode can lead to service disruptions and deployment failures, impacting your application's availability and scalability. As organizations leverage EKS Auto Mode to dynamically scale resources, a limited IP address space in the configured VPC often becomes a critical bottleneck. This is particularly challenging when running large scale workloads with rapid scaling events. In this post, I'll show you how to implement Subnet Selection for Pods in EKS Auto Mode to effectively manage IP address allocation and prevent outages caused by IP exhaustion. By leveraging subnet selection for pods with secondary VPC CIDR ranges, you can create a robust networking architecture that supports your cluster's growth while maintaining operational stability.
When optimizing IPs or addressing IP exhaustion in your clusters, subnet selection for pods can accept additional subnets from your existing VPC primary CIDRs, a valid VPC CIDR from RFC1918 range for secondary CIDR range, or using recommended CIDRs (/16) from the CG-NAT space, i.e. 100.64.0.0/10 as this is less likely to be used in a corporate setting than other RFC1918 ranges.
Solution overview
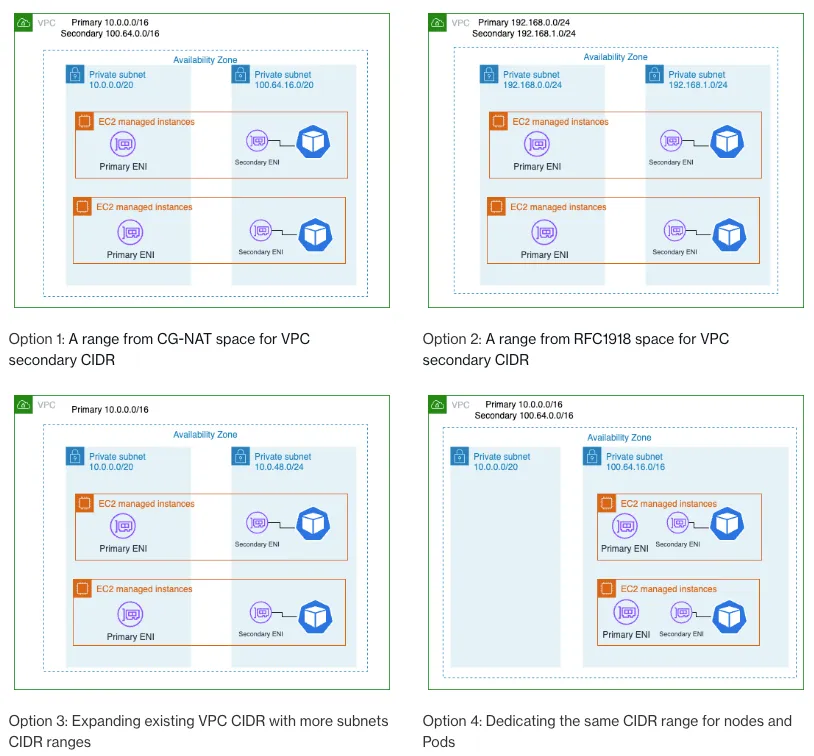
As shown in the following Option 1 diagram, the primary Elastic Network Interface (ENI ) of the worker node still uses the primary VPC CIDR range (in this case 10.0.0.0/16) but the secondary ENIs use the secondary VPC CIDR Range (in this case 100.64.0.0/16). Now, in order to have the Pods use the 100.64.0.0/16 CIDR range EKS Auto Mode, you must configure the NodeClass
The Option 2, Option 3 and Option 4 diagrams illustrates the additional options you can implement to address IP exhaustion challenges depending on your desired outcome.
podSubnetSelectorTerms and podSecurityGroupSelectorTerms fields that enables advanced networking configurations by allowing pods to run in different subnets than their nodes.The Option 2, Option 3 and Option 4 diagrams illustrates the additional options you can implement to address IP exhaustion challenges depending on your desired outcome.

Option 1: A range from CG-NAT space for VPC secondary CIDR

Option 2: A range from RFC1918 space for VPC secondary CIDR

Option 3: Expanding existing VPC CIDR with more subnets CIDR ranges

Option 4: Dedicating the same CIDR range for nodes and Pods
Prerequisites
- You have properly installed and configured latest versions of AWS Command Line Interface (AWS Command Line Interface [AWS CLI ]), kubectl , and terraform .
Walkthrough
For this demonstration, we are going to create an EKS Auto Mode cluster using a pattern from Amazon EKS Blueprints for Terraform .
Step1: Create an EKS Auto Mode Cluster
To get started, clone the repo from here .
Deploy the pattern by applying the terraform files:
1
2
3
4
git clone https://github.com/aws-ia/terraform-aws-eks-blueprints.git
cd terraform-aws-eks-blueprints/patterns/eks-automode/automode-custom-nodepools
terraform init
terraform apply -auto-approve
Verify the provisioned EKS Auto Mode cluster
1
2
3
4
5
6
7
8
9
10
11
12
% kubectl get nodes
No resources found

% kubectl get nodepool
NAME       NODECLASS       NODES   READY   AGE
amd64      ebs-optimized   0       True    46m
graviton   ebs-optimized   0       True    46m

% kubectl get nodeclasses.eks.amazonaws.com
NAME            ROLE                                   READY   AGE
basic           automode-cgnat-AmazonEKSAutoNodeRole   True    46m
ebs-optimized   automode-cgnat-AmazonEKSAutoNodeRole   True    46m
Deploy the sample application provided in the pattern to use custom NodePools to provision nodes in the cluster.
1
kubectl apply -f sample-app.yaml
Verify the pods
1
2
3
4
5
% kubectl get pods -o wide
NAME      READY   STATUS    RESTARTS   AGE     IP            NODE                  NOMINATED NODE   READINESS GATES
httpd-0   1/1     Running   0          3m26s   10.0.13.160   i-0e019c092da2de585   <none>           <none>
httpd-1   1/1     Running   0          2m25s   10.0.13.161   i-0e019c092da2de585   <none>           <none>
httpd-2   1/1     Running   0          2m18s   10.0.13.162   i-0e019c092da2de585   <none>           <none>
Step 2: Configure your VPC
- Get and Set EKS cluster networking details
1
2
3
4
export your_cluster_name="automode-cgnat"
VPC_ID=$(aws eks describe-cluster --name $your_cluster_name --query 'cluster.resourcesVpcConfig.vpcId' --output text --region us-east-1)
SG_ID=$(aws eks describe-cluster --name $your_cluster_name --query 'cluster.resourcesVpcConfig.securityGroupIds[0]' --output text --region us-east-1)
echo "VPC_ID: $VPC_ID SG_ID: $SG_ID"- Create 2 new subnets for pod and node, verify its NACL and Routes
1
aws ec2 describe-subnets --filters "Name=vpc-id,Values=$VPC_ID" --query 'Subnets[*].{SubnetId:SubnetId,CidrBlock:CidrBlock,AvailabilityZone:AvailabilityZone}' --output table --region us-east-1
An example output is as follows.
1
2
3
4
5
6
7
8
9
10
------------------------------------------------------------------
|                         DescribeSubnets                        |
+-------------------+---------------+----------------------------+
| AvailabilityZone  |   CidrBlock   |         SubnetId           |
+-------------------+---------------+----------------------------+
|  us-east-1a       |  10.0.48.0/24 |  subnet-example1           |
|  us-east-1b       |  10.0.49.0/24 |  subnet-example2           |
|  us-east-1a       |  10.0.0.0/20  |  subnet-example3           |
|  us-east-1b       |  10.0.16.0/20 |  subnet-example4           |
+-------------------+---------------+----------------------------+- Define variables with the values of the private subnet IDs created by the template.
1
2
3
subnet_id_1=$(aws ec2 describe-subnets --filters "Name=vpc-id,Values=$VPC_ID" "Name=tag-value,Values=*private*" --query 'Subnets[0].SubnetId' --output text  --region us-east-1)
subnet_id_2=$(aws ec2 describe-subnets --filters "Name=vpc-id,Values=$VPC_ID" "Name=tag-value,Values=*private*" --query 'Subnets[1].SubnetId' --output text  --region us-east-1)
echo $subnet_id_1 $subnet_id_2- Define variables with the Availability Zones of the subnets retrieved in the previous step.
1
2
3
az_1=$(aws ec2 describe-subnets --subnet-ids $subnet_id_1 --query 'Subnets[*].AvailabilityZone' --output text --region us-east-1)
az_2=$(aws ec2 describe-subnets --subnet-ids $subnet_id_2 --query 'Subnets[*].AvailabilityZone' --output text --region us-east-1)
echo $az_1 $az_2- Associate an additional CIDR block to your VPC. Replace the CIDR block value in the following command.
- We are using a CIDR block from CG-NAT for this demo.
1
aws ec2 associate-vpc-cidr-block --vpc-id $VPC_ID --cidr-block 100.64.0.0/16 --region us-east-1- Confirm that the new block is associated.
1
aws ec2 describe-vpcs --vpc-ids $VPC_ID --query 'Vpcs[*].CidrBlockAssociationSet[*].{CIDRBlock: CidrBlock, State: CidrBlockState.State}' --output table --region us-east-1
An example output is as follows.
1
2
3
4
5
6
7
8
---------------------------------
|         DescribeVpcs          |
+----------------+--------------+
|    CIDRBlock   |    State     |
+----------------+--------------+
|  10.0.0.0/16   |  associated  |
|  100.64.0.0/16 |  associated  |
+----------------+--------------+- Create as many subnets as you want to use in each Availability Zone that your existing subnets are in.
- Specify a CIDR block that’s within the CIDR block that you associated with your VPC in a previous step.
1
2
3
4
5
6
7
new_subnet_id_1=$(aws ec2 create-subnet --vpc-id $VPC_ID --availability-zone $az_1 --cidr-block 100.64.16.0/20 \
    --tag-specifications 'ResourceType=subnet,Tags=[{Key=Name,Value=pod-subnet},{Key=kubernetes.io/role/pod,Value=1}]' \
    --query Subnet.SubnetId --output text --region us-east-1)
new_subnet_id_2=$(aws ec2 create-subnet --vpc-id $VPC_ID --availability-zone $az_2 --cidr-block 100.64.32.0/20 \
    --tag-specifications 'ResourceType=subnet,Tags=[{Key=Name,Value=pod-subnet},{Key=kubernetes.io/role/pod,Value=1}]' \
    --query Subnet.SubnetId --output text --region us-east-1)
echo $new_subnet_id_1 $new_subnet_id_2 - View the current subnets in your VPC.
1
2
3
aws ec2 describe-subnets --filters "Name=vpc-id,Values=$VPC_ID" \
    --query 'Subnets[*].{SubnetId: SubnetId,AvailabilityZone: AvailabilityZone,CidrBlock: CidrBlock}' \
    --output table --region us-east-1
An example output is as follows.
1
2
3
4
5
6
7
8
9
10
11
12
--------------------------------------------------------------------
|                          DescribeSubnets                         |
+------------------+------------------+----------------------------+
| AvailabilityZone |    CidrBlock     |         SubnetId           |
+------------------+------------------+----------------------------+
|  us-east-1a      |  10.0.48.0/24    |  subnet-example1           |
|  us-east-1b      |  10.0.49.0/24    |  subnet-example2           |
|  us-east-1b      |  100.64.32.0/20  |  subnet-example3           |
|  us-east-1a      |  100.64.16.0/20  |  subnet-example4           |
|  us-east-1a      |  10.0.0.0/20     |  subnet-example5           |
|  us-east-1b      |  10.0.16.0/20    |  subnet-example6           |
+------------------+------------------+----------------------------+
Step 3: Configure Subnet selection for Pods
- Copy the example configuration into a file
nodeclass-cgnat.yamlto create NodeClass:
1
2
3
4
5
6
7
8
9
10
11
12
13
14
15
16
17
18
19
20
21
22
23
24
25
26
27
28
29
30
apiVersion: eks.amazonaws.com/v1
kind: NodeClass
metadata:
  name: cgnat
spec:
  # Use role name here
  role: "${node_iam_role_name}"
  subnetSelectorTerms:
    - tags:
        Name: "${cluster_name}-private*"
  securityGroupSelectorTerms:
    - tags:
        Name: "${cluster_name}-node"
  ephemeralStorage:
    size: "80Gi"    # Range: 1-9000Gi or 1-64000G or 1-58Ti or 1-64T
    iops: 3000      # Range: 3000-16000
    throughput: 125 # Range: 125-1000
  tags:
    Environment: "production"
    Team: "platform"

  # Separate subnets for pods
  podSubnetSelectorTerms:
    - tags:
        Name: "pod-subnet"
        kubernetes.io/role/pod: "1"

  podSecurityGroupSelectorTerms:
    - tags:
Name: "${cluster_name}-node"- Set your environment variable
Replace the variables with your own values.
1
2
3
4
export cluster_name="automode-cgnat"
export node_iam_role_name="automode-cgnat-AmazonEKSAutoNodeRole"
sed -i "" "s/\${cluster_name}/$cluster_name/g" nodeclass-cgnat.yaml
sed -i "" "s/\${node_iam_role_name}/$node_iam_role_name/g" nodeclass-cgnat.yaml- Create the NodeClass
1
2
kubectl apply -f nodeclass-cgnat.yaml
nodeclass.eks.amazonaws.com/cgnat created- Edit the existing NodePool to set the NodeClass field to the new NodeClass created in the previous step
1
2
3
4
5
6
7
kubectl edit NodePool
...
      nodeClassRef:
        group: eks.amazonaws.com
        kind: NodeClass
        name: cgnat
...- Verify the Pods are assigned IPs from the CG-NAT CIDR after a rolling update has been completed
1
2
3
4
5
% kubectl get po -A -o wide
NAMESPACE   NAME      READY   STATUS    RESTARTS   AGE   IP              NODE                  NOMINATED NODE   READINESS GATES
default     httpd-0   1/1     Running   0          73s   100.64.26.128   i-0361a68ba052db698   <none>           <none>
default     httpd-1   1/1     Running   0          50s   100.64.26.129   i-0361a68ba052db698   <none>           <none>
default httpd-2 1/1 Running 0 45s 100.64.26.130 i-0361a68ba052db698 <none> <none>- Verify that the Nodes uses IP address from the VPC primary CIDR range
1
2
3
 % kubectl get node -o wide
NAME                  STATUS   ROLES    AGE     VERSION               INTERNAL-IP   EXTERNAL-IP   OS-IMAGE                                                             KERNEL-VERSION   CONTAINER-RUNTIME
i-0361a68ba052db698   Ready    <none>   3m12s   v1.32.5-eks-98436be   10.0.4.228    <none>        Bottlerocket (EKS Auto, Standard) 2025.8.1 (aws-k8s-1.32-standard)   6.1.144          containerd://1.7.27+bottlerocket
Verify the AZ of the provisioned node. The AZ of the node matches the AZ of the Pod subnet.
1
2
3
kubectl get nodeclaims.karpenter.sh
NAME          TYPE         CAPACITY    ZONE         NODE                  READY   AGE
amd64-jvlt6   c6a.xlarge   on-demand   us-east-1a   i-0361a68ba052db698   True    13m
If you want the Nodes to be assigned IPs from the CG-NAT CIDR, you can use
subnetSelectorTerms to select matching tags from the CG-NAT subnets.Clean Up
First, remove the sample app and/or any other application that you deployed ot the cluster:
1
kubectl delete -f sample-app.yaml
Delete the subnets that you created in a previous step.
1
2
aws ec2 delete-subnet --subnet-id $new_subnet_id_1
aws ec2 delete-subnet --subnet-id $new_subnet_id_2
Then, destroy the infrastructure created with terraform:
1
terraform destroy
Conclusion
In this post, I showed how to optimize IP address management in Amazon EKS Auto Mode using subnet selection for pods configurations. By implementing secondary CIDR ranges and configuring pod subnet selection, you can effectively address IP exhaustion challenges while maintaining the security and reliability of your Kubernetes workloads. This solution not only helps prevent outages but also provides the flexibility to scale your applications with confidence.
To further enhance your EKS networking architecture, you might want to explore:
- Custom Networking Best Practices Guide
- Pattern for EKS Auto Mode with custom NodePool and NodeClass
- Subnet selection for Pods in Auto Mode
For more information, check out the Amazon EKS Networking documentation and the
Amazon EKS Auto Mode Workshop .
Amazon EKS Auto Mode Workshop .
Have you encountered IP exhaustion challenges in your EKS clusters? Share your experiences and solutions in the comments.
Enjoyed reading this content? Let the author know!
Your likes, comments, shares, and saves help creators reach more builders.

Loading recommendations
Loading article