
Deploy a Cloud Database to Scale a LAMP App
A key method for increasing application capacity is re-architecting monolithic applications and applying horizontal scaling. Managed cloud services simplify the process of breaking apart monoliths into component services. This tutorial demonstrates how to migrate and scale a monolithic application to distributed cloud architecture.


In previous tutorials we deployed a single application on a VPC . Applications like these are called monolithic applications because all the components are tightly coupled in a single server. Cloud architectures are frequently loosely coupled with application components connected via the network. This tutorial is an update of a Lightsail workshop .
Unlike the tutorial, and in keeping with conventions of the Practical Cloud Guide. we will complete an updated version of the workshop with the AWS CLI instead of the AWS Lightsail console. we will deploy a monolithic LAMP (Linux, Apache, MySQL, PHP) application and an external relational database, the replace the monolithic app’s database with the external database. In addition, we will scale the application by adding additional servers to a load balancer that distributes requests to the servers.
What You Will Learn
- How to deploy a LAMP stack application as a monolith in a single Lightsail instance.
- Re-architect the application by separating the application from the database.
- Scaling and load balancing the LAMP stack.
Prerequisites
Info | |
|---|---|
✅ AWS Level | 200 - Intermediate |
⏱ Time to complete | 45 minutes |
💰 Cost to complete | Free when using the AWS Free Tier or USD 1.01 |
🧩 Prerequisites | - An AWS account: If you don't have an account, follow the Setting Up Your AWS Environment tutorial for a quick overview. For a quick overview for creating account follow Create Your AWS Account .
- AWS credentials: Follow the instructions in Access Your Security Credentials to get your AWS credentials
-A Cloud9 environment for an individual .
- AWS CLI V2 installed .
- AWS Lightsail CLI plugin for Linux installed
- A git client: Follow the instructions to Install Git for your operating system. |
💻 Code Sample | Code sample used in tutorial on GitHub |
📢 Feedback | Any feedback, issues, or just a 👍 / 👎 ? |
⏰ Last Updated | 2023-08-11 |
Module 1: Deploy a Monolithic App
In a monolithic application all the components are in a single VPS. In this example, the components include a MySQL database. a PHP application framework, and the application all hosted in a single Lightsail instance.
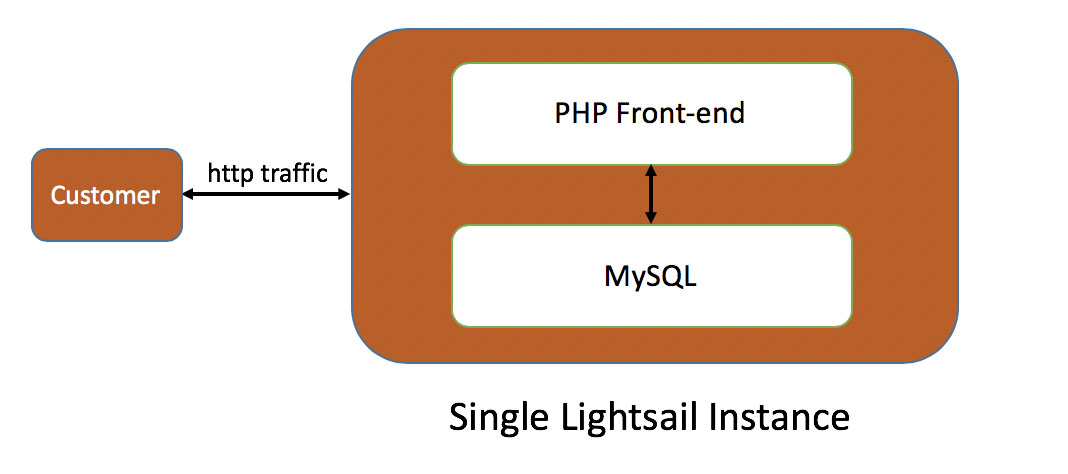
We will deploy the application on a AWS Lightsail Virtual Private Server (VPS) using the Lightsail command line client (CLI). The CLI provides a way to configure the server at launch with commands or a shell script. A script can install software, change file permissions, and set configuration parameters that a server requires for deploying an application.
This tutorial uses a script that does the following:
- The Bitnami image has a default web page installed which needs to be removed. The script starts by changing into the root directory of the web server (/opt/bitnami/apache2/htdocs) and deleting the existing files
- Next the script clones the application code to render the web front-end from the lab’s Github repo
- To ensure that the PHP application can write to the settings file (connectvalues.php), the script changes the ownership (chown) on the file to match the account under which the Apache web server runs, as well as ensuring that account can write to the file (via chmod)
- Each Bitnami-based instance generates a unique password for the locally installed MySQL database, this next command in the script opens the settings file and updates it with this password (which can be found at /home/bitnami/bitnami_application_password)
- Finally the script issues a set of SQL commands to MySQL (via the MySQL command line tool) that will initialize the local database
Copy the script and save it to a file named
launch.sh .Bash
#!/bin/bashecho "removing default website"cd /opt/bitnami/apache2/htdocsrm -rf *echo "cloning github repo"git clone https://github.com/build-on-aws/sample-php-app .echo "setting ownership on settings file"sudo chown bitnami:daemon connectvalues.phpsudo chmod 666 connectvalues.phpecho "adding db password to settings file"sed -i.bak "s/<password>/$(cat /home/bitnami/bitnami_application_password)/;" /opt/bitnami/apache2/htdocs/connectvalues.phpecho "creating tasks database"cat /opt/bitnami/apache2/htdocs/data/init.sql | /opt/bitnami/mariadb/bin/mysql -u root -p$(cat /home/bitnami/bitnami_application_password)
To ease deployments, AWS Lightsail VPS are preconfigured with commonly used software called
blueprints . Our application is deployed on a LAMP stack and we can use the the Lightsail CLI to find a LAMP stack blueprint. Use the get-blueprints command and filter the results using the Linux utility grep .Bash
aws lightsail get-blueprints | grep lamp"group": "lamp_8_bitnami","blueprintId": "lamp_8_bitnami",
We need to specify the size of the VPS, and like a blueprint, we can use the CLI to find an appropriately sized VPS. The specifications (such as the number of CPUs, memory size, and disk size) for a VPS are called bundles. We will scale application by adding additional servers or horizontal scaling . We can use a small VPS bundle that can be copied, or
cloned , to scale the application horizontally.Bash
aws lightsail get-bundles...{"supportedPlatforms": ["LINUX_UNIX"],"name": "Small","power": 1000,"price": 10.0,"ramSizeInGb": 2.0,"diskSizeInGb": 60,"transferPerMonthInGb": 3072,"cpuCount": 1,"instanceType": "small","isActive": true,"bundleId": "small_2_0"}
With the
lamp_8_bitnami blueprint deploy a small_2_0 VPS named PHP-fe-1 using the create-instances command. Note that the launch.sh script you created will be called by --user-data parameter. This deploys the application at launch.Bash
aws lightsail create-instances \--instance-names PHP-fe-1 \--availability-zone us-west-2a \--blueprint-id lamp_8_bitnami \--user-data file://launch.sh \--bundle-id small_2_0
It will take several minutes to instantiate the VPS. You can check the status of an instance with the
get-instance-state command.Bash
aws lightsail get-instance-state --instance-name PHP-fe-1
The CLI returns the state of the VPS in a JSON document.
JSON
{"state": {"code": 16,"name": "running"}}
When the server is ready verify the connection between the PHP application and the locally-running MySQL database. To find the public IP of your lightsail instance check the card for your instance on the Lightsail console home page or use the Lightsail CLI command
get-instance-access-details .TIP: To find specific values in a JSON file install jq , a utility for parsing JSON.sudo yum install jq -y
Bash
aws lightsail get-instance-access-details --instance-name PHP-fe-1 | jq .accessDetails.ipAddress
Verify the connection between the PHP application and the locally-running MySQL database by opening a browser to
http://<ipAddress> .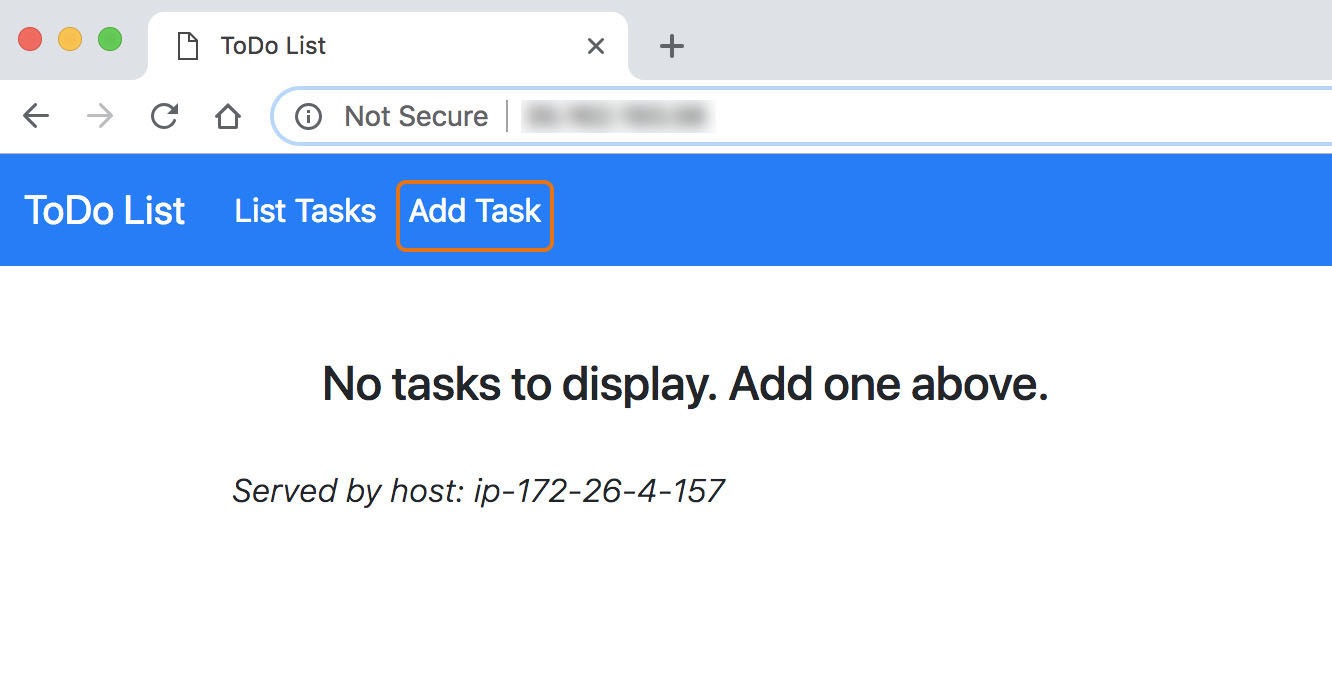
Module 2: Create a High Availability Relational Database
In this section, we’ll deploy a Lightsail database, a managed database service that reduces the complexity of deploying and managing database software. Lightsail manages the underlying infrastructure and database engine while you create and deploy databases and tables running inside the service.
With the Lightsail CLI, create a MySQL 5.7 database (
--relational-database-blueprint-id mysql_5_7 ). The point of this lab is to deploy a fault-tolerant and scalable implementation of the web application which requires a High Availability database plan, e.g., --relational-database-bundle-id micro_ha_2_0 . Name the database todo-db ( --relational-database-name todo-db ).By default Lightsail will create a strong password for you. However, for this tutorial, keep the password simple (
--master-user-password taskstasks) and assign a user name ( --master-username dbmasteruser)Bash
aws lightsail create-relational-database \--relational-database-name todo-db \--relational-database-blueprint-id mysql_5_7 \--relational-database-bundle-id micro_ha_2_0 \--master-username dbmasteruser \--master-user-password taskstasks \--no-publicly-accessible
Module 3: Replace the Database
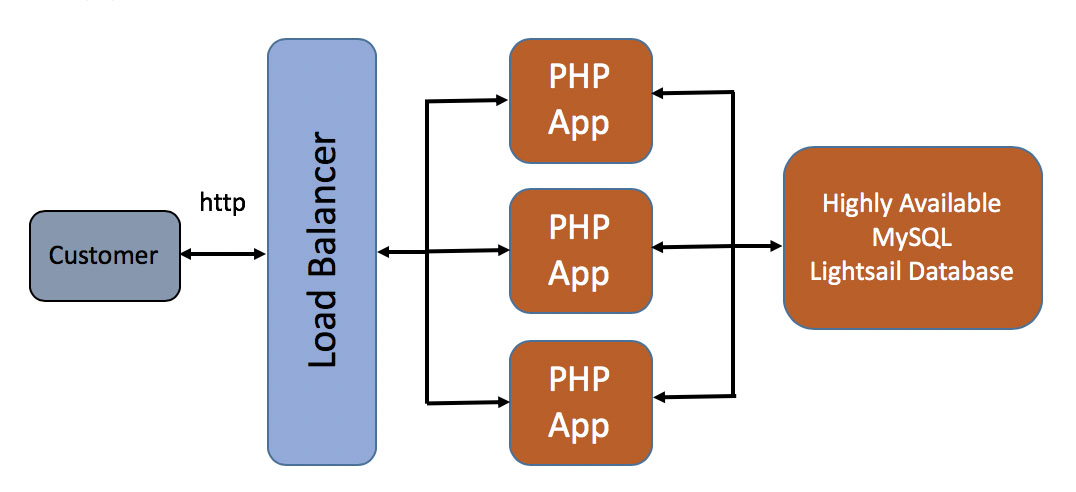
The next step is to replace the local MySQL instance running in the VPS with a high availability Amazon Relational Database Service (RDS) database. The application architecture will look like this:
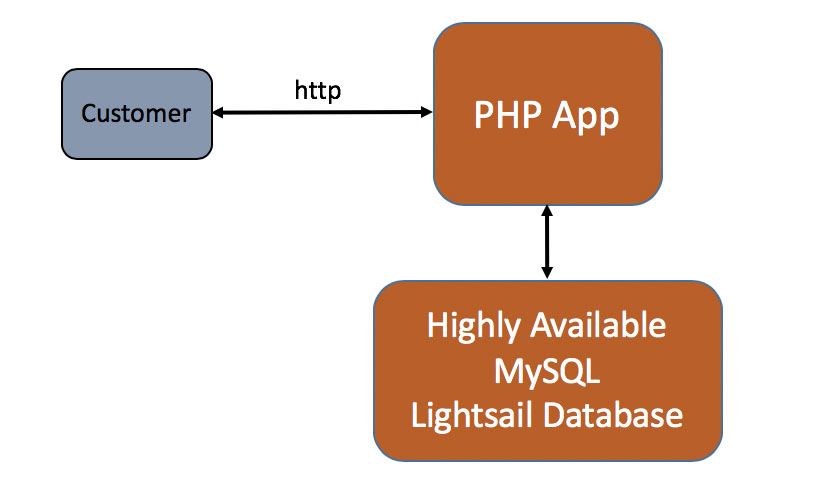
Update the application configuration to point to the highly-available Lightsail database. First, we will need the address of the high availability database. Use the
get-relational-databases command to get the a JSON doc describing the instance and filter it with jq.Bash
aws lightsail get-relational-databases | jq .relationalDatabases[].masterEndpoint.address
In the ToDo application click Settings from the top menu.
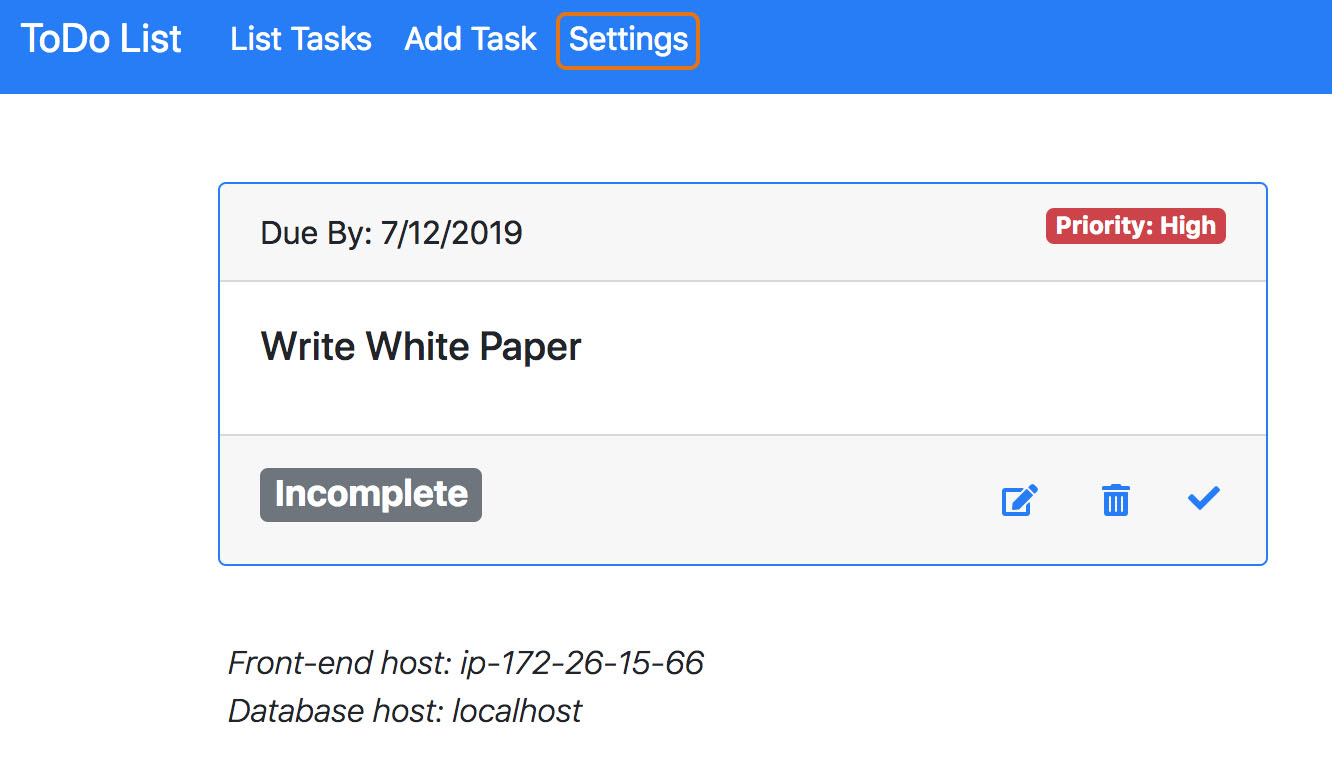
Paste the endpoint value of your Lightsail database under DB Hostname. Enter
dbmasteruser for the DB Username, and taskstasks for the DB Password. Choose Save Settings.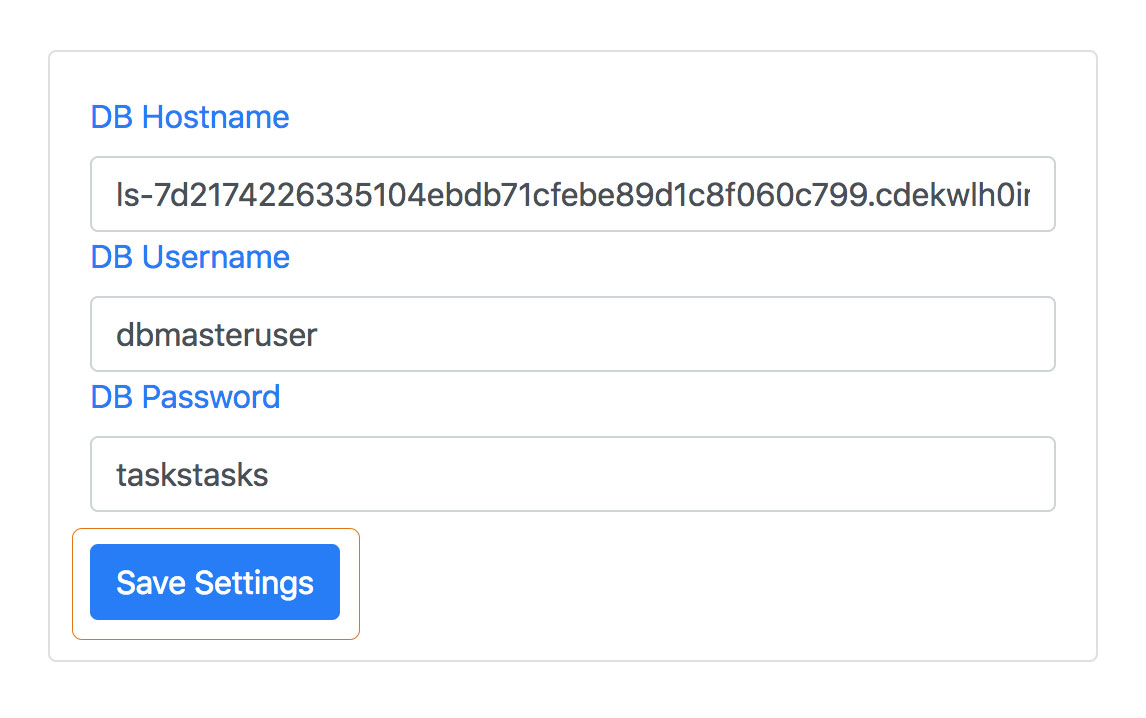
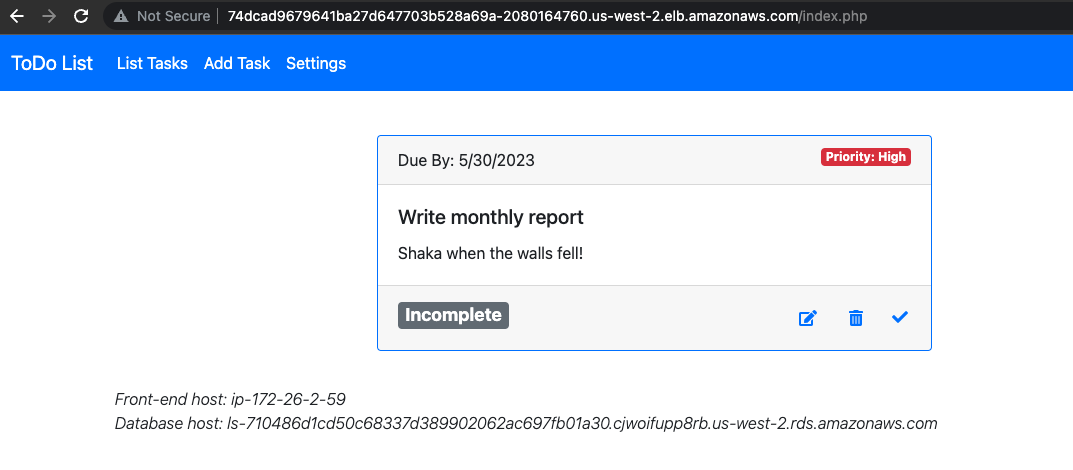
Test the new database by clicking List Tasks in the top menu, there shouldn’t be any tasks to display. Also note at the bottom of the screen it should list your Lightsail database endpoint as the value for Database host
If your web app is still showing the previously deployed database (denoted by
localhost as the database host), you may need to use either a new browser window or an incognito window.Module 4: Clone the Application
Snapshots are point-in-time copies of instances. Lightsail simplifies creating snapshots of instances that can be used to backup and restore instances, scale instance sizes up or down, and/or to deploy a new instance. Create a snapshot of the VPS with the
create-instance-snapshot command.Bash
aws lightsail create-instance-snapshot \--instance-snapshot-name PHP-fe-ls-db \--instance-name PHP-fe-1
The status will change to
Snapshotting , we will need to wait for the process to complete before moving forward. This can take up to 5 minutes. You can check the status of a snapshot with this command:Bash
aws lightsail get-instance-snapshot --instance-snapshot-name PHP-fe-ls-db | jq .instanceSnapshot.state
When the snapshot is complete, create two new instances with
create-instances-from-snapshot . Note that you can use a list of instance names to create multiple instances.Bash
aws lightsail create-instances-from-snapshot \--instance-snapshot-name PHP-fe-ls-db \--instance-names {PHP-fe-2,PHP-fe-3} \--availability-zone us-west-2a \--bundle-id small_2_0
Get the public IP of the two newly created front end instances with these commands.
Bash
aws lightsail get-instance --instance-name PHP-fe-2 | jq .instance.publicIpAddressaws lightsail get-instance --instance-name PHP-fe-3 | jq .instance.publicIpAddress
Open a browser window and enter the IP address of the one of the new instances, then repeat it for the other instance. Notice that the hostname for that particular web front end instance is listed under your task list, and that it changes based on which instance you are visiting in the web browser.
Module 5: Scale the Application
The next step is to create a load balancer to provide scalability and fault tolerance. Set
—instance-port to 80 and name the load balancer todo-lb .Bash
aws lightsail create-load-balancer \--instance-port 80 \--load-balancer-name todo-lb
You can check the status of the load balancer. This command will return
active when the load balancer is running.Bash
aws lightsail get-load-balancer --load-balancer-name todo-lb | jq .loadBalancer.state
With the load balancer ready, attach the three instances.
Bash
aws lightsail attach-instances-to-load-balancer \--load-balancer-name todo-lb \--instance-names {"PHP-fe-1","PHP-fe-2","PHP-fe-3"}
The Lightsail load balancer performs a health check on each instance by sending a request to the root of the web application on each instance. If the web application returns an HTTP Status 200, the instance passes the health check. It can take some time for each instance to pass the health check, and you can verify the status of the instances with the
get-load-balancer command.Bash
aws lightsail get-load-balancer --load-balancer-name todo-lb | jq .loadBalancer.instanceHealthSummary
When all instances are "healthy" you've scaled your application. Congratulations! The new application architecture looks like this.
You can find the address of the load balancer with
get-load-balancer and filter the response to dnsName .Bash
aws lightsail get-load-balancer —-load-balancer-name todo-lb | jq .loadBalancer.dnsName
Open a browser to http://< dnsName > to verify that application is working. Refresh the browser window and you will see the Front-end host ip change.
Module 6: Clean Up
To prevent additional costs, delete the VPS instances, the snapshot, and the MySQL instance.
Bash
aws lightsail delete-instance --instance-name PHP-fe-1aws lightsail delete-instance --instance-name PHP-fe-2aws lightsail delete-instance --instance-name PHP-fe-3aws lightsail delete-relational-database --relational-database-name todo-dbaws lightsail delete-instance-snapshot --instance-snapshot-name PHP-fe-ls-dbaws lightsail delete-load-balancer --load-balancer-name todo-lb
What You Accomplished
We’ve taken an application deployed on a single VPS and scaled it by replacing the local database with a high availability database, creating copies of the VPS, and attaching them to a load balancer that distributes the requests among the VPS. The import takeaways are;
- Configure a VPS with a launch script.
- Replace a local database with high availability instance.
- Create a snapshot to clone a VPS.
- Scaling an application with a load balancer.
You are well on your way to becoming a cloud engineer.
What's Next
The next section is a departure from deploying applications and databases. You will learn about c reating accounts and managing user roles and permissions . Modern enterprises commonly have several environments such as dev, test, and production. Managing multiple environments for an enterprise is a core requirement for a cloud engineer.
Enjoyed reading this content? Let the author know!
Your likes, comments, shares, and saves help creators reach more builders.

Loading recommendations
Loading article