
Migrate a SQL Server Database to the Cloud
Migrating a SQL Server database to the cloud is similar to migrating a database to a new server. The cloud can simplify the process through the use of managed services such as AWS Lightsail.


For an IT administrator, restoring a database from a backup isn't unusual. Migrating an on-premise database to the cloud follows a similar process. However, instead of using the AWS console, we will automate the process using scripts. In this tutorial, we'll walk through how to migrate a SQL Server database to the cloud, using the command line to instantiate and configure the database server, rather than a console application.
Sections
Info | |
|---|---|
✅ AWS Level | 200 - Intermediate |
⏱ Time to complete | 45 minutes |
💰 Cost to complete | Free when using the AWS Free Tier or USD 1.01 |
🧩 Prerequisites | - An AWS account: If you don't have an account, follow the Setting Up Your AWS Environment tutorial for a quick overview. For a quick overview for creating account follow Create Your AWS Account .
- AWS credentials: Follow the instructions in Access Your Security Credentials to get your AWS credentials
- A git client: Follow the instructions to Install Git for your operating system. |
💻 Code Sample | Code sample used in tutorial on GitHub |
📢 Feedback | Any feedback, issues, or just a 👍 / 👎 ? |
⏰ Last Updated | 2023-08-09 |
What You Will Learn
- How to create a browser-based environment for working with cloud resources
- How to create storage and attach it to a database server
- How to deploy and configure SQL Server with a Lightsail blueprint
- How to restore a MS SQL database on a Windows Server VPS
Module 1: Setting Up a Working Environment
In this tutorial, you will use the command line. There are advantages to using the command line. First, the command line offers a larger set of options for creating services. Second, commands can be chained together so that one command returns an output that can be used by another. Third, commands can be combined into a script that can be reused.
Whether it’s on-premise or in the cloud, deployments and configuration are frequently done on a local computer. However, a case can be made for using an online environment. Browser-based terminals or integrated development environments (IDEs) offer a consistent environment customized to a specific tasks. They can be configured with custom tool chains that reduce dependency conflicts. In addition, they can be accessed from any browser and maintain state and history from the last time they were used. AWS offers Cloudshell , a browser-based terminal, and Cloud9 , an in-browser IDE.
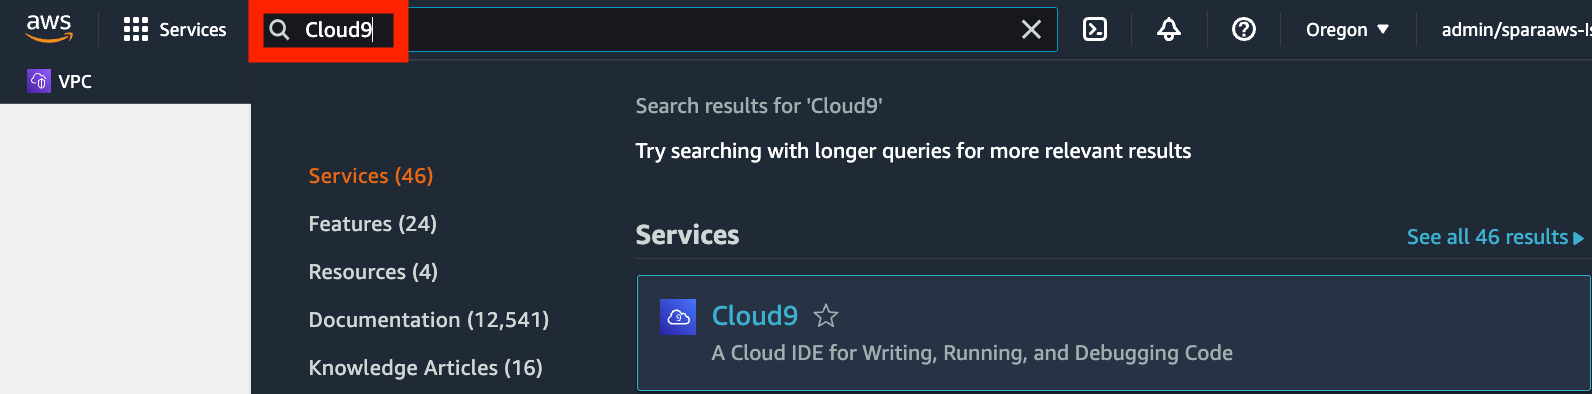
You will be using the AWS CLI and writing scripts. Cloud9 is ideal because you can write and store commands and scripts in the IDE and execute them in the included terminal. To start with Cloud9, use the AWS console Search bar to find the Cloud9 service.
Step 1: Create a Cloud9 Environment
Choose Create Environment.

In the Details panel of the Create Environment page, name the environment. You can also add an optional Description to specify how it's used and to differentiate it from other environments.
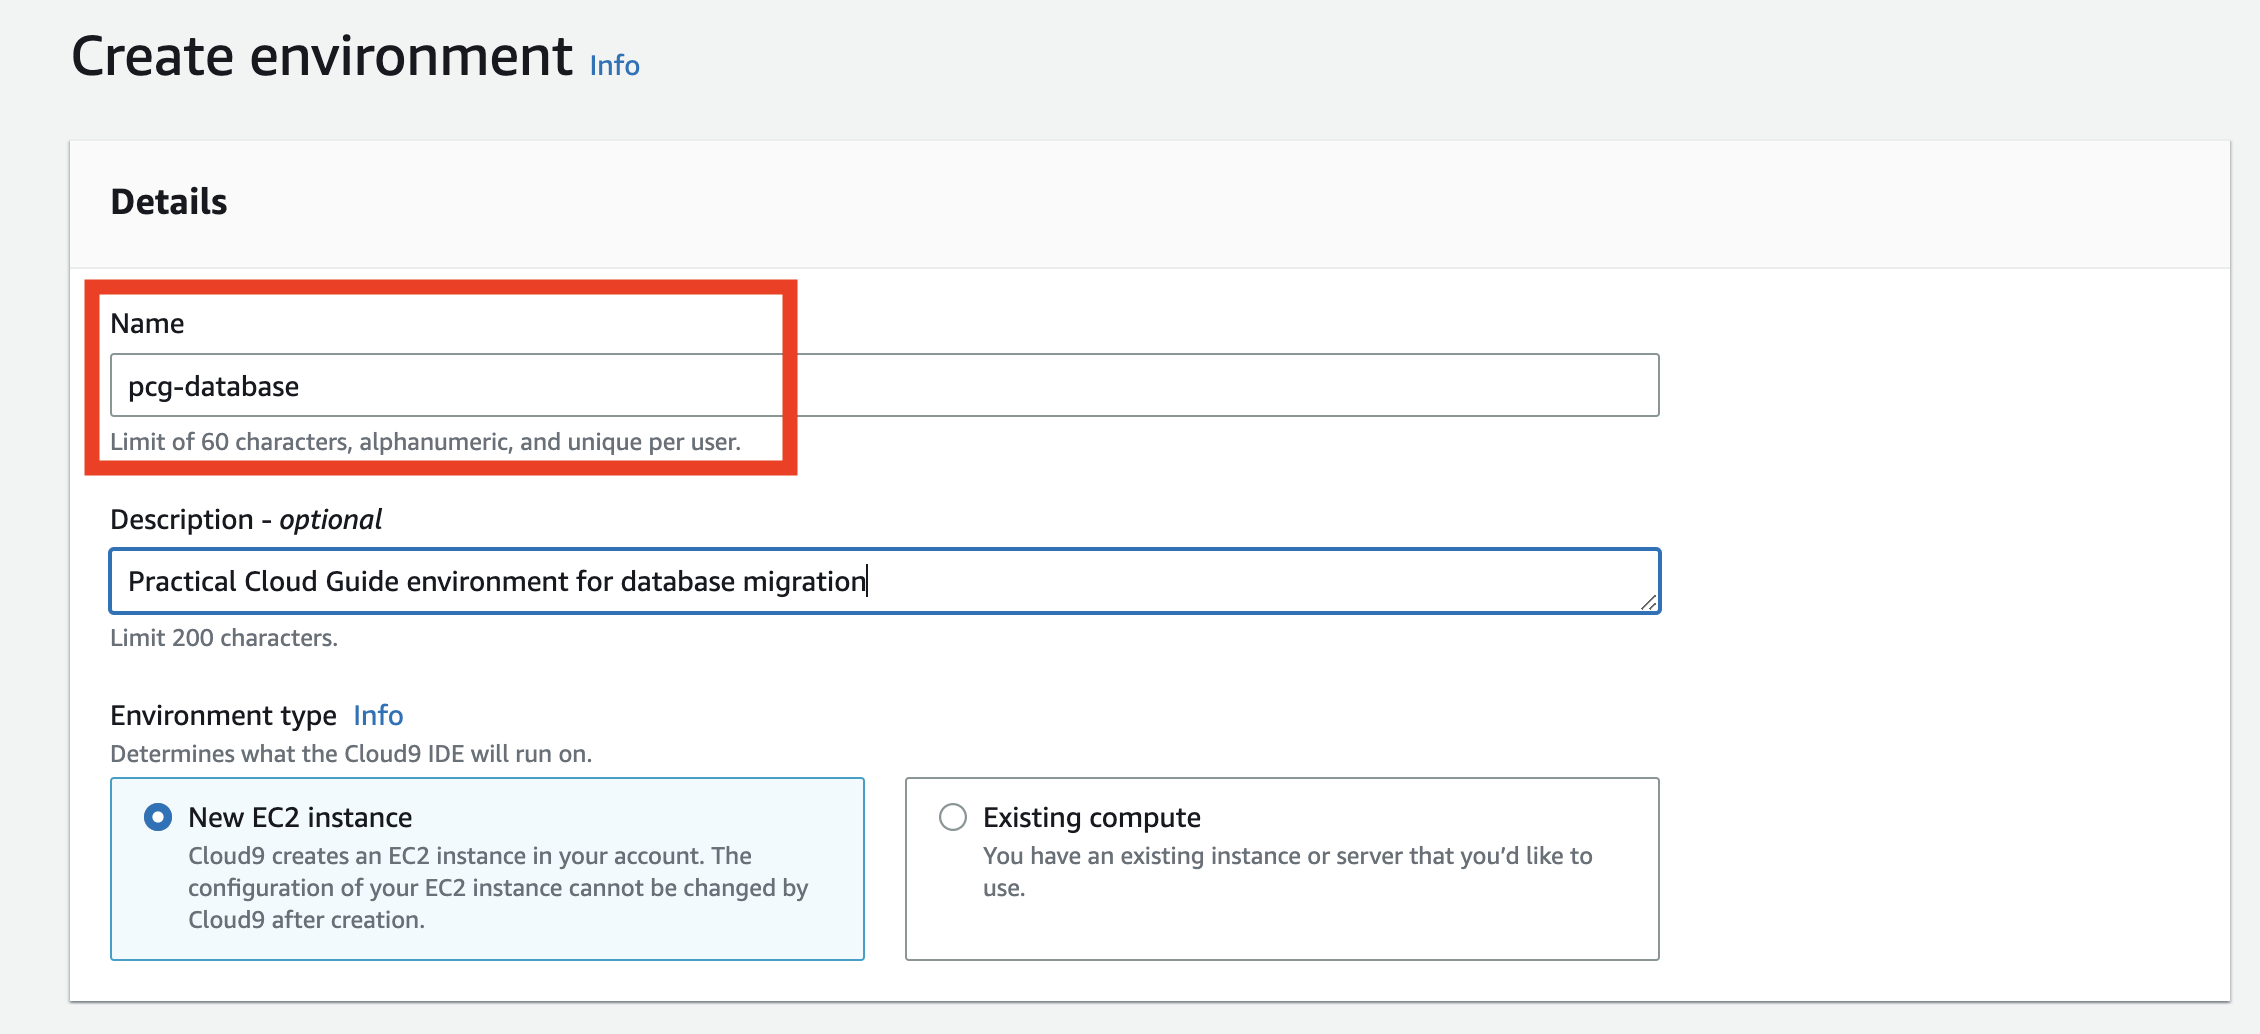
Accept the default values for New EC2 Instance and Networking panels. Choose Create. When the environment is created, choose Open to start the environment.
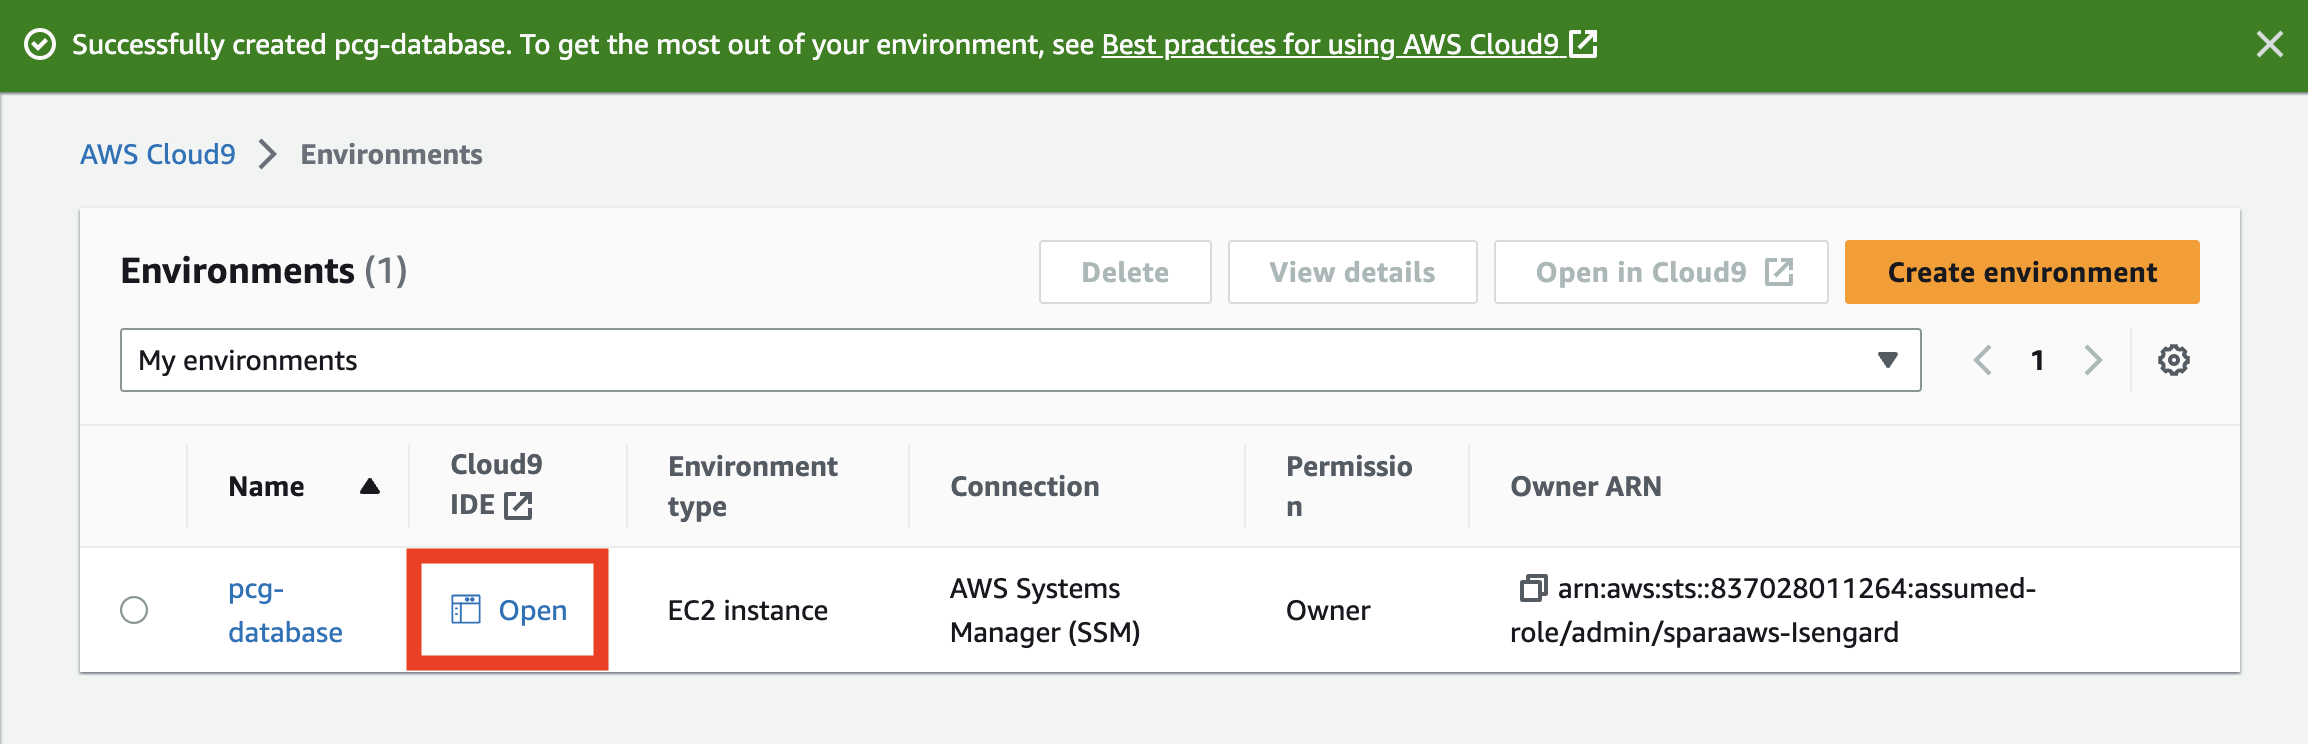
Your Cloud9 environment is ready.
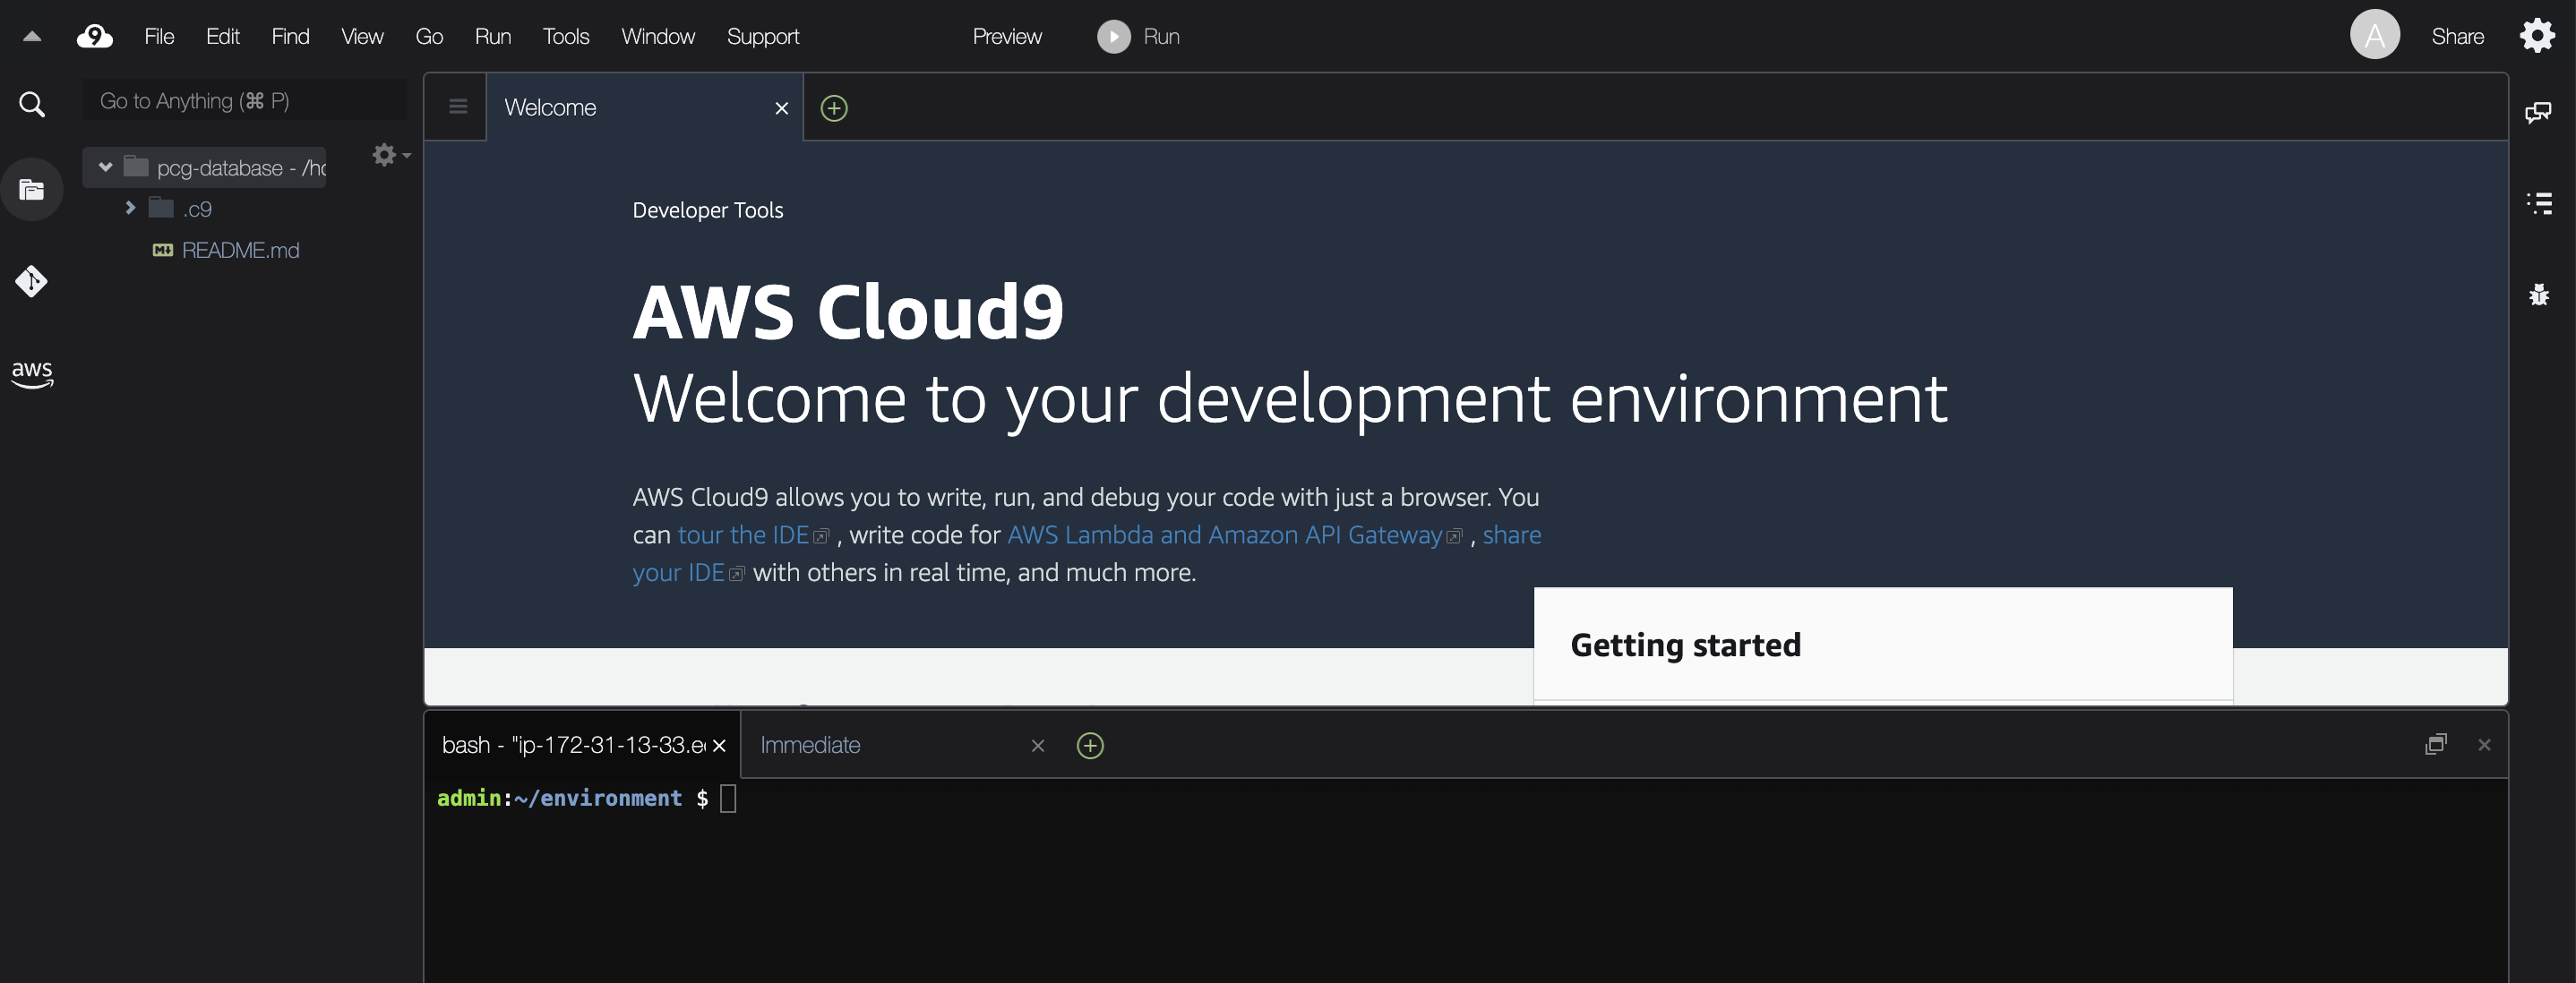
Step 2: Configure the Environment with Tools
This tutorial uses the AWS CLI and the Lightsail plugin. The current version of Cloud9 includes the 1.x version of the CLI, but the Lightsail plugin requires the 2.x version of the AWS CLI. You will have to upgrade to CLI 2.x version and install the Lightsail plugin.
Bash
curl "https://awscli.amazonaws.com/awscli-exe-linux-x86_64.zip" -o "awscliv2.zip"unzip awscliv2.zipsudo ./aws/install
Bash
sudo curl "https://s3.us-west-2.amazonaws.com/lightsailctl/latest/linux-amd64/lightsailctl" -o "/usr/local/bin/lightsailctl"sudo chmod +x /usr/local/bin/lightsailctl
Check the installation.
Bash
aws lightsail —versionaws-cli/2.11.20 Python/3.11.3 Linux/4.14.314-237.533.amzn2.x86_64 exe/x86_64.amzn.2 prompt/off
Your Cloud9 environment is ready.
Tip: Cloud9 is a full-featured IDE and you can save command snippets and scripts in a code repository like Github or Gitlab . Cloud9 includes Git Panel for managing repositories. An advantage of using a code repository is that it is available anywhere and you can use it to manage snippets and scripts for reuse.
Module 2: Create a SQL Server Instance from a Lightsail Blueprint
AWS Lightsail includes templates for instantiating VPS with a popular software package. You will instantiate a Windows Server with SQL Server installed with Lightsail.
In the Cloud9 terminal, use the AWS Lightsail CLI to create a VPS with SQL Server using a blueprint. You can find blueprints with the
aws lightsail get-blueprints command. The get-blueprints command lists all the blueprints available; you can find a specific blueprint by piping the output of the command to the unix grep utility.Bash
aws lightsail get-blueprints | grep sql"blueprintId": "windows_server_2022_sql_2022_express","group": "windows_2022_sql_exp_2022","blueprintId": "windows_server_2022_sql_2019_express","group": "windows_2022_sql_exp_2019","blueprintId": "windows_server_2016_sql_2016_express","group": "windows_2016_sql_exp",
There are several different versions of SQL Server Express available. Use the latest SQL Server version,
windows_server_2022_sql_2022_express . Create a VPS with with this blueprint. In addition, the --user-data parameter creates a directory to store the back SQL Server backup file. The --bundle-id sets the size of the server.Bash
aws lightsail create-instances --instance-names pcgSQLServer \--availability-zone us-west-2a \--blueprint-id windows_server_2022_sql_2022_express \--user-data "mkdir c:\backup" \--bundle-id large_win_1_0
Note that this SQL Server instance is not a managed Relational Database Service (RDS). You are responsible for any system or security updates and backing up data files.
Module 3: Create Storage for Data and Log Files
Databases typically store data files and logs in separate drives attached to the server. With Lightsail, you can create both object storage and block storage. Block storage is similar to a physical drive and can be formatted with a file system and attached to a server. In this section, you will create block storage. In a following section, you will attach it to a VPS and format it with the NTFS file system.
Step 1: Create Block Storage
In the Cloud9 terminal, use the AWS CLI to instantiate storage with the
aws lightsail create-disk command. Name the disk and set the availability zone.Bash
aws lightsail create-disk \--disk-name sqlserver-data-and-logs \--availability-zone us-west-2a \--size-in-gb 32
If successful, Lightsail returns a status message.
JSON
{"operations": [{"id": "14d4be4a-955f-45d0-81f7-7a5440195c54","resourceName": "sqlserver-data-and-logs","resourceType": "Disk","createdAt": "2023-08-02T01:52:51.867000+00:00","location": {"availabilityZone": "us-west-2a","regionName": "us-west-2"},"isTerminal": false,"operationType": "CreateDisk","status": "Started","statusChangedAt": "2023-08-02T01:52:52.128000+00:00"}]}
Step 2: Attach Block Storage to the Database Server
Attach the block storage to the database server. The server will recognize it as a drive.
Bash
aws lightsail attach-disk \--disk-name sqlserver-data-and-logs \--disk-path /dev/xvdf \--instance-name pcgSQLServer
When the disk is attached, it returns a JSON message to confirm the operation.
JSON
{"operations": [... ,{"id": "e92ee8ac-45cf-4bae-a16b-ac55fea264c7","resourceName": "pcgSQLServer","resourceType": "Instance","createdAt": "2023-08-02T01:54:18.196000+00:00","location": {"availabilityZone": "us-west-2a","regionName": "us-west-2"},"isTerminal": false,"operationDetails": "sqlserver-data-and-logs","operationType": "AttachDisk","status": "Started","statusChangedAt": "2023-08-02T01:54:18.196000+00:00"}]}
Although the storage is attached to the server, it is an unformatted disk. You will format it with a Windows Server.
Module 4: Configure the SQL Server VPS
The VPS is a Windows Server. Use the RDP button in the Lightsail console. Choose the terminal icon in the pcgSQLServer panel.
Note: The RDP button may take 5-to-7 minutes before it becomes active and you can connect to the server.
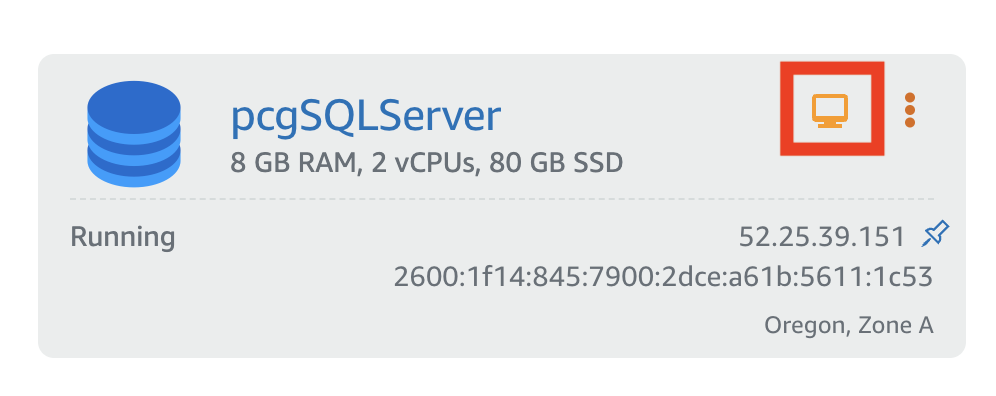
We need to format the disk to store data and log files. Here are the steps to make the disk usable by a Windows Server.
Step 1: Find the Disk Number of the Unformatted-But-Attached Disk
In the RDP window, open a Powershell window and use the
Get-Disk commandlet to find the unformatted disk, which is attached but offline.PowerShell
get-disk | Where-Object {$_.OperationalStatus -eq 'Offline' }Number Friendly Name Serial Number HealthStatus OperationalStatus Total Size Partition Style------ ------------- ------------- ------------ ----------------- ---------- ----------1 AWS PVDISK vol0318528261ed8ca45 Healthy Offline 32 GB RAW
Once you know the Disk Number, initialize and partition the disk with the
New-Partition commandlet. The commandlet also assigns a drive letter and use the entire disk.PowerShell
Initialize-Disk -Number 1New-Partition –DiskNumber 1 -AssignDriveLetter –UseMaximumSizeFormat-Volume -DriveLetter D -FileSystem NTFS -NewFileSystemLabel Data
Step 2: Download the Wide World Importers Sample Database
Microsoft distributes an example SQL Server backup file . Use this file to restore a backup. When you instantiated the SQL Server VPS, a backup directory was created. Download the Wide World Importers backup file to that directory.
PowerShell
$source = "https://github.com/Microsoft/sql-server-samples/releases/download/wide-world-importers-v1.0/WideWorldImporters-Full.bak"$dest = "C:\backup\WideWorldImporters-Full.bak"Invoke-WebRequest -Uri $source -OutFile $dest
Step 3: Create Directories for Data Files and Logs
The data files and logs for the Wide World Importers database are stored in a separate drive. Create the directories in the attached drive.
PowerShell
mkdir D:\SQL_DATAmkdir D:\SQL_LOGSmkdir D:\SQL_LOGS\SQL2022
Module 5: Restore the Database from the Backup File
To restore the database from Powershell, use Transact-SQL (T-SQL) , a Microsoft version of SQL. The
sqlcmd utility lets you use T-SQL commands against SQL Server. Save the following script to a file in the C:\backup directory and name it restore_database.sql , use notepad or an editor of your choice.SQL
USE [master]GORESTORE DATABASE [WideWorldImporters] FROM DISK = N'C:\backup\WideWorldImporters-Full.bak'WITH FILE = 1,MOVE N'WWI_Primary' TO N'D:\SQL_Data\WideWorldImporters.mdf',MOVE N'WWI_UserData' TO N'D:\SQL_Data\WideWorldImporters_UserData.ndf',MOVE N'WWI_Log' TO N'D:\SQL_Logs\SQL2022\WideWorldImporters.ldf',MOVE N'WWI_InMemory_Data_1' TO N'D:\SQL_Data\WideWorldImporters_InMemory_Data_1',NOUNLOAD,STATS = 5GO
Run the script using
sqlcmd .PowerShell
sqlcmd -i C:\backup\restore_database.sql
If the restore is successful, you will see many status messages ending with this message:
PowerShell
100 percent processed.RESTORE DATABASE successfully processed 58496 pages in 4.218 seconds (108.343 MB/sec).
Open SQL Server Management Studio from the Windows Start button.
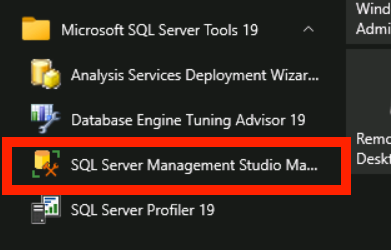
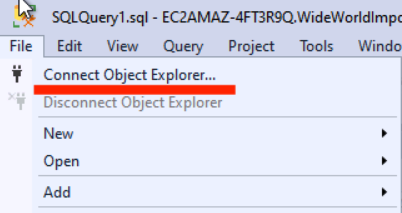
When SQL Server Management Studio is open, choose File > Connect Object Explorer.
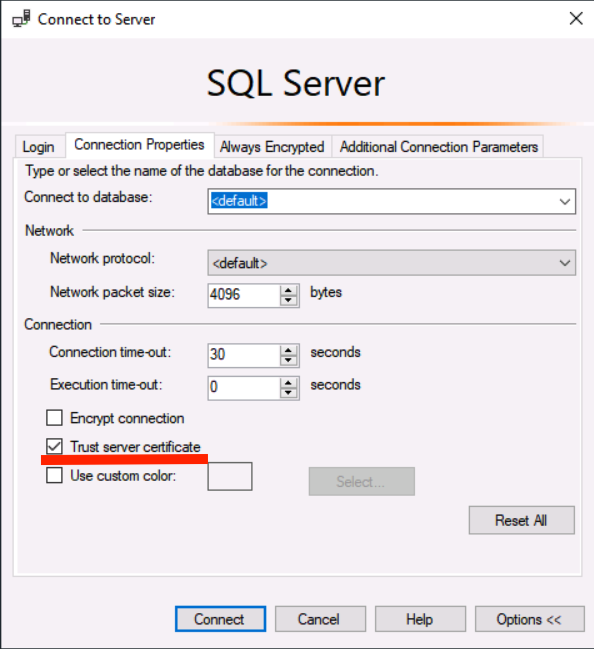
The Connect to Server window will open. Select the server name by choosing Browse for more, then the server name under Database Engine.
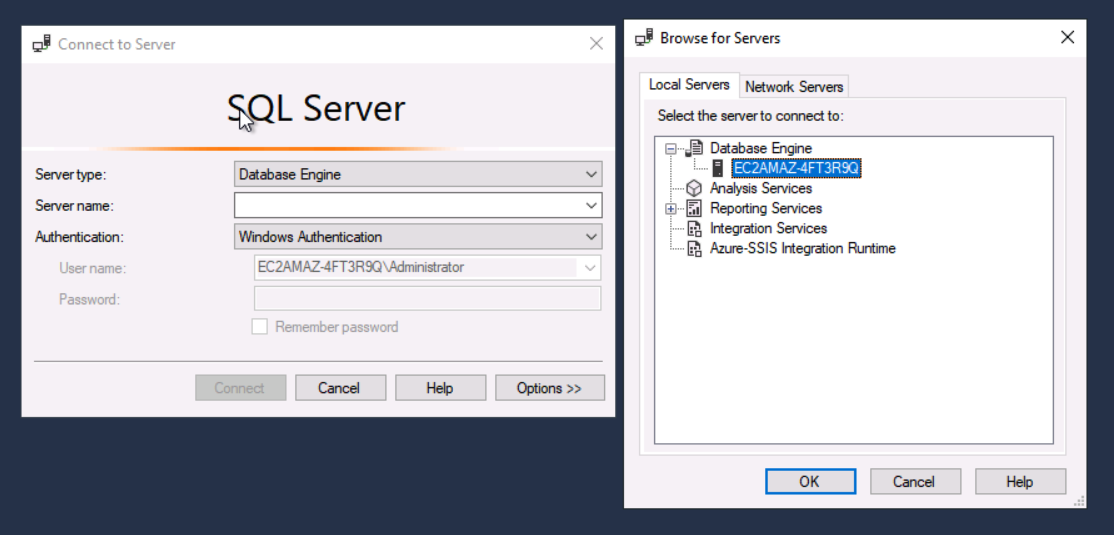
We will use Windows Authentication which requires choosing the Options>> button and selecting Trust Server Certificate. Then choose Connect.
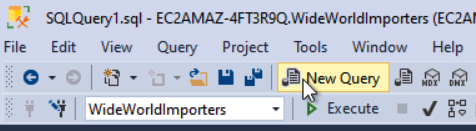
With the database connected to SQL Server Management Studio, you can query the Wide World Importers database by choosing New Query.
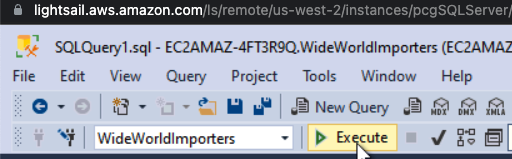
In the query window, type in the SQL query. This query lists all the rows in the
Website.Customers view.SQL
SELECT * FROM Website.Customers;
To run the query, choose Execute in the menu.
The Results pane displays the rows from the view.
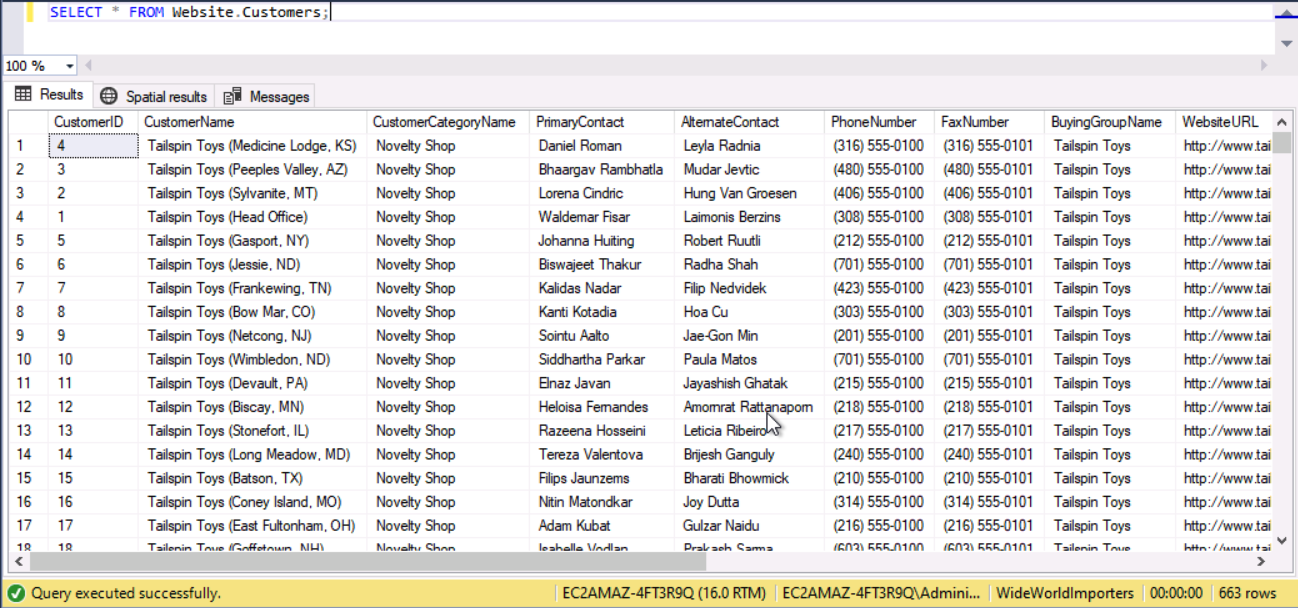
Congrats! You’ve migrated a SQL Server database to the cloud.
Module 5: Clean up
Delete the VPS, the attached disk, and the Cloud9 environment to prevent further charges.
Step 1: Delete the VPS
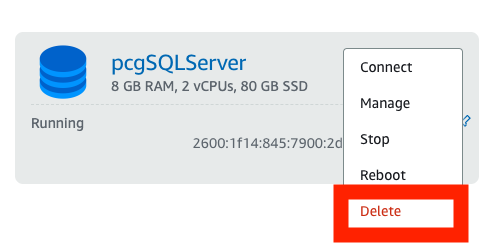
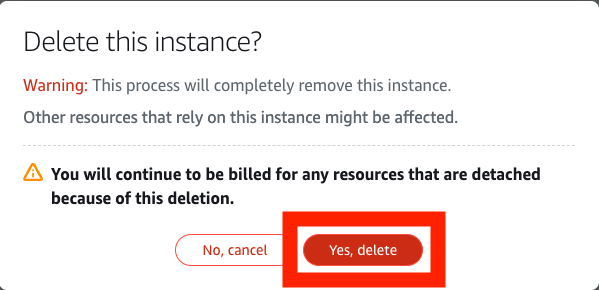
In the Lightsail console, choose Instances, then select the three dots in pcgSQLServer. Choose Delete.
Choose Yes, delete.
Step 2: Delete the Disk
In the Lightsail console, choose Storage, select the three dots in
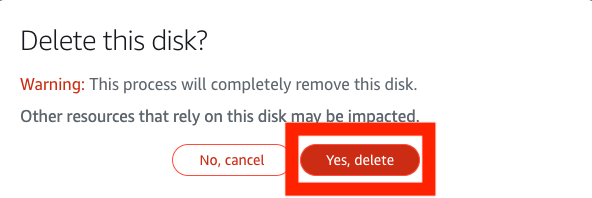
sqlserver-data-and-logs . Choose Delete.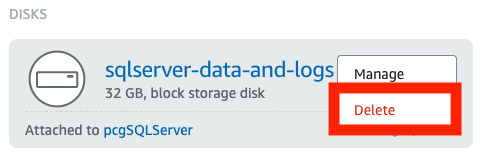
Choose Yes, delete.
Step 3: Delete the Cloud9 Environment
In the Cloud9 console, choose
pcg-database and select Delete.
What Did You Accomplish?
You deployed a SQL Server in the cloud and restored a database. However, the true takeaway is that you did this in a terminal using the AWS CLI and Lightsail plugin. You accomplished the task without using the console. As an additional challenge, try to complete this tutorial by writing a script to deploy the SQL Server and configure storage and a Powershell script to restore the database. Learning how to use the AWS CLI is the first step to building reproducible and testable infrastructure. The Practical Cloud Guide will use this approach to building and maintaining infrastructure.
If you want to do a deep dive into SQL Server in the cloud, checkout the Amazon RDS for SQL Server Workshop to get hands-on with SQL Server at AWS.
What's Next?
Instantiating SQL Server from a Lightsail blueprint is not complicated. However, you are responsible for maintaining that instance, which includes updates and backups. An important distinction between the cloud and on-premise data centers is the option to have a fully managed solution. In a managed solution, the cloud provider is responsible for maintaining the resource. In the following tutorial, you will deploy a relational database to scale a web application.
Enjoyed reading this content? Let the author know!
Your likes, comments, shares, and saves help creators reach more builders.

Loading recommendations
Loading article