
How to associate an account when using Amazon SageMaker next generation (Unified Studio)
This guide provides a step-by-step guide on how to setup an account association when using Amazon SageMaker Unified Studio.


Learn how to securely access data from another AWS account in Amazon SageMaker next generation while maintaining proper governance and control over data assets using associated accounts.
Note: The following screenshots are from August 2025. While the Amazon SageMaker console interface may evolve, the core process remains consistent.
Account association in Amazon SageMaker next generation enables you to connect two AWS accounts:
- A Main Account running an Amazon SageMaker domain
- A Secondary Account containing data assets like the Glue Data Catalog
We will use AWS Resource Access Manager to share resources from your secondary account to the main account. In this way users in the Amazon SageMaker domain can discover and work with the data assets from the secondary account, while the secondary account keeps control on data access stored on it. The following diagram that represents our this case:
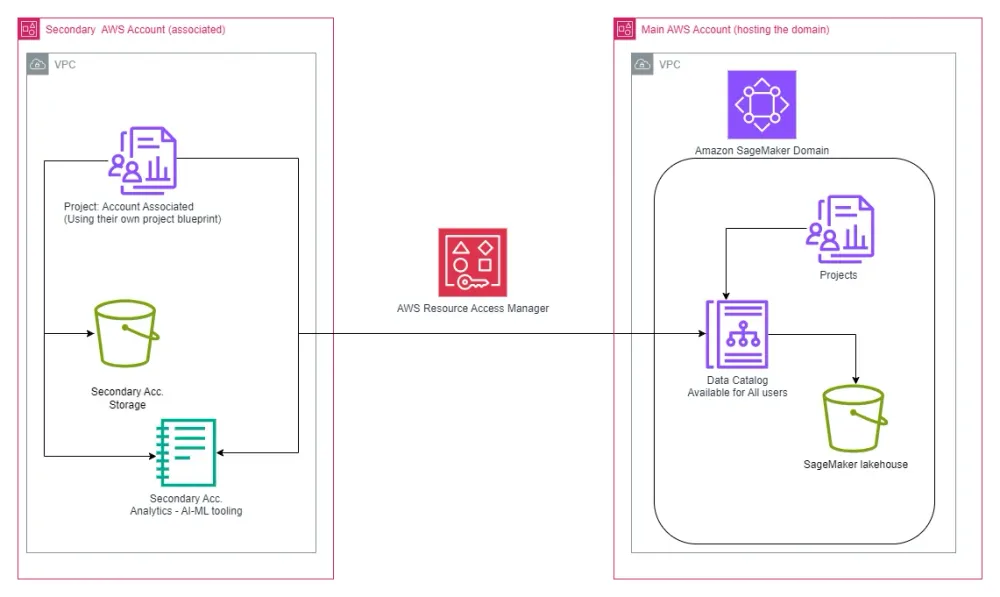
Let’s see what’s here:
- You have an Amazon SageMaker domain running on an AWS account, let’s call it Main Account.
- You also have another AWS account with some data assets in the glue data catalog on that account, let’s call this one Secondary account.
- We will use AWS Resource Access Manager to share resources from your secondary account to the main account. In this way users in the Amazon SageMaker domain can discover and work with the data assets from the secondary account, while the secondary account keeps control on data access stored on it.
Note: I would recommend to check on the AWS RAM documentation to identify what permissions are needed in order to proceed with these steps.
Prerequisites:
Administrative Access:
- Admin privileges on both the Main Account and Secondary Account
- If not using admin privileges, proper AWS RAM permissions as per AWS RAM documentation
Account Setup:
- A Main Account with an existing Amazon SageMaker domain
- A Secondary Account with data assets in the Glue data catalog
AWS Services Configuration:
- If using AWS Organizations: RAM sharing must be enabled through AWS RAM under Settings
- Both accounts must be in the same AWS region
- Proper IAM roles and permissions to request and manage associations
Infrastructure Requirements:
- VPC with specific tagging (though specific tags are not detailed in the document)
- At least 3 subnets in the VPC
- S3 bucket availability for data asset storage
- Optional: AWS KMS key if custom encryption is needed
User Access
- Appropriate IAM roles or SSO users configured for accessing the project profiles
- If using SSO, proper Identity Center configuration
Account Association Process:
Steps in the Main Account
1. Start the Account association. In the Main Account, go the Amazon SageMaker Console and click on the domain you are working on, in my case, my domain is called “corporate”.
a. Scroll down until you see the tab called: Account Association
b. Click on Request Association
a. Scroll down until you see the tab called: Account Association
b. Click on Request Association

c. If your company uses AWS organization and you need to associate an account within it, keep the option AWS Organization-only RAM share selected. Be mindful of the note here: “The accounts must be in your AWS Organization. Sharing with AWS Organizations must be enabled through AWS RAM under Settings.”
Otherwise, choose External RAM share. This option is convenient when you are planning to share your domain with 3rd parties outside of your company, or when you don’t have the AWS organizations enabled in your company. This is the option, we will use today.
d. In the option: AWS RAM share managed permission you need to define whether the IAM roles and users in the secondary account will have access to the Amazon SageMaker domain, or just API access. In our case, let’s make sure our IAM users and Roles can log in to the Amazon SageMaker Unified Studio domain.
e. Add the AWS account id and click on Request Association

You will be taken to the Amazon SageMaker console again and you will see the new account we added with a requested status.

Steps in the Secondary Account:
Now, let’s jump into the Amazon SageMaker console of our requested account, or as we called: Secondary Account, you will see a request here:

Note: If you don’t see the request in the associated account, check the following:
Does your role in the main account have permissions to request associations?
If using AWS organization, Do you have RAM enabled?
Does your role in the secondary account have permissions to see the associations?
Normally, the association requests occur within the same AWS region. Confirm what regions you are using in both accounts.
When you click on View Request, you will see the following:

Note: confirm the domain ID matches the domain id from the Main account
Click on the radio button on the left of the domain ID and click on review request

Validate the details and accept association

It will take few seconds and then you will see the following screen:

Great job, so far you have enabled an association between the main account (hosting the Amazon SageMaker Domain) and the secondary account (where your data lake or lakehouse resides)
Steps in the Main Account:
Let’s go back to the main account to verify your secondary account is associated to the main account too.

In order to use this associated account, you need to create a project profile exclusively for this association. Let’s do it:
a. In the main account, click on the project profiles tab -located 3 spaces on the right of the account associations- and click on Create

Provide a project profile name and description. You should make sure your project profiles name or description indicates this is used by the associated account.

In the section called project profile creation options, you will keep the create from a template and keep All capabilities also selected.

Note: The idea here is to identify what tooling would be used when using the associated account. You can pick and choose a group of capabilities, or select one-by-one in the custom create option.
In the section Default tooling blueprint deployment settings, make sure you:
a. Select the associated account (secondary account)
b. Choose the region where your data lake, lakehouse, and other AWS services like Athena, glue and being used in that secondary account.
If required, you can use the AWS Systems Manager Parameters Store that contains parameters definition.
a. Select the associated account (secondary account)
b. Choose the region where your data lake, lakehouse, and other AWS services like Athena, glue and being used in that secondary account.
If required, you can use the AWS Systems Manager Parameters Store that contains parameters definition.
c. All projects will have by default a git repo, you can choose the git repo you want to use for this case and check the option: Users can edit Git connection to allow your users to modify the connection

In the Authorization section you should select whether all users of this domain can use this project profile or if you have 1 SSO user, SSO group, IAM user, or IAM role that are allowed to use this project profile.
Note: This is a key factor. Most of cases, you want to make sure only the right people have access to this secondary account, think on the following questions to choose the appropriate configuration here:
a. Who owns the data in the secondary account? or,
b. do you have a Lake Formation administrator already defined in that secondary account?
c. do you want all users in your Amazon SageMaker domain accessing the data stored in the secondary account?
d. do you have a IAM role or IAM user in the main account who can act as data owner and publisher from the secondary account?
In our case, Let’s pretend we have a lake house admin in my secondary account and we have created a SSO user created in Identity Center called analyst_account2_<aws_account_id>. They will be playing the role of data curators in regards of the data stored in the secondary account within the Amazon SageMaker Domain.
If you want users to access this project profile immediately after creation, please check 'Enable project profile on creation'

Verification and final Steps in the Secondary Account
After creation verify that you project profile is referring to the secondary AWS account id in the project profile details
It is also good to verify the secondary account is properly configured, go to the Amazon SageMaker>Associated Domains>Associated Domain <your domain>. if it is not enabled you will see something like this:

Just click enable and follow these steps:

The secondary account will use the AWS tooling we setup in the previous step. In order to do this, you need to create 3 IAM roles. Provisioning, Manager and Query Execution. You can use the option: “Create and use a new service role”. However, it is possible that the AWS admin prefers using their own IAM roles, if this is your case, check the permissions details link to make sure that your own roles have all the permissions needed to enable the tooling in this account.
In this case, let’s use the option that creates and uses the role for us.
Then you need to identify a bucket where the data assets will be store and also used by the tooling as storage. Additionally, you need to select a VPC and at least 3 subnets,
Note: Be mindful some tagging is needed for this VPC to work properly see the documentation or see the tags used in the main account to mimic the same tagging in the secondary account.

If you need to control the data encryption in the secondary account, make sure you check the option Customize encryption settings (advanced), then choose an AWS KMS key.
In this example, let’s keep the default option and click on Enable Blueprint

Next, go to the Enable blueprint and configure All Capabilities

You see this options:


Your blueprints in the secondary account should look like this:

Final Steps in the Main Account
Now, let’s go back to the main account.
Login in the Amazon SageMaker domain using the credentials of one of the users listed in the Authorization section of your project profile, in this case, Analyst_account_2

Create a project, providing a name, description and make sure you choose the project profile created in the previous section.

When ready, click on create the project.
The project will take some minutes to be created. During this time, we are creating all the tooling required for this project. Noted that those are going to be created in the secondary account.
Check creation on the secondary account (optional):
You can verify that the creation was successful by going back into the secondary account and checking the following services:
Cloud formation: You will see some cloud templates executed there, you can explore them and identify all the assets created during the project creation.
Cloud formation: You will see some cloud templates executed there, you can explore them and identify all the assets created during the project creation.

Lake Formation: You will see the glue database associated to the project and the permissions to access it.

AWS Glue, Athena, S3 locations: There is a database created as you defined it in the project creation, as well as a athena’s work-group and a S3 location created for this project.
Note: These verification in the secondary account is not a mandatory step, but it is good for you to know what’s is happening in both accounts when you create a project using an associated account.
Troubleshooting Guide:
Account Association Request Not Visible If you don't see the request in the associated account, verify:
Your role in the main account has permissions to request associations
If using AWS Organizations, RAM sharing is enabled
Your role in the secondary account has permissions to see associations
Both accounts are operating in the same AWS region
If using AWS Organizations, RAM sharing is enabled
Your role in the secondary account has permissions to see associations
Both accounts are operating in the same AWS region
IAM Role Issues When encountering role-related errors:
Prefer using default IAM roles created by SageMaker platform
If creating custom roles:
Follow exact name patterns from documentation
Don't add extra words or remove wording in role names
If you see errors mentioning "AmazonSageMaker<RoleName>{-<region>-<domainId>}", you may need to rename your custom role to match this pattern
If creating custom roles:
Follow exact name patterns from documentation
Don't add extra words or remove wording in role names
If you see errors mentioning "AmazonSageMaker<RoleName>{-<region>-<domainId>}", you may need to rename your custom role to match this pattern
Account Association Setup Issues If encountering problems during setup:
Check CloudTrail logs in both accounts (main and secondary)
Review the RAM console for created policies
Verify AWS Organizations permissions if applicable
Confirm AWS RAM permissions are properly configured
Review the RAM console for created policies
Verify AWS Organizations permissions if applicable
Confirm AWS RAM permissions are properly configured
Project Profile Verification After creation, verify:
Project profile correctly references the secondary AWS account ID
Secondary account is properly configured and enabled
Associated blueprints are deployed correctly in the secondary account
Secondary account is properly configured and enabled
Associated blueprints are deployed correctly in the secondary account
Resource Creation Verification To verify successful project creation, check in secondary account:
AWS CloudFormation for executed templates
AWS Lake Formation for database and permissions
AWS Glue, Athena, and S3 locations for created resources
AWS Lake Formation for database and permissions
AWS Glue, Athena, and S3 locations for created resources
Stay Tuned for Part 2: Data Sharing and Consumption Across Associated Accounts
Now that you've successfully set up account association in Amazon SageMaker next generation, you might be wondering: "How do I effectively share and consume data across these associated accounts?" Great news! In our upcoming blog post, we'll dive deep into the practical aspects of cross-account data management, including:
- Best practices for data sharing between main and secondary accounts
- Implementing governance controls while maintaining data accessibility
- Real-world examples of cross-account data consumption patterns
- Tips for optimizing performance and security
Follow our AWS blog to ensure you don't miss this essential guide to maximizing the value of your account associations in Amazon SageMaker next generation.
Until then, feel free to explore the account association setup we've covered here and familiarize yourself with the infrastructure you've just created. Your journey toward efficient cross-account data collaboration is just beginning!
Enjoyed reading this content? Let the author know!
Your likes, comments, shares, and saves help creators reach more builders.

Loading recommendations
Loading article