
Zero to Hero: Automate installation of WordPress CMS with Terraform and Amazon Q
In this blog, we will see how to use prompts in Visual Studio Code to build a Terraform project with Amazon Q. We will also explore how to run Terraform init, Terraform plan, Terraform apply, and Terraform destroy commands. Additionally, we'll demonstrate how to install a WordPress Content Management System on an EC2 instance with RDS as the database.

Welcome to another installment of Q-Bits , our regular series showcasing cool ways Amazon employees are leveraging Amazon Q Developer. Let's create a WordPress content management system on AWS using Terraform Infrastructure as Code (IaC) and Amazon Q. This guide assumes you have Visual Studio Code installed and have configured Amazon Q through your free Amazon Builder account. To install the Amazon Q Developer extension for your IDE, visit https://docs.aws.amazon.com/amazonq/latest/qdeveloper-ug/q-in-IDE-setup.html
Open Amazon Q in your preferred IDE to ask your software development questions.
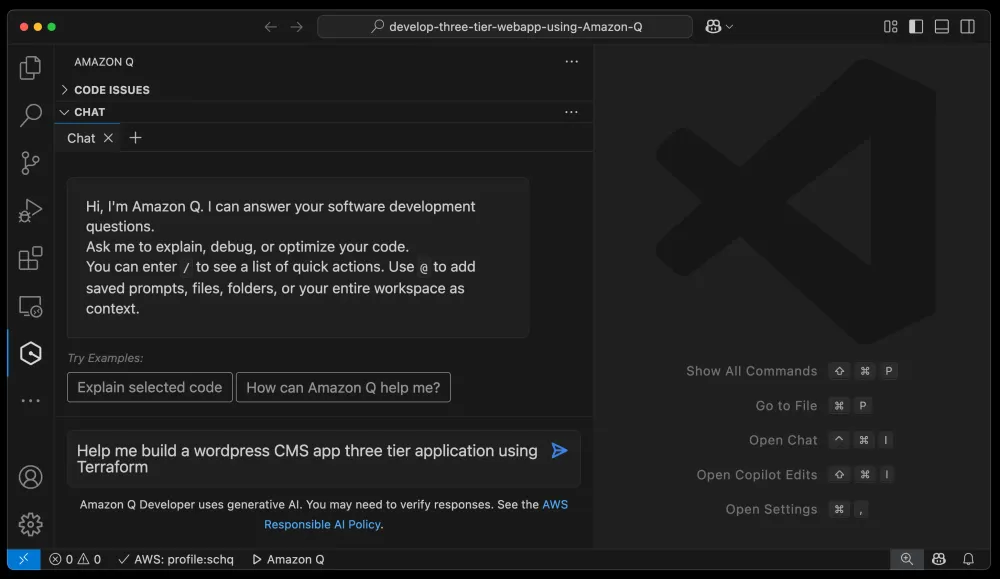
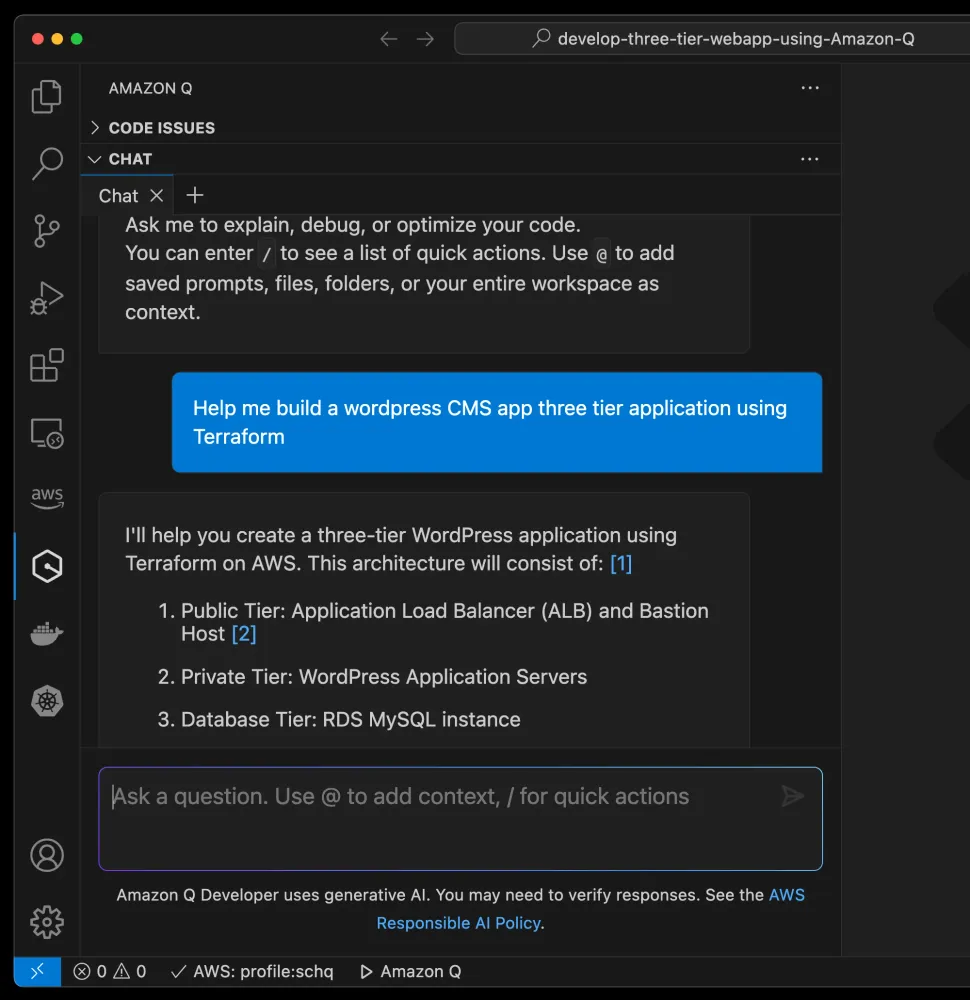
Ask Amazon Q to help you build a three-tier WordPress CMS application using Terraform. Amazon Q will generate the necessary Terraform configuration files and provide step-by-step guidance.
The following files were generated through additional prompts to Amazon Q, including a customized userdata.sh file. Store all files in a directory named 'deploy-three-tier-webapp-on-aws-using-terraform'.
- providers.tf - Configures AWS as the cloud provider and sets up basic connectivity
- variables.tf - Defines input variables used across the project
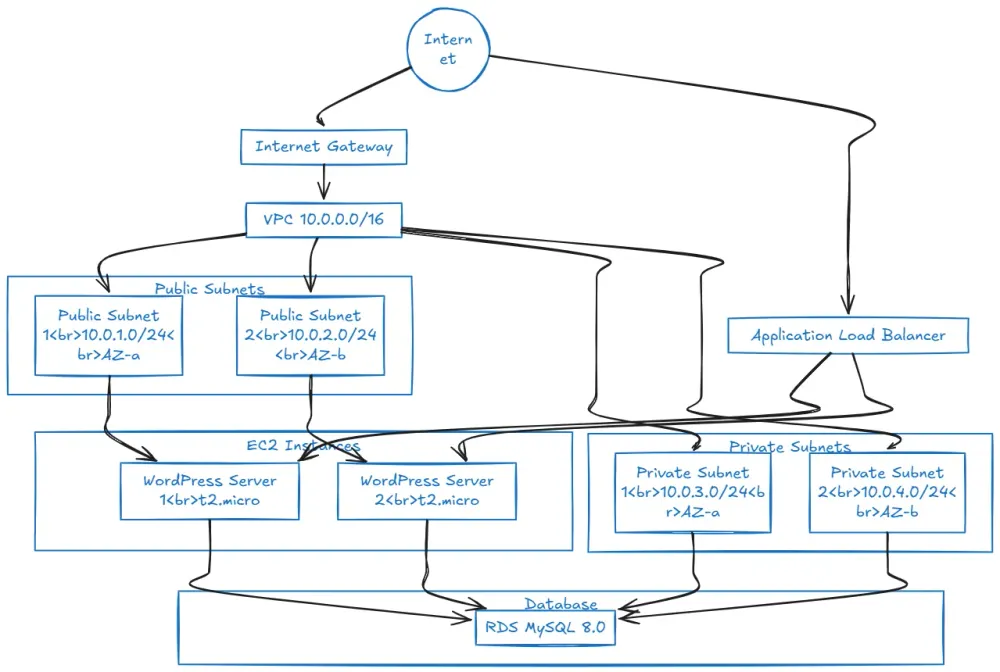
- main.tf - Contains the core infrastructure code (VPC, subnets, etc.)
- outputs.tf - Specifies what values should be shown after deployment
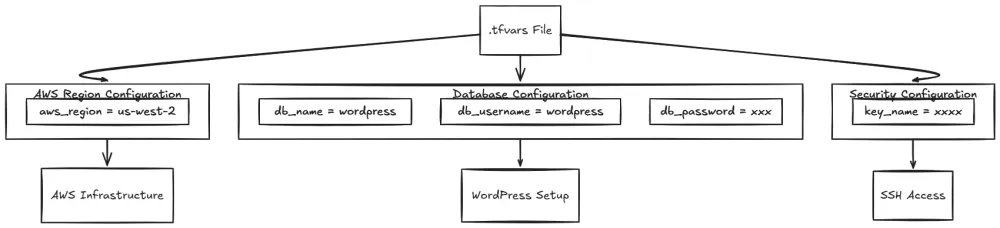
- terraform.tfvars - Stores the actual values for variables (should be git-ignored if contains sensitive data)
- .terraform.lock.hcl - Locks provider versions for consistent deployments
- backend.tf - (Optional) Configures where Terraform stores its state file
→ Providers.tf
Think of this configuration file as establishing the connection between Terraform and AWS - similar to how you configure your phone's WiFi settings with a network name and password. When you set up a new Terraform project, this provider configuration is typically one of your first files because it creates the essential link that lets Terraform communicate with AWS.
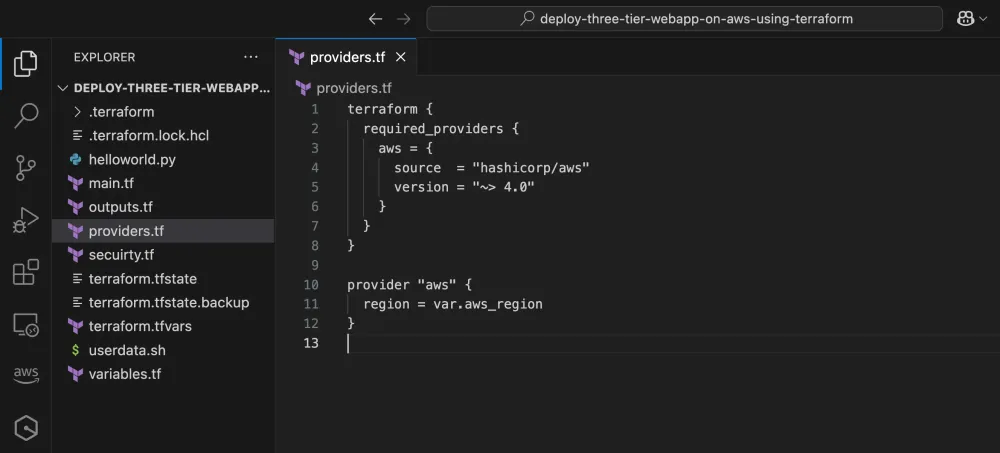
Key points in this configuration:
- The
providerblock specifies which AWS region to use
- The
profileparameter indicates which AWS credentials to use
- The
required_providersblock ensures you use a compatible AWS provider version
YAML
terraform {required_providers {aws = {source = "hashicorp/aws"version = "~> 4.0"}}}provider "aws" {region = var.aws_regionprofile = "default" # AWS credentials profile to use}
Let's break it down into two main parts:
- The
terraformblock:
YAML
terraform {required_providers {aws = {source = "hashicorp/aws"version = "~> 4.0"}}}
This
required_providers block defines the essential tools for your Terraform configuration - similar to a shopping list for a specific project. Here's what each part specifies:- The AWS provider is your primary tool
- The source
hashicorp/awsindicates where Terraform downloads the provider
- The version constraint
~> 4.0lets you use any 4.x version (for example, 4.1, 4.2, but not 5.0)
- The
providerblock:
YAML
provider "aws" {region = var.aws_region}
The
provider block configures your AWS connection settings - similar to selecting a specific AWS region for your resources. This configuration uses a variable ( var.aws_region ) for the region value instead of a hardcoded string, which provides two key benefits:- Flexibility: You can change the region by updating a single variable
- Reusability: You can use the same configuration across different environments
→ variables.tf
This file defines Terraform variables that can be used throughout the configuration. Variables make the code more flexible and reusable by allowing users to specify values dynamically rather than hardcoding them.
YAML
variable "aws_region" {description = "AWS region"type = stringdefault = "us-west-2"}variable "vpc_cidr" {description = "CIDR for VPC"type = stringdefault = "10.0.0.0/16"}variable "instance_type" {description = "EC2 instance type"type = stringdefault = "t2.micro"}variable "db_instance_class" {description = "RDS instance class"type = stringdefault = "db.t3.micro"}variable "db_name" {description = "The name of the WordPress database"type = stringdefault = "wordpress"}variable "db_username" {description = "The username for the WordPress database"type = stringdefault = "wordpress"}variable "db_password" {description = "The password for the WordPress database"type = stringsensitive = true}# Add this to variables.tfvariable "key_name" {description = "Name of the EC2 key pair"type = string}
This variable defines the AWS Region where resources will be deployed, defaulting to us-west-2 if not provided, which Terraform will use automatically.
YAML
# VPC CIDR Blockvariable "vpc_cidr" {description = "CIDR for VPC"type = stringdefault = "10.0.0.0/16"}
Defines the IP address range for the Virtual Private Cloud (VPC) using a default CIDR block of 10.0.0.0/16, which provides up to 65,536 IP addresses.
YAML
# EC2 Instance Type:variable "instance_type" {Deploying WP, RDS and ELB with the help of terraform4description = "EC2 instance type"type = stringdefault = "t2.micro"
Specifies the Amazon RDS instance class, with a default of db.t3.micro, which is a cost-effective instance type.
YAML
# RDS Database Instance Class:variable "db_instance_class" {description = "RDS instance class"type = stringdefault = "db.t3.micro"}
→ main.tf
YAML
# VPC Configurationresource "aws_vpc" "wordpress_vpc" {cidr_block = var.vpc_cidrenable_dns_hostnames = trueenable_dns_support = truetags = {Name = "wordpress-vpc"}}# Public Subnetsresource "aws_subnet" "public_subnet_1" {vpc_id = aws_vpc.wordpress_vpc.idcidr_block = "10.0.1.0/24"availability_zone = "${var.aws_region}a"tags = {Name = "WordPress Public Subnet 1"}}resource "aws_subnet" "public_subnet_2" {vpc_id = aws_vpc.wordpress_vpc.idcidr_block = "10.0.2.0/24"availability_zone = "${var.aws_region}b"tags = {Name = "WordPress Public Subnet 2"}}# Private Subnets for RDSresource "aws_subnet" "private_subnet_1" {vpc_id = aws_vpc.wordpress_vpc.idcidr_block = "10.0.3.0/24"availability_zone = "${var.aws_region}a"tags = {Name = "WordPress Private Subnet 1"}}resource "aws_subnet" "private_subnet_2" {vpc_id = aws_vpc.wordpress_vpc.idcidr_block = "10.0.4.0/24"availability_zone = "${var.aws_region}b"tags = {Name = "WordPress Private Subnet 2"}}# Internet Gatewayresource "aws_internet_gateway" "wordpress_igw" {vpc_id = aws_vpc.wordpress_vpc.idtags = {Name = "WordPress IGW"}}# Route Tableresource "aws_route_table" "public_rt" {vpc_id = aws_vpc.wordpress_vpc.idroute {cidr_block = "0.0.0.0/0"gateway_id = aws_internet_gateway.wordpress_igw.id}tags = {Name = "WordPress Public Route Table"}}resource "aws_route_table_association" "public_1" {subnet_id = aws_subnet.public_subnet_1.idroute_table_id = aws_route_table.public_rt.id}resource "aws_route_table_association" "public_2" {subnet_id = aws_subnet.public_subnet_2.idroute_table_id = aws_route_table.public_rt.id}# Elastic IP for WordPress Server 1resource "aws_eip" "wordpress_1_eip" {instance = aws_instance.wordpress_1.idvpc = truetags = {Name = "WordPress Server 1 EIP"}}# Elastic IP for WordPress Server 2resource "aws_eip" "wordpress_2_eip" {instance = aws_instance.wordpress_2.idvpc = truetags = {Name = "WordPress Server 2 EIP"}}# Create template file for user datadata "template_file" "user_data" {template = file("userdata.sh")vars = {db_name = var.db_namedb_username = var.db_usernamedb_password = var.db_passworddb_endpoint = replace(aws_db_instance.wordpress.endpoint, ":3306", "")}}# EC2 Instancesresource "aws_instance" "wordpress_1" {ami = "ami-0606dd43116f5ed57" # Ubuntu 22.04 LTSinstance_type = var.instance_typesubnet_id = aws_subnet.public_subnet_1.idassociate_public_ip_address = truekey_name = var.key_namevpc_security_group_ids = [aws_security_group.wordpress_sg.id]user_data = data.template_file.user_data.renderedtags = {Name = "WordPress Server 1"}depends_on = [aws_db_instance.wordpress]}resource "aws_instance" "wordpress_2" {ami = "ami-0606dd43116f5ed57" # Ubuntu 22.04 LTSinstance_type = var.instance_typesubnet_id = aws_subnet.public_subnet_2.idassociate_public_ip_address = truekey_name = var.key_namevpc_security_group_ids = [aws_security_group.wordpress_sg.id]user_data = data.template_file.user_data.renderedtags = {Name = "WordPress Server 2"}depends_on = [aws_db_instance.wordpress]}# RDS Subnet Groupresource "aws_db_subnet_group" "wordpress" {name = "wordpress-subnet-group"subnet_ids = [aws_subnet.private_subnet_1.id, aws_subnet.private_subnet_2.id]tags = {Name = "WordPress DB subnet group"}}# RDS Instanceresource "aws_db_instance" "wordpress" {identifier = "wordpress-db"allocated_storage = 20storage_type = "gp2"engine = "mysql"engine_version = "8.0"instance_class = var.db_instance_classdb_name = var.db_nameusername = var.db_usernamepassword = var.db_passwordskip_final_snapshot = truevpc_security_group_ids = [aws_security_group.rds_sg.id]db_subnet_group_name = aws_db_subnet_group.wordpress.name}# Create ALBresource "aws_lb" "wordpress_alb" {name = "wordpress-alb"internal = falseload_balancer_type = "application"security_groups = [aws_security_group.alb_sg.id]subnets = [aws_subnet.public_subnet_1.id, aws_subnet.public_subnet_2.id]}# Create ALB Target Groupresource "aws_lb_target_group" "wordpress_tg" {name = "wordpress-tg"port = 80protocol = "HTTP"vpc_id = aws_vpc.wordpress_vpc.idhealth_check {path = "/"healthy_threshold = 2unhealthy_threshold = 10}}# Create ALB Listenerresource "aws_lb_listener" "front_end" {load_balancer_arn = aws_lb.wordpress_alb.arnport = "80"protocol = "HTTP"default_action {type = "forward"target_group_arn = aws_lb_target_group.wordpress_tg.arn}}# Attach EC2 instances to target groupresource "aws_lb_target_group_attachment" "wordpress_1" {target_group_arn = aws_lb_target_group.wordpress_tg.arntarget_id = aws_instance.wordpress_1.idport = 80}resource "aws_lb_target_group_attachment" "wordpress_2" {target_group_arn = aws_lb_target_group.wordpress_tg.arntarget_id = aws_instance.wordpress_2.idport = 80}
→ security.tf

YAML
# Security Group for EC2 instancesresource "aws_security_group" "wordpress_sg" {name = "wordpress-sg"description = "Security group for WordPress servers"vpc_id = aws_vpc.wordpress_vpc.idingress {from_port = 80to_port = 80protocol = "tcp"cidr_blocks = ["0.0.0.0/0"]}ingress {from_port = 443to_port = 443protocol = "tcp"cidr_blocks = ["0.0.0.0/0"]}ingress {from_port = 22to_port = 22protocol = "tcp"cidr_blocks = ["0.0.0.0/0"]}egress {from_port = 0to_port = 0protocol = "-1"cidr_blocks = ["0.0.0.0/0"]}}# Security Group for RDSresource "aws_security_group" "rds_sg" {name = "wordpress-rds-sg"description = "Security group for WordPress RDS"vpc_id = aws_vpc.wordpress_vpc.idingress {from_port = 3306to_port = 3306protocol = "tcp"security_groups = [aws_security_group.wordpress_sg.id]}egress {from_port = 0to_port = 0protocol = "-1"cidr_blocks = ["0.0.0.0/0"]}}# Security Group for ALBresource "aws_security_group" "alb_sg" {name = "wordpress-alb-sg"description = "Security group for WordPress ALB"vpc_id = aws_vpc.wordpress_vpc.id# Allow HTTP from anywhereingress {from_port = 80to_port = 80protocol = "tcp"cidr_blocks = ["0.0.0.0/0"]}# Allow HTTPS from anywhereingress {from_port = 443to_port = 443protocol = "tcp"cidr_blocks = ["0.0.0.0/0"]}# Allow all outbound trafficegress {from_port = 0to_port = 0protocol = "-1"cidr_blocks = ["0.0.0.0/0"]}tags = {Name = "WordPress-ALB-SecurityGroup"}}# Update EC2 security group to allow traffic from ALBresource "aws_security_group_rule" "allow_alb" {type = "ingress"from_port = 80to_port = 80protocol = "tcp"source_security_group_id = aws_security_group.alb_sg.idsecurity_group_id = aws_security_group.wordpress_sg.id}
→ outputs.tf

YAML
output "wordpress_server_1_public_ip" {value = aws_eip.wordpress_1_eip.public_ip}output "wordpress_server_2_public_ip" {value = aws_eip.wordpress_2_eip.public_ip}output "wordpress_server_1_public_dns" {value = aws_eip.wordpress_1_eip.public_dns}output "wordpress_server_2_public_dns" {value = aws_eip.wordpress_2_eip.public_dns}output "rds_endpoint" {value = aws_db_instance.wordpress.endpoint}output "alb_dns_name" {value = aws_lb.wordpress_alb.dns_name}
→ userdata.sh
YAML
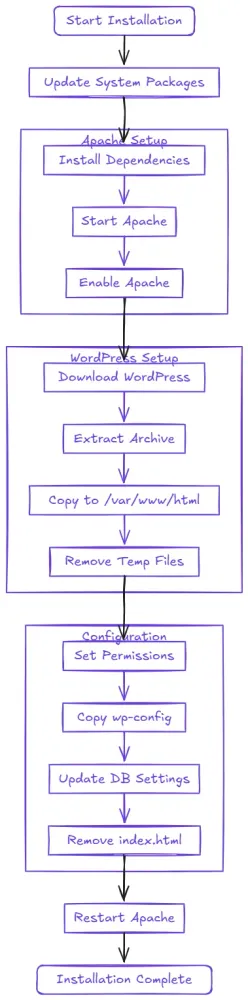
#!/bin/bashsudo apt-get update -ysudo apt-get install -y apache2 php php-mysql mysql-client# Start and enable Apache2sudo systemctl start apache2sudo systemctl enable apache2# Download and configure WordPresscd /tmpsudo wget https://wordpress.org/latest.tar.gzsudo tar -xzf latest.tar.gzsudo cp -r wordpress/* /var/www/html/sudo rm -rf wordpress latest.tar.gz# Set correct permissionssudo chown -R www-data:www-data /var/www/html/sudo chmod -R 755 /var/www/html/# Configure wp-config.phpsudo cp /var/www/html/wp-config-sample.php /var/www/html/wp-config.php# Update WordPress configurationsudo sed -i "s/database_name_here/${db_name}/" /var/www/html/wp-config.phpsudo sed -i "s/username_here/${db_username}/" /var/www/html/wp-config.phpsudo sed -i "s/password_here/${db_password}/" /var/www/html/wp-config.phpsudo sed -i "s/localhost/${db_endpoint}/" /var/www/html/wp-config.php# Remove default Apache index.htmlsudo rm -f /var/www/html/index.html# Restart Apache2sudo systemctl restart apache2
→ terraforms.tfvars
JSON
aws_region = "us-west-2"db_name = "wordpress"db_username = "wordpress"db_password = "Admin_123"# Change this to a secure passwordkey_name = "udemycoursekeypair"# Requesting you to create a Key Pair in same region as mentioned in Line 1 else whole stack will fail
How to Deploy a WordPress Instance Once All the Files Are Kept Handy?
Here are the key commands and their explanations. We are going to run
terraform init , followed by terraform plan and terraform apply in sequence.-
terraform init
- This is always the first command you run in a new or existing Terraform working directory
- Initializes the working directory
- Downloads required providers and modules
- Sets up the backend for storing state files
-
terraform plan
- Shows what changes Terraform will make to your infrastructure
- Creates an execution plan without actually applying changes
- Good practice to review changes before applying them
- Optional: Use
terraform plan -out=plan.tfto save the plan to a file
-
terraform apply
- Applies the changes to reach the desired state
- Creates, updates, or deletes infrastructure resources
- Will show a plan and ask for confirmation before making changes
- To automatically approve:
terraform apply -auto-approve
- To apply a saved plan:
terraform apply plan.tf
-
terraform destroy
- Destroys all resources managed by your Terraform configuration
- Use with caution as this will delete resources
- Will ask for confirmation before destroying. To automatically approve:
terraform destroy -auto-approve
Watch the video demonstration of executing Terraform commands and installing WordPress on AWS.
Conclusion
Thank you for completing this tutorial. After completing this demonstration, you can remove all created resources to avoid unnecessary costs. Important: This command permanently deletes resources defined in your Terraform configuration. Make sure you're in the correct working directory and environment before proceeding. To decommission the resources, run:
JSON
terraform destroy
Before we conclude, you can access all the files in GitHub here. Please ensure you run these Terraform files in your development or staging environment, adhere to best coding guidelines, and perform a security check. Happy building WordPress CMS on AWS with Terraform and Amazon Q! If this blog helped you leverage Amazon Q, please hit like and feel free to let us know in the comments. Thank you!
Enjoyed reading this content? Let the author know!
Your likes, comments, shares, and saves help creators reach more builders.

Loading recommendations
Loading article