

Deploy Your Web Application to staging and production with Elastic Beanstalk, AWS CDK, CloudFront, and Circleci pipelines
In this guide, I cover the following key aspects Elastic Beanstalk- Load balancers- EC2- Relational Database Service (RDS)- Route 53- CloudFront- Virtual Private Cloud (VPC)- Security Groups- SSL/TLS Certificate Manager - Secrets Manager- S3 Buckets- Namecheap Integration- NextJS/ReactJS CloudFront deployment- Papertrail monitoring & logging- CircleCI pipelines- Staging and Production Environments


A demonstration of how to use AWS CDK Pipelines and Elastic Beanstalk to deploy a web application and speed up the development & deployment process.
In the second part of the guide, I will show you how to deploy the React/Next.Js app as well to s3 and Cloudfront.
In the end, we will build Circleci ci/cd pipelines to deploy our application to staging or production automatically & will set up Papertrail monitory logs for our elastic Beanstalk application.
AWS Elastic Beanstalk provides a solution for this. It’s a user-friendly service designed for deploying and scaling web applications and services. Supporting various programming languages and server configurations (Java, .NET, PHP, Node.js, Python, Ruby, Go, and Docker with servers like Apache, Nginx, Passenger, and IIS), Elastic Beanstalk simplifies deployment by accepting a single ZIP or WAR file. It takes care of tasks like capacity provisioning, load balancing, auto-scaling, and application health monitoring, while still granting us control over the underlying AWS resources.
In this guide, we will learn how to
- Deploy your web application by creating an Elastic Beanstalk environment and configuring its settings.
- Set up an RDS instance to host your application’s relational database with the desired engine and security settings.
- Manage your domain’s DNS records and hosted zones on Route 53 for efficient domain resolution.
- Accelerate content delivery and reduce latency by creating a CloudFront distribution, configuring origins, and associating it with your Elastic Beanstalk environment.
- Isolate and control your network environment by setting up a Virtual Private Cloud with proper subnets, route tables, and internet gateways.
- Define security groups for services like Elastic Beanstalk and RDS to control inbound and outbound traffic securely.
- Secure your domain with SSL/TLS certificates from AWS Certificate Manager, associating them with your CloudFront distribution and Elastic Beanstalk environment.
- Safely store and manage sensitive information, such as database credentials, using AWS Secrets Manager and integrate it with your Elastic Beanstalk environment.
- Create and configure S3 buckets for storing static assets, backups, and other necessary files with proper access controls.
- Automate your build and deployment workflows by configuring Circle CI with a .circleci/config.yml file and integrating it with your version control system.
- Point your domain to AWS by updating DNS records on Namecheap and associating the domain with your AWS resources.
Elastic Beanstalk
A Platform-as-a-Service (PaaS) offered by AWS that simplifies the deployment and management of applications. It automatically handles infrastructure provisioning, capacity scaling, load balancing, and application health monitoring.
You can manually create Elastic beanstalk application by following the aws guide
https://docs.aws.amazon.com/elasticbeanstalk/latest/dg/GettingStarted.CreateApp.html
RDS
A managed database service that simplifies the setup, operation, and scaling of relational databases like MySQL, PostgreSQL, and others.
You can manually create RDS by following the AWS guide
https://docs.aws.amazon.com/AmazonRDS/latest/UserGuide/USER_CreateDBInstance.html
Let’s focus on creating the Elastic Beanstalk app, RDS, and VPC via aws CDK 🚀
Copy the account ID, navigate to security credentials, and create access keys.
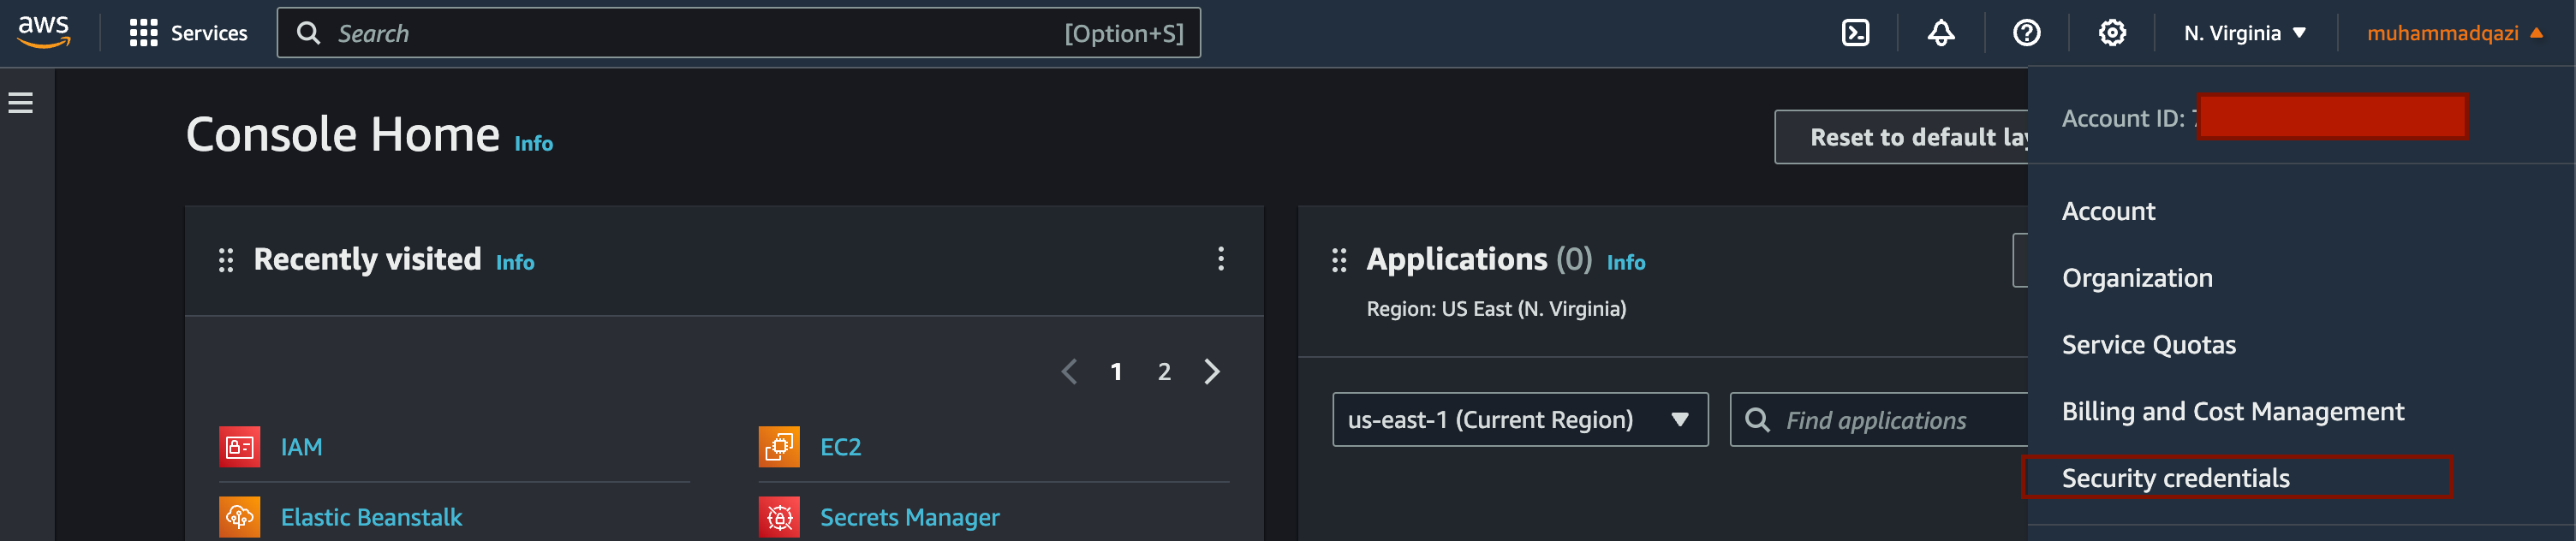
Copy your access keys and add it to
~/.aws/config file[aws-deploy]aws_access_key_id = YOUR_ACCESS_KEY_IDaws_secret_access_key = YOUR_SECRET_ACCESS_KEY
Please install the specific version of the CDK to match the dependencies that are installed later on.
Example:
yarn add cdk@2.70.0Initialize the CDK application that we will use to create the infrastructure.
npx cdk init app --language typescriptCreating cloud formation resource stacks
We are going to delete the default file created by CDK and define our code for all the ElasticBeanstalk resources stack, RDS, and VPC stacks.
Add the following code in /lib as elbtest-stack.ts, rds-infrastructure.ts, and vpc-stack.ts respectively.
1) ElbtestStack (Elastic Beanstalk Stack):
Below AWS CDK script defines an AWS CloudFormation stack for an Elastic Beanstalk environment. It includes the creation of an S3 asset from a specified directory containing application code, an Elastic Beanstalk application, an application version tied to the S3 asset, and the necessary IAM roles and instance profiles. It also configures options such as autoscaling group settings and environment properties.
import * as cdk from '@aws-cdk/core'import * as s3assets from '@aws-cdk/aws-s3-assets'import * as elasticbeanstalk from '@aws-cdk/aws-elasticbeanstalk'import * as iam from '@aws-cdk/aws-iam'
export interface EBEnvProps extends cdk.StackProps {  // Autoscaling group configuration  minSize?: string;  maxSize?: string;  instanceTypes?: string;  envName?: string;
}
export class ElbtestStack extends cdk.Stack {  constructor(scope: cdk.Construct, id: string, props?: EBEnvProps) {    super(scope, id, props);
    // The code that defines your stack goes here
    // Construct an S3 asset Zip from directory up.    const webAppZipArchive = new s3assets.Asset(this, 'WebAppZip', {      path: `${__dirname}/YOUR_SRC_DIR`,    });
    // Create a ElasticBeanStalk app.    const appName = 'YOUR_DB';    const app = new elasticbeanstalk.CfnApplication(this, 'Application', {      applicationName: appName,    });
    // Create an app version from the S3 asset defined earlier    const appVersionProps = new elasticbeanstalk.CfnApplicationVersion(this, 'AppVersion', {      applicationName: appName,      sourceBundle: {        s3Bucket: webAppZipArchive.s3BucketName,        s3Key: webAppZipArchive.s3ObjectKey,      },    });
    // Make sure that Elastic Beanstalk app exists before creating an app version    appVersionProps.addDependsOn(app);
    // Create role and instance profile    const myRole = new iam.Role(this, `${appName}-aws-elasticbeanstalk-ec2-role`, {      assumedBy: new iam.ServicePrincipal('ec2.amazonaws.com'),    });
    const managedPolicy = iam.ManagedPolicy.fromAwsManagedPolicyName('AWSElasticBeanstalkWebTier')    myRole.addManagedPolicy(managedPolicy);
    const myProfileName = `${appName}-InstanceProfile`
    const instanceProfile = new iam.CfnInstanceProfile(this, myProfileName, {      instanceProfileName: myProfileName,      roles: [        myRole.roleName      ]    });
    // Example of some options which can be configured    const optionSettingProperties: elasticbeanstalk.CfnEnvironment.OptionSettingProperty[] = [      {        namespace: 'aws:autoscaling:launchconfiguration',        optionName: 'IamInstanceProfile',        value: myProfileName,      },      {        namespace: 'aws:autoscaling:asg',        optionName: 'MinSize',        value: props?.maxSize ?? '1',      },      {        namespace: 'aws:autoscaling:asg',        optionName: 'MaxSize',        value: props?.maxSize ?? '1',      },      {        namespace: 'aws:ec2:instances',        optionName: 'InstanceTypes',        value: props?.instanceTypes ?? 't2.micro',      },    ];
    // Create an Elastic Beanstalk environment to run the application    const elbEnv = new elasticbeanstalk.CfnEnvironment(this, 'Environment', {      environmentName: props?.envName ?? `${appName}-env`,      applicationName: app.applicationName || appName,      solutionStackName: '64bit Amazon Linux 2023 v6.0.4 running Node.js 18',      optionSettings: optionSettingProperties,      versionLabel: appVersionProps.ref,    });  }}
Make sure to replace the application source code directory with the correct one. you can also find this code in my GitHub repository
2) RdsStack (RDS Database Stack):
The below script creates an Amazon RDS (Relational Database Service) instance within an AWS CDK stack. It takes in a Virtual Private Cloud (VPC) and a security group as input parameters, generates a secret for database credentials using AWS Secrets Manager, and creates an RDS instance configured for MySQL. The script also creates an AWS Systems Manager (SSM) parameter containing the ARN of the generated database credentials secret.
import * as cdk from '@aws-cdk/core'import * as ec2 from '@aws-cdk/aws-ec2'import * as rds from '@aws-cdk/aws-rds'import * as secretsmanager from '@aws-cdk/aws-secretsmanager';import * as ssm from '@aws-cdk/aws-ssm'import { ISecurityGroup, IVpc } from '@aws-cdk/aws-ec2';import { Secret } from '@aws-cdk/aws-secretsmanager';
interface RdsStackProps extends cdk.StackProps {    myVpc: ec2.IVpc;    rdsSecurityGroup: ec2.ISecurityGroup;}
export class RdsStack extends cdk.Stack {    readonly myRdsInstance: rds.DatabaseInstance;    readonly databaseCredentialsSecret: Secret;
    constructor(scope: cdk.Construct, id: string, props?: RdsStackProps) {        super(scope, id, props);
        const databaseUsername = process.env.DB_USERNAME;
        const applicationName = 'APP_NAME';        this.databaseCredentialsSecret = new secretsmanager.Secret(this, 'DBCredentialsSecret', {            secretName: `${applicationName}-db-credentials`,            generateSecretString: {                secretStringTemplate: JSON.stringify({                    username: databaseUsername                }),                excludePunctuation: true,                includeSpace: false,                generateStringKey: 'password',            }        });
        new ssm.StringParameter(this, 'DBCredentialsArn', {            parameterName: `${applicationName}-db-credentials-arn`,            stringValue: this.databaseCredentialsSecret.secretArn,        });
        this.myRdsInstance = new rds.DatabaseInstance(this, 'MyDatabaseInstance', {            publiclyAccessible: true,            engine: rds.DatabaseInstanceEngine.mysql({                version: rds.MysqlEngineVersion.VER_5_7,            }),            instanceType: ec2.InstanceType.of(ec2.InstanceClass.BURSTABLE3, ec2.InstanceSize.SMALL),            vpc: props?.myVpc as IVpc,            securityGroups: [props?.rdsSecurityGroup as ISecurityGroup],            allocatedStorage: 20,            databaseName: 'DB_NAME_HERE',            storageEncrypted: true,        });    }}
Make sure to replace the name according to your application above.
3) VpcStack (Virtual Private Cloud Stack):
Below AWS CDK script defines a VPC stack with multiple subnets for a fictional application named “YOUR_APP_NAME” It creates a VPC with public, private, and isolated subnets, configures a gateway endpoint for Amazon S3 in the private subnet, and sets up security groups for a bastion host, an Elastic Load Balancer (ELB), an Auto Scaling Group (ASG), an RDS instance, and an ElastiCache instance. Ingress and egress rules between these security groups are defined to control traffic flow within the VPC.
import * as cdk from '@aws-cdk/core';import * as ec2 from '@aws-cdk/aws-ec2';import { SecurityGroup, GatewayVpcEndpointAwsService } from '@aws-cdk/aws-ec2';
export class VpcStack extends cdk.Stack {    readonly myVpc: ec2.IVpc;    readonly bastionHostSecurityGroup: SecurityGroup;    readonly elbSecurityGroup: SecurityGroup;    readonly asgSecurityGroup: SecurityGroup;    readonly rdsSecurityGroup: SecurityGroup;    readonly elastiCacheSecurityGroup: SecurityGroup;
    constructor(scope: cdk.Construct, id: string, props?: cdk.StackProps) {        super(scope, id, props);        const applicationName = 'APP_NAME_HERE';        this.myVpc = new ec2.Vpc(this, `${applicationName}-vpc`, {            cidr: process.env.VPC_CIDR,            maxAzs: 4,            natGateways: 1,            vpnGateway: true,            subnetConfiguration: [                {                    subnetType: ec2.SubnetType.PUBLIC,                    name: 'Public',                    cidrMask: 20,                },                {                    subnetType: ec2.SubnetType.PRIVATE,                    name: 'Application',                    cidrMask: 20,                },                {                    subnetType: ec2.SubnetType.ISOLATED,                    name: 'Database',                    cidrMask: 24,                }            ]        });
        this.myVpc.addGatewayEndpoint('s3-gateway', {            service: GatewayVpcEndpointAwsService.S3,            subnets: [{                subnetType: ec2.SubnetType.PRIVATE            }]        })
        this.bastionHostSecurityGroup = new SecurityGroup(this, 'bastionHostSecurityGroup', {            allowAllOutbound: true,            securityGroupName: 'bastion-sg',            vpc: this.myVpc,        });
        this.elbSecurityGroup = new SecurityGroup(this, 'elbSecurityGroup', {            allowAllOutbound: true,            securityGroupName: 'elb-sg',            vpc: this.myVpc,        });
        this.elbSecurityGroup.addIngressRule(ec2.Peer.anyIpv4(), ec2.Port.tcp(80));        this.elbSecurityGroup.addIngressRule(ec2.Peer.anyIpv6(), ec2.Port.tcp(80));
        this.asgSecurityGroup = new SecurityGroup(this, 'asgSecurityGroup', {            allowAllOutbound: false,            securityGroupName: 'asg-sg',            vpc: this.myVpc,        });
        this.asgSecurityGroup.connections.allowFrom(this.elbSecurityGroup, ec2.Port.tcp(80), 'Application Load Balancer Security Group');        this.asgSecurityGroup.connections.allowFrom(this.bastionHostSecurityGroup, ec2.Port.tcp(22), 'Allows connections from bastion hosts');
        this.rdsSecurityGroup = new SecurityGroup(this, 'rdsSecurityGroup', {            allowAllOutbound: false,            securityGroupName: 'rds-sg',            vpc: this.myVpc,        })
        this.rdsSecurityGroup.connections.allowFrom(this.asgSecurityGroup, ec2.Port.tcp(3306), 'Allow connections from eb Auto Scaling Group Security Group');        this.rdsSecurityGroup.connections.allowFrom(this.bastionHostSecurityGroup, ec2.Port.tcp(3306), 'Allow connections from bastion hosts');
        this.elastiCacheSecurityGroup = new SecurityGroup(this, 'elastiCacheSecurityGroup', {            allowAllOutbound: false,            securityGroupName: 'elasti-sg',            vpc: this.myVpc,        });
        this.elastiCacheSecurityGroup.connections.allowFrom(this.asgSecurityGroup, ec2.Port.tcp(6379), 'Allow connections from eb Auto Scaling Security Group');    }}
Make sure to replace the name according to your application above.
Finally, add the following code to /bin as aws-deploy.ts
#!/usr/bin/env nodeimport * as dotenv from 'dotenv';import 'source-map-support/register';import * as cdk from '@aws-cdk/core';import { ElbtestStack } from '../lib/elbtest-stack';import { RdsStack } from '../lib/rds-infrastructure';import { VpcStack } from '../lib/vpc-stack';
dotenv.config()const app = new cdk.App();
const env = {  account: process.env.AWS_ACCOUNT_ID,  region: process.env.AWS_REGION,}
const vpcStack = new VpcStack(app, 'VpcStack', { env: env });const rdsStack = new RdsStack(app, 'RdsStack', { env: env , myVpc: vpcStack.myVpc, rdsSecurityGroup: vpcStack.rdsSecurityGroup });const ebStack =  new ElbtestStack(app, 'ElbtestStack', {  env: env });
rdsStack.addDependency(vpcStack);ebStack.addDependency(rdsStack);
app.synth();
The above script serves as the entry point for deploying AWS CloudFormation stacks using the AWS Cloud Development Kit (CDK). It begins by configuring the environment with necessary modules, loading environment variables, and initializing the CDK application. It defines three stacks representing VPC, RDS database, and Elastic Beanstalk, interconnecting them and establishing dependencies to ensure proper deployment order. The script concludes by synthesizing the CloudFormation templates for deployment. Overall, it orchestrates the deployment of a comprehensive AWS infrastructure, including networking, a relational database, and a scalable application environment.
You will need to install some additional dependencies, add those with the following command
yarn add @aws-cdk/aws-elasticbeanstalk @aws-cdk/aws-s3-assets dotenvYou will need to also bootstrap the cloud formation if this is your first time.
cdk bootstrap --profile aws-deployThen to build and create the CloudFormation template:
yarn build && cdk synth --all --profile aws-deployThe above profile is the name you add in
~/.aws/config file.Finally, let's deploy the stack,
yarn build && cdk deploy --all --profile aws-deployThis might take a while, be patient.
Accessing RDS from the local machine
You will need to make some changes in security groups to access the RDS database from your local machine via Beekeeper or SQL workbench.
Go to RDS, and select the database instance you want to access.
You will need to add your machine IP address to security groups, and sometimes add IP address to routing tables as well. Make sure the database is publicly accessible.
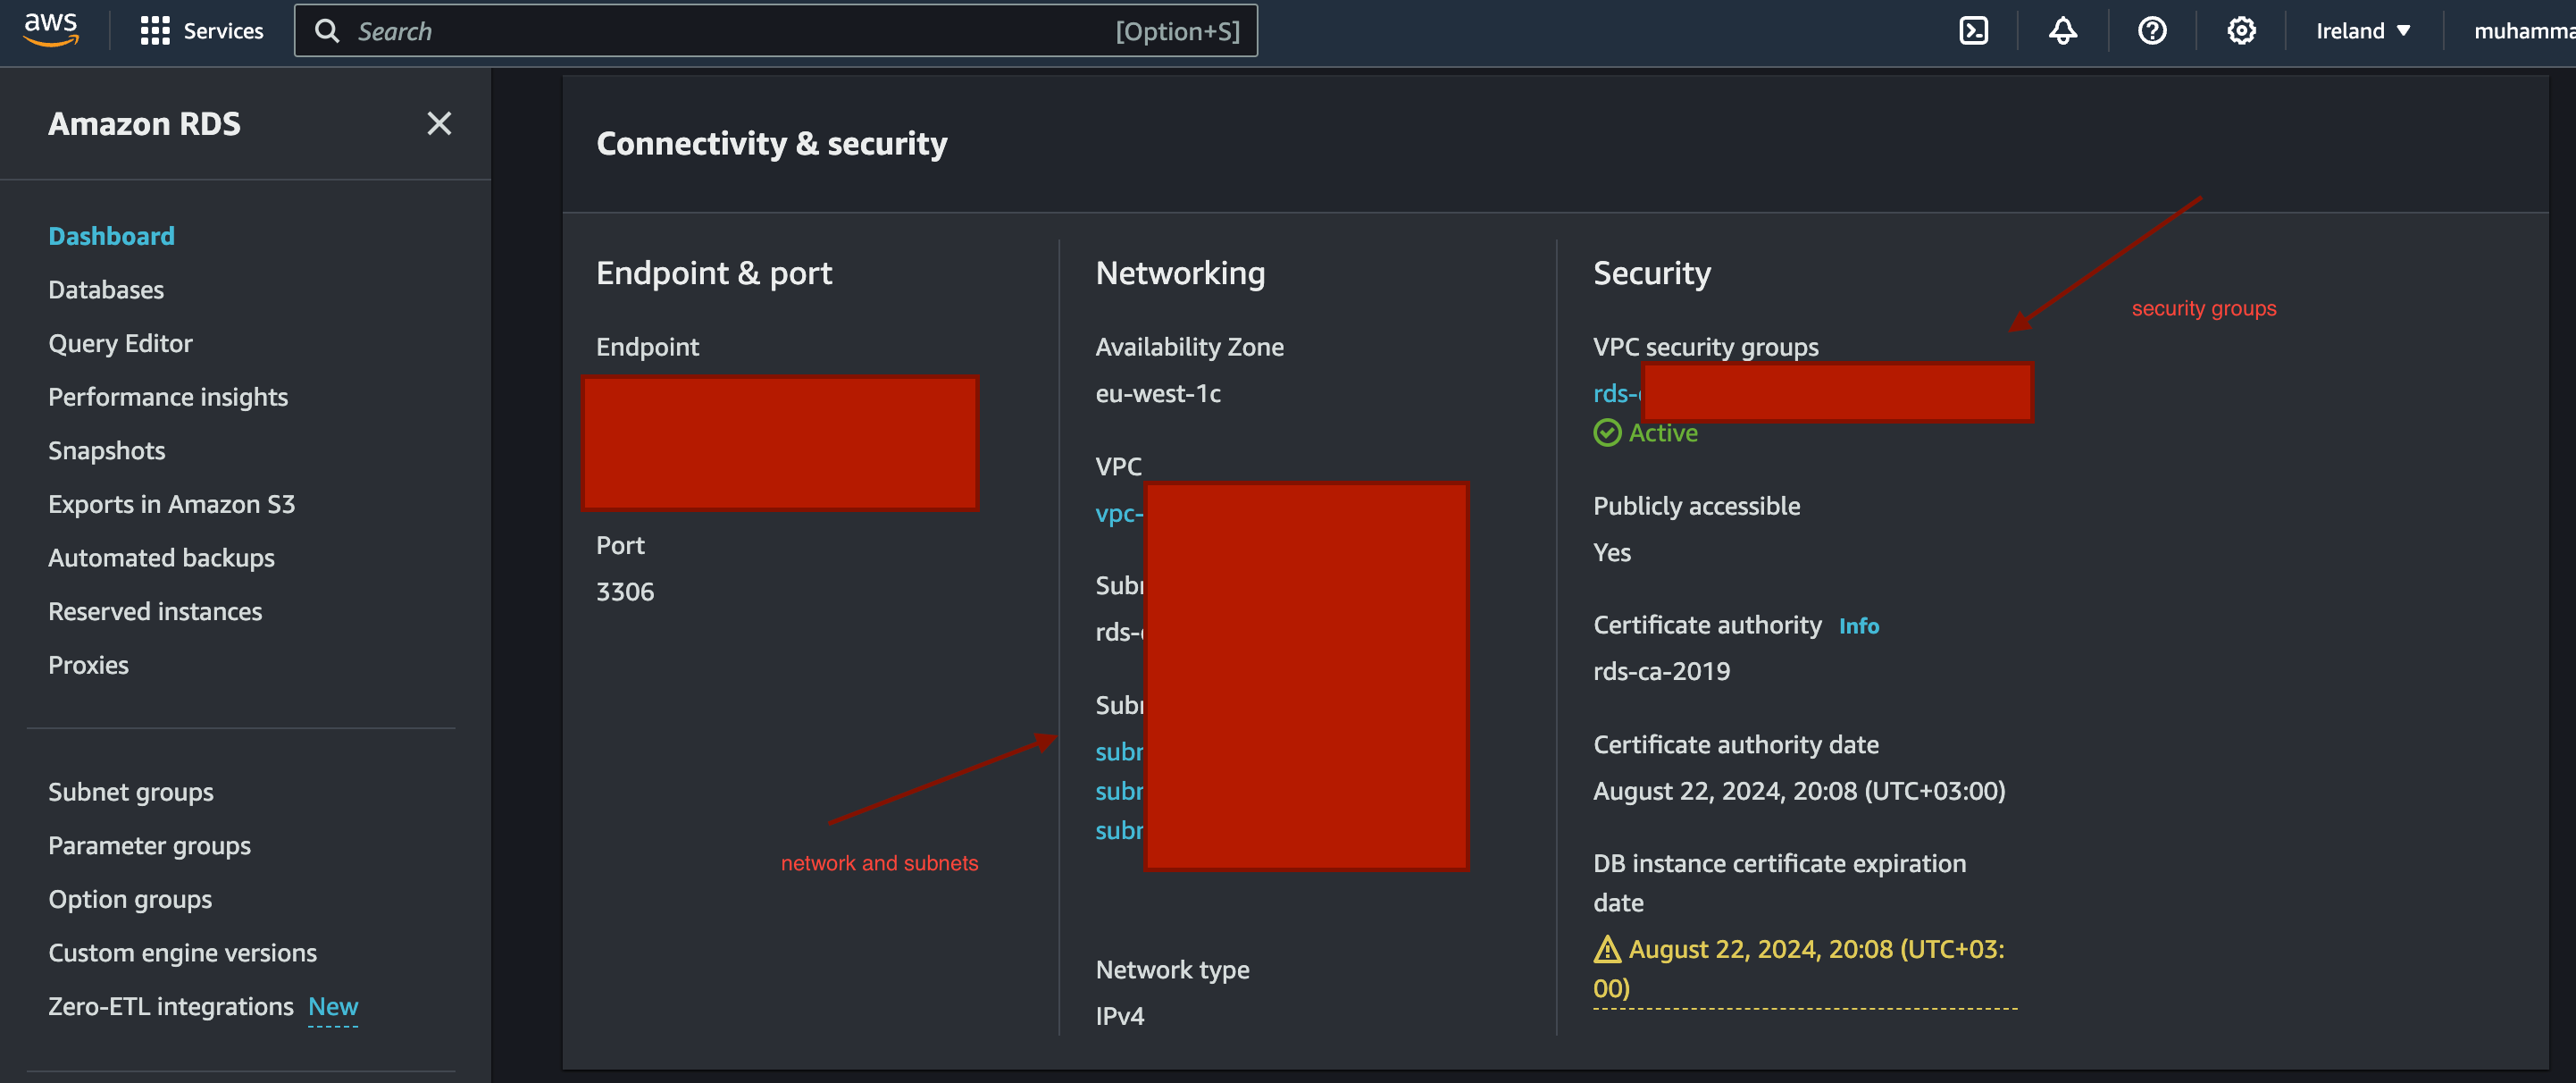
Now click on the security group, and follow the steps below.
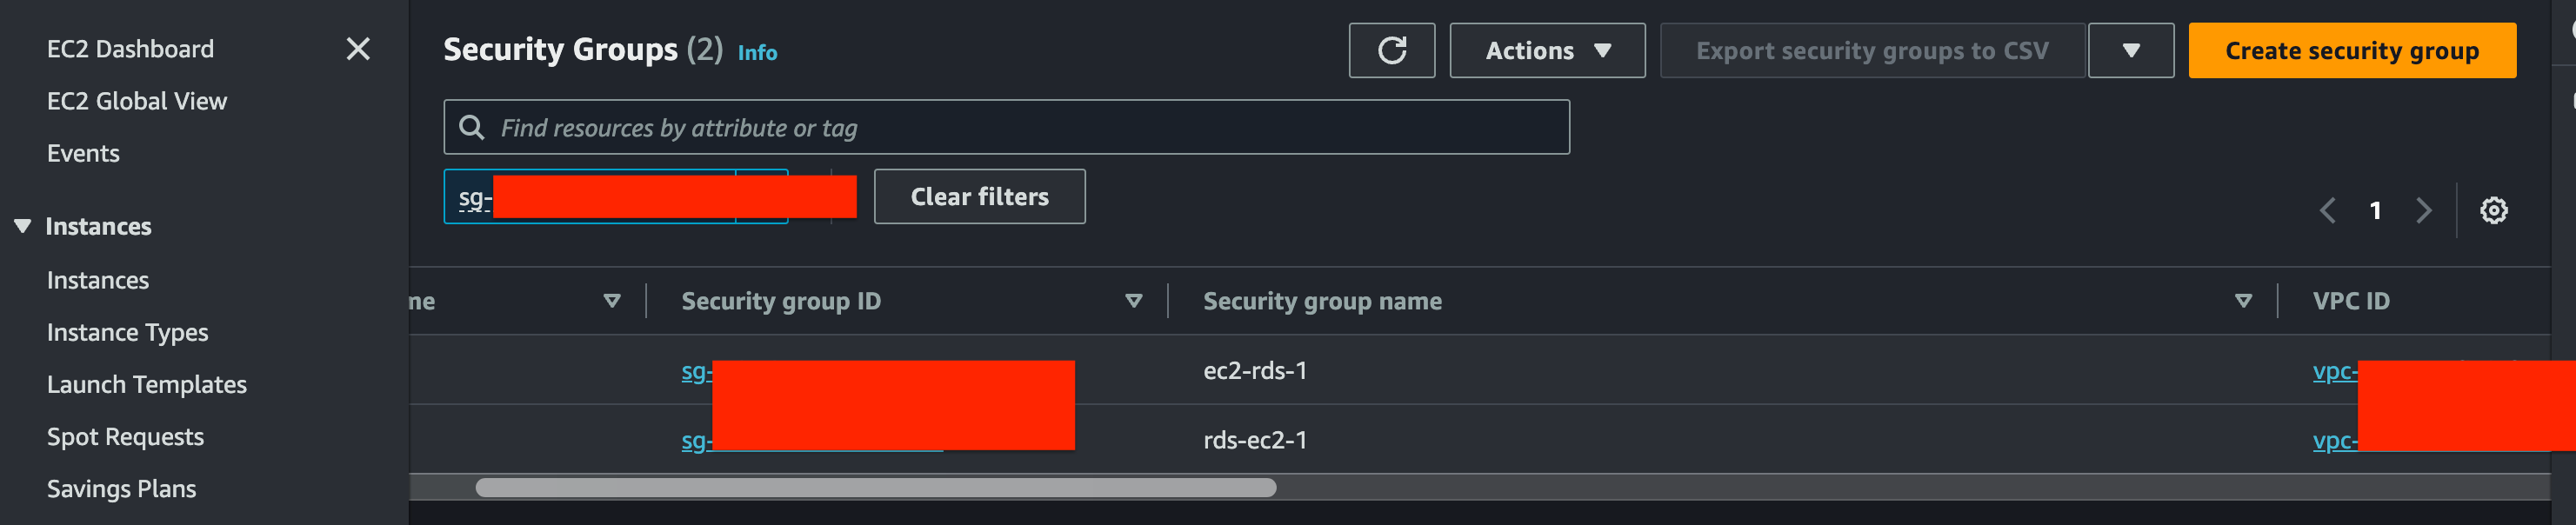
Click Edit inbound rules
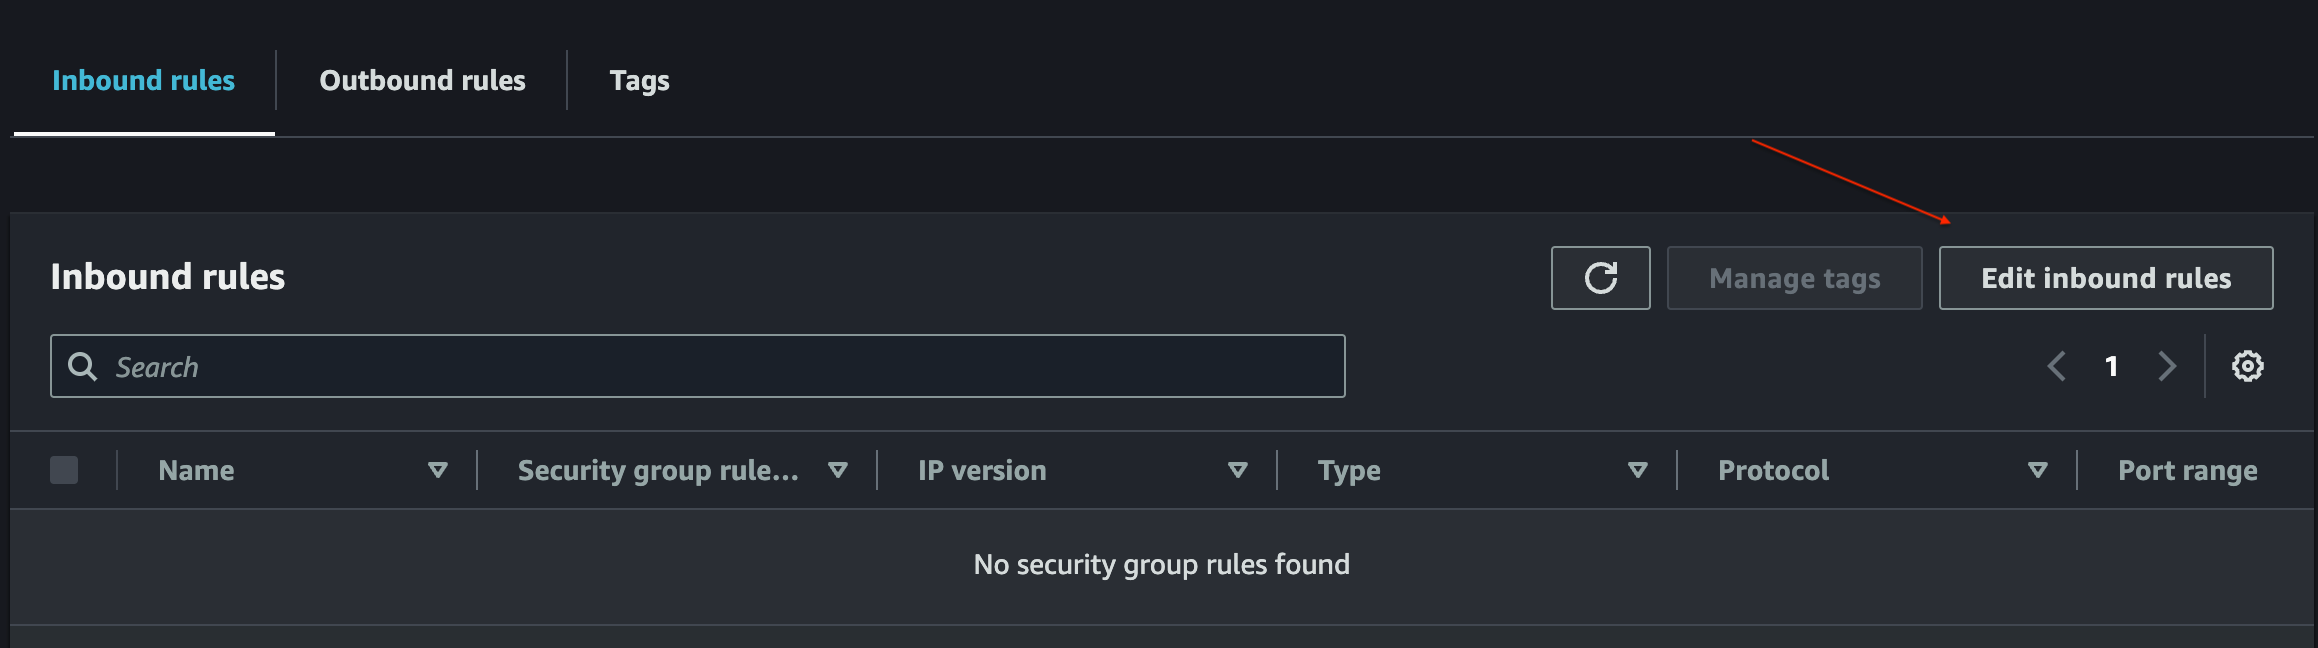
And add your IP address here
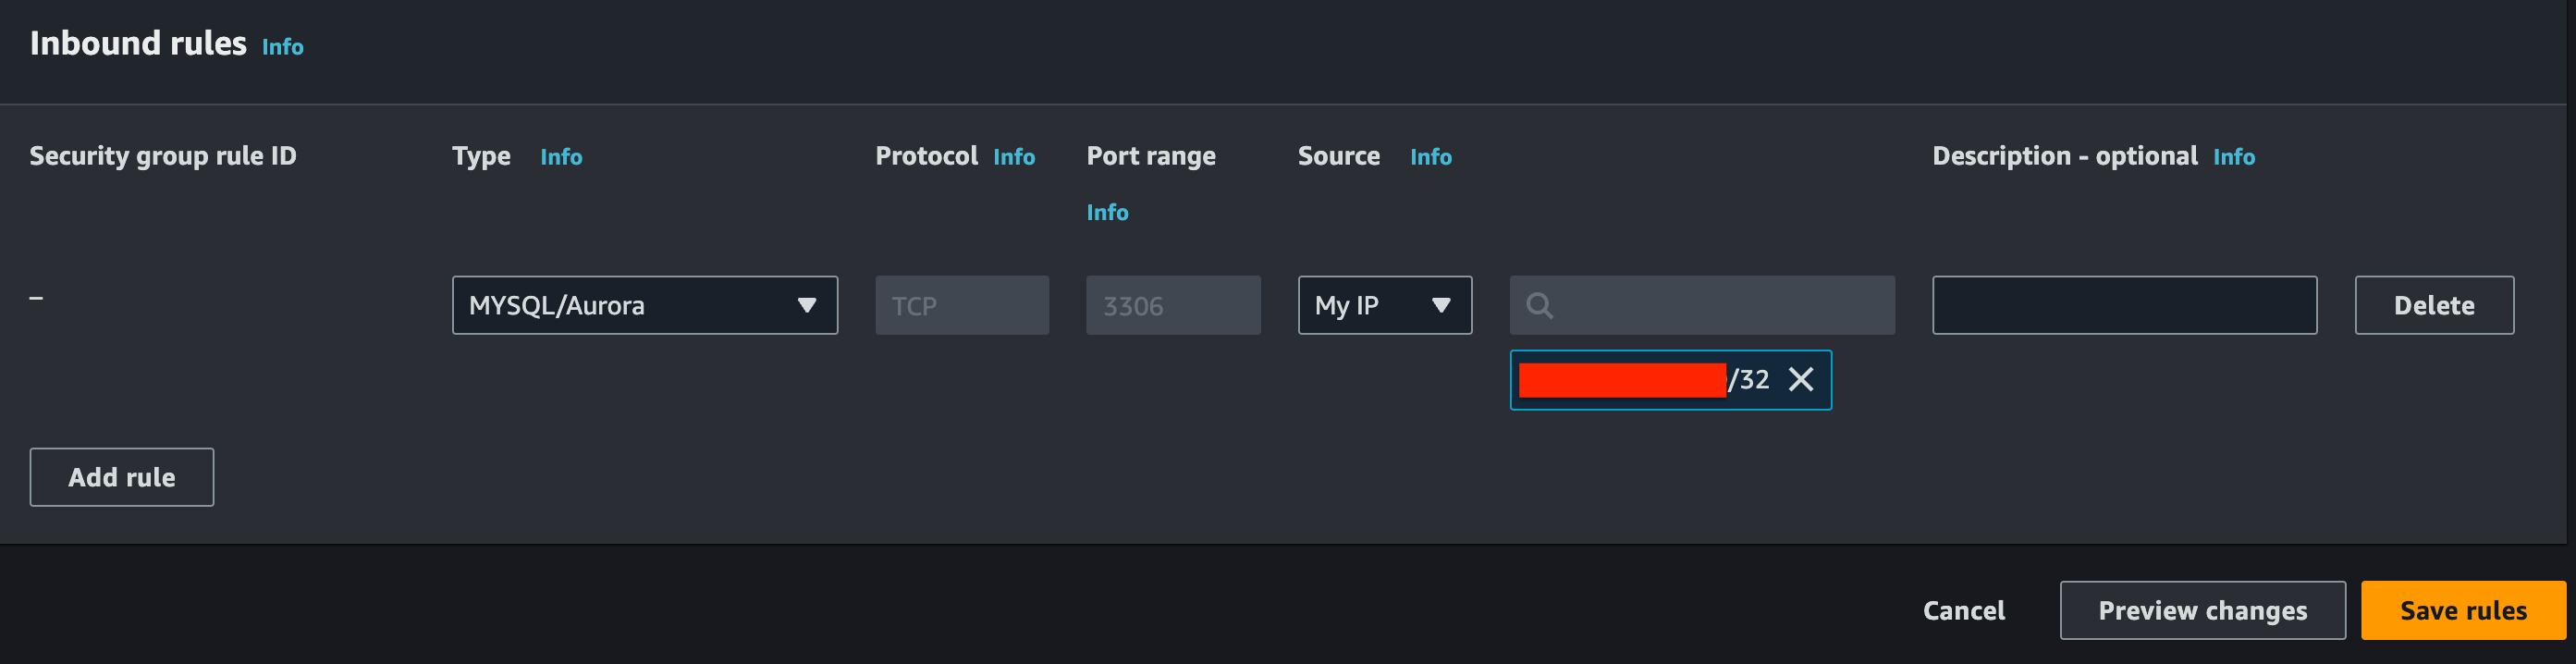
If your database is still not accessible from your local machine then, follow the additional steps to add the IP address to the routing table.
Click on the subnet shown in the above figure, locate the routing table press Edit routes, and add your IP address, you can find your IP by the link
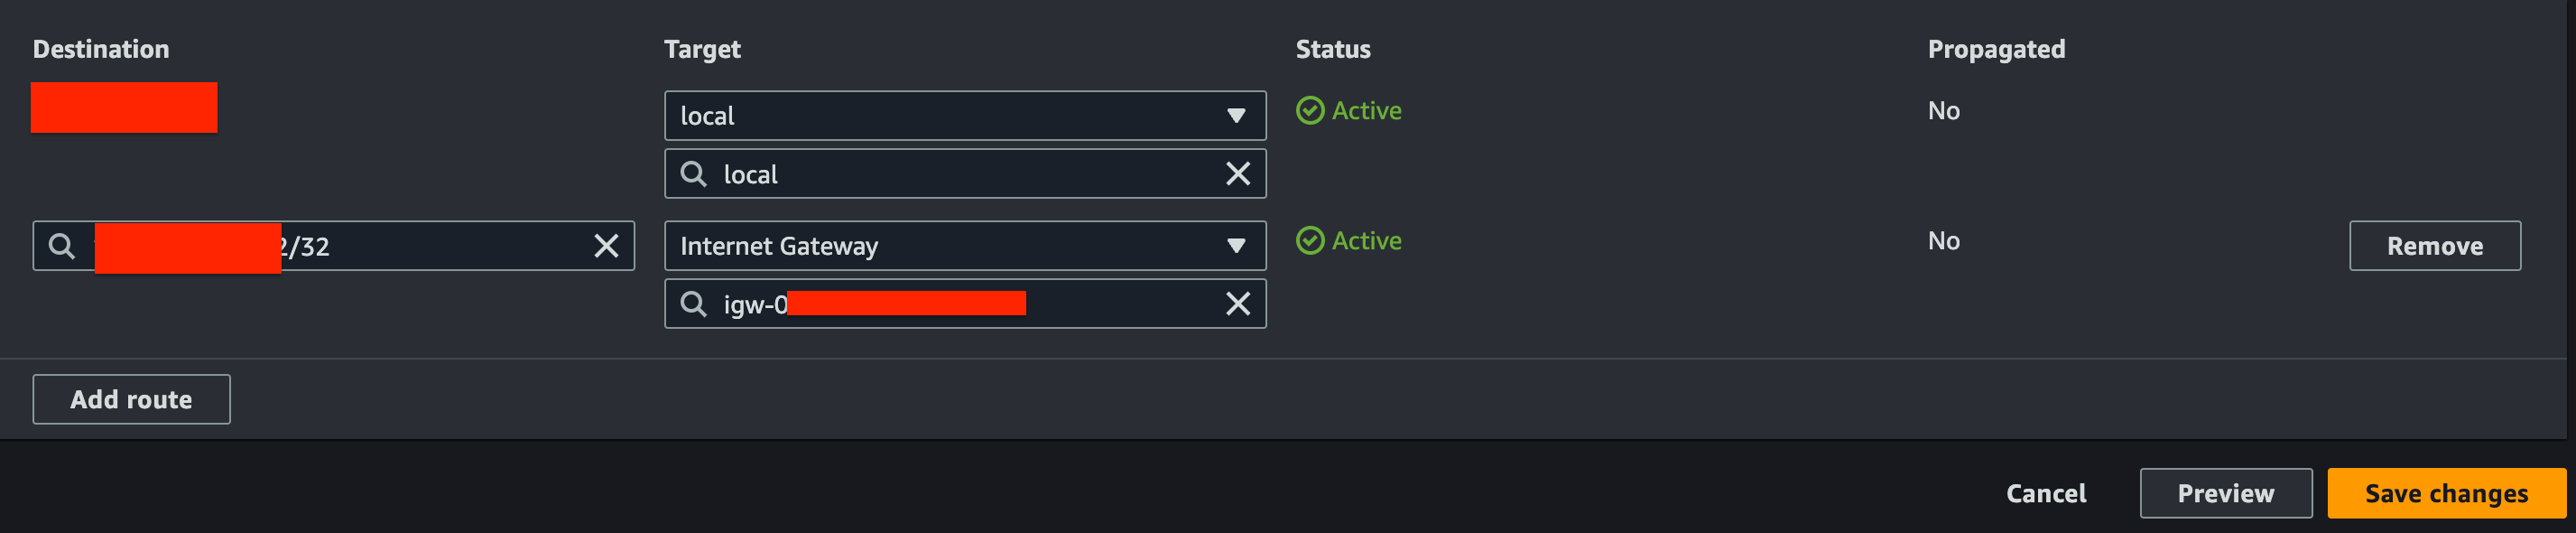
Now you are good to go to access your database from a local machine.
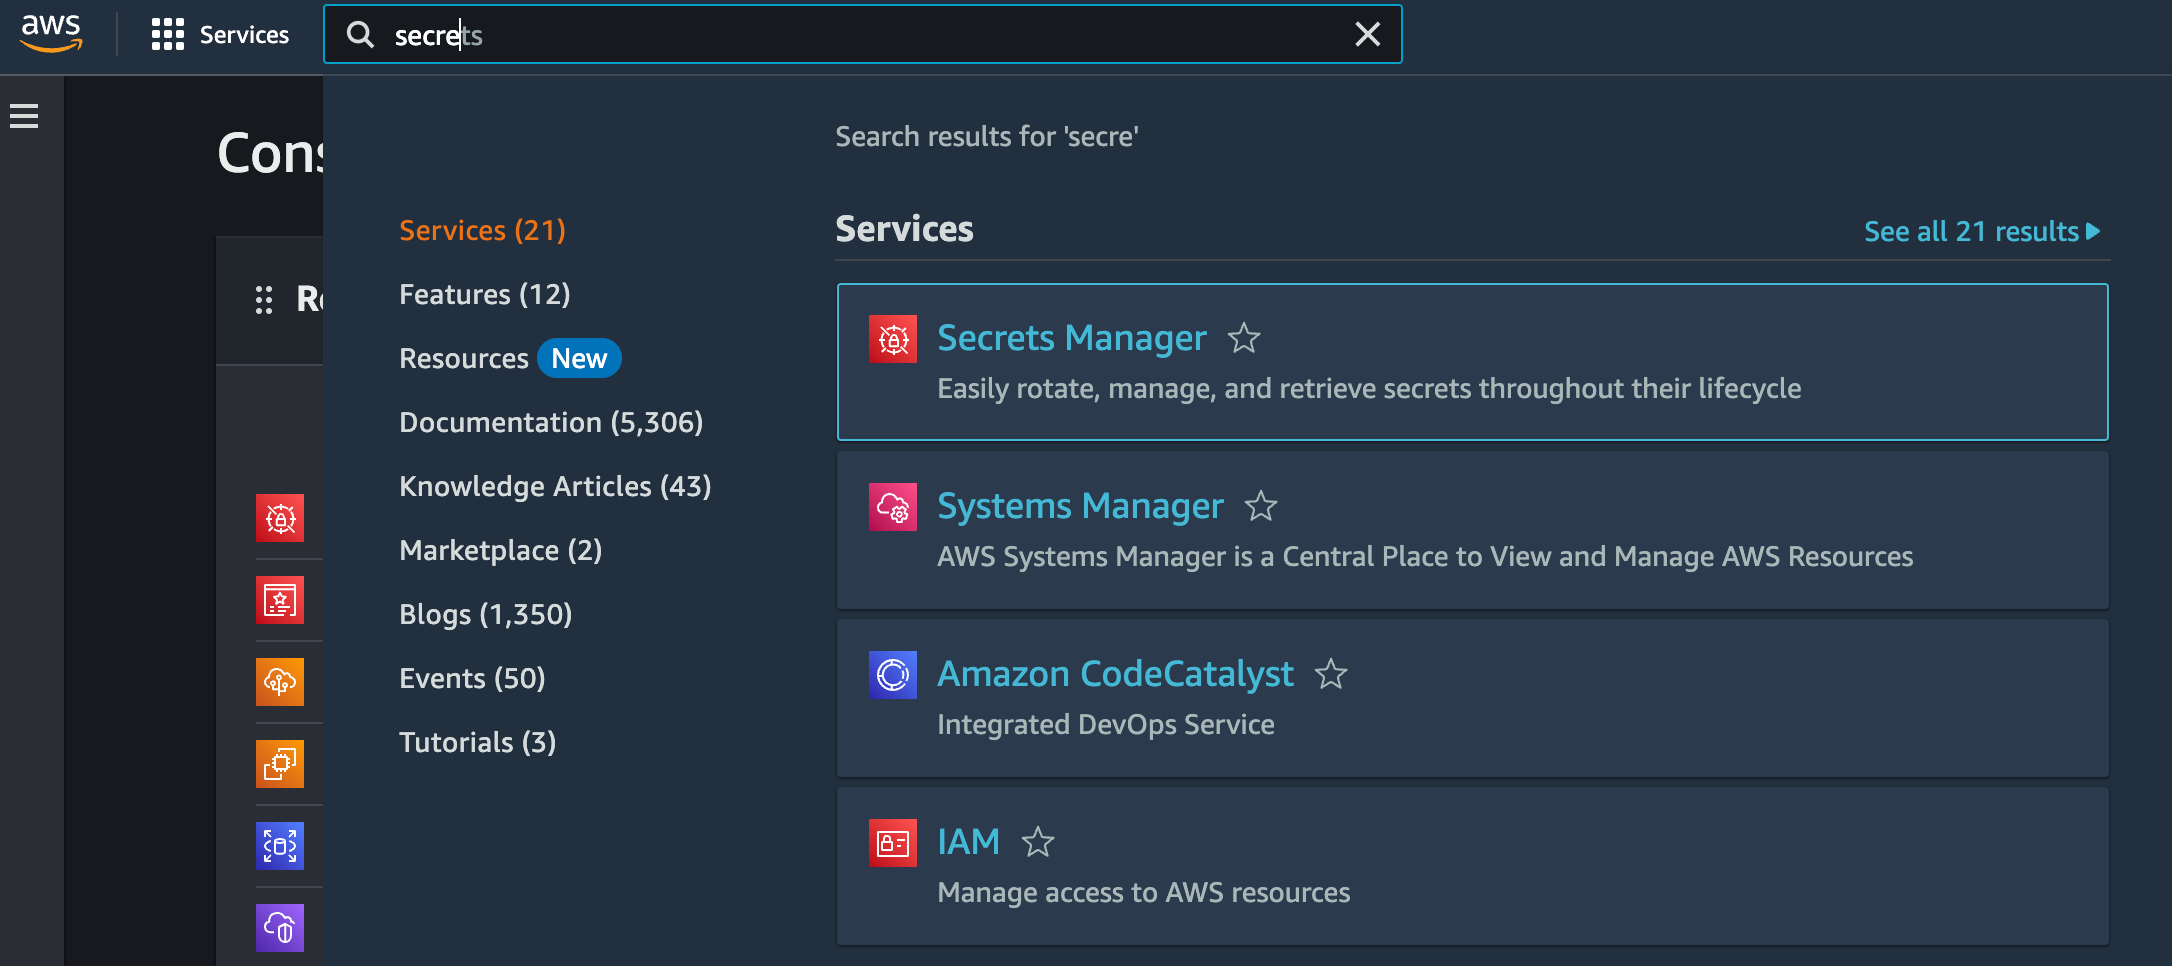
You can find RDS instance credentials in AWS Secrets Manager
Elastic Beanstalk custom domain using Route 53
For this step, you will need to generate an SSL/TLS certificate for your domain, using AWS certificate manager, and add Route 53 DNS in your domain provider panel. I am using namecheap for my domain management and will show you how to do that.
If you want to enable HTTPS for your elastic Beanstalk auto-generated link, you can follow some additional steps below.
Generate SSL/TLS certificate using AWS Certificate Manager
Search Certificate Manager in the AWS console, and press the request button, you will be asked to fill in your domain and add some certificate settings.
You will see a certificate generated but is pending.
Make sure to remove the (.) dot from the end with your domain name example:
_somevalue12312.domain.com. just remove .domain.com. 
Copy the CNAME and CNAME values, and add this to your domain records.
Now, Let’s enable HTTPS for the elastic beanstalk auto-generated link, then use a custom domain for elastic beanstalk.
Open your elastic beanstalk environment, go to Configure instance traffic and scaling, in the configuration menu, and add the HTTPS listeners there.
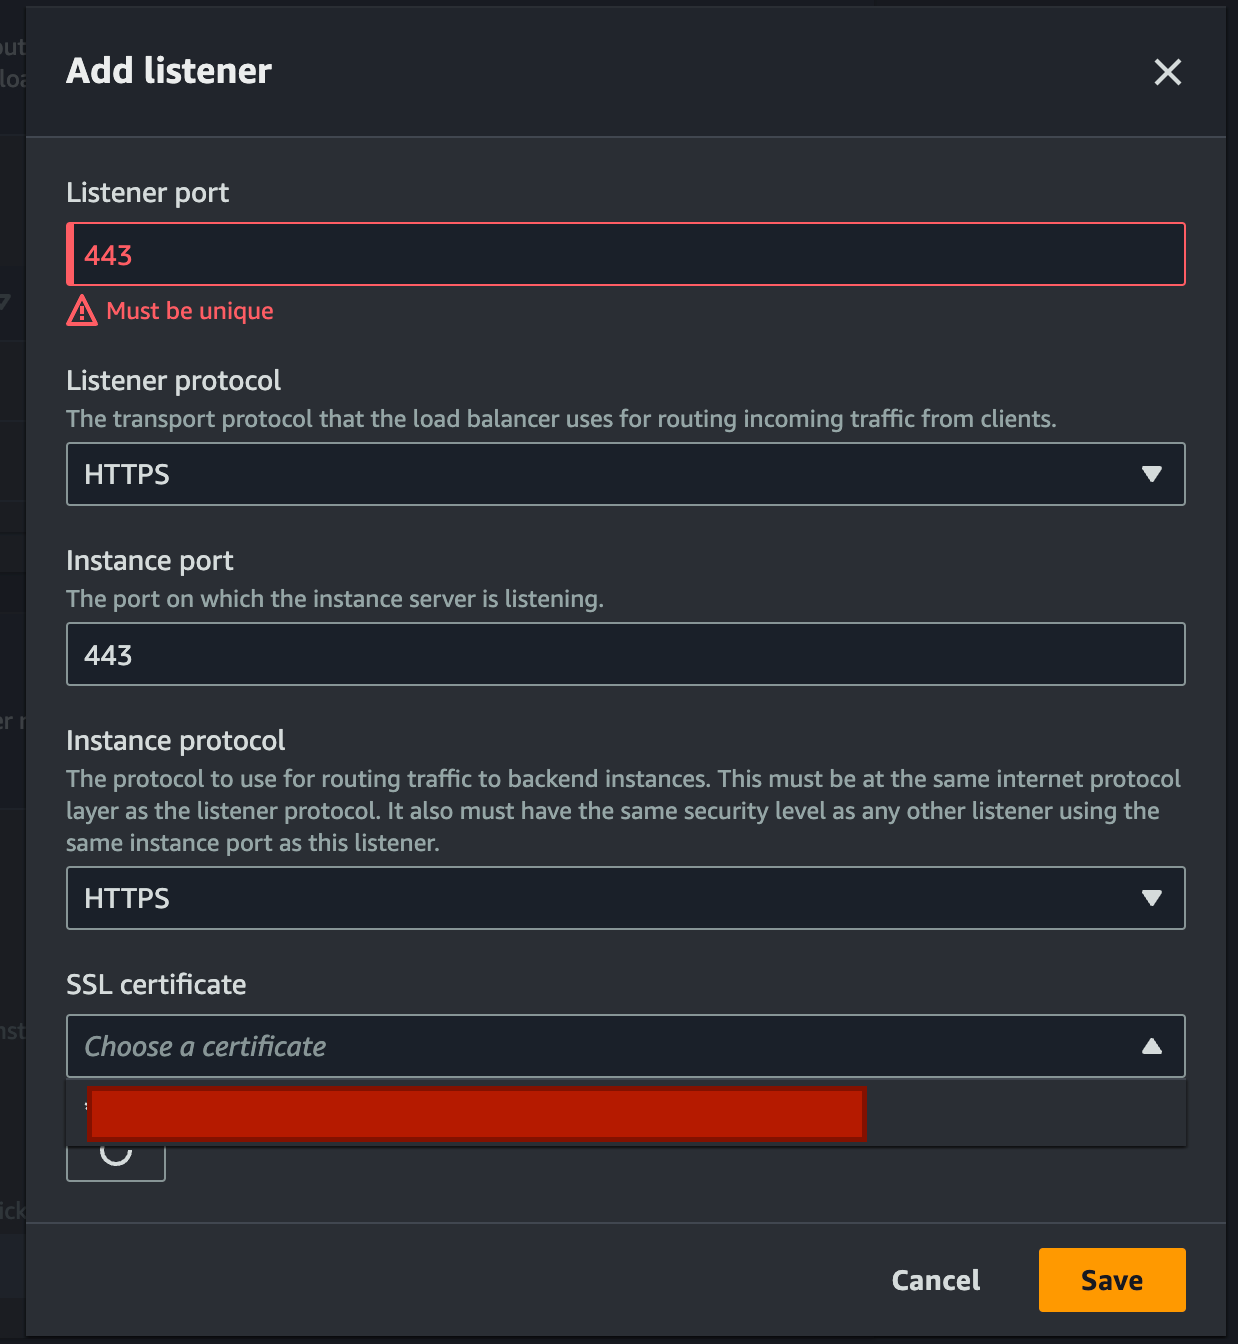
Fill out the above form and choose the certificate which you just generated.
To update the security policy using the console
- Open the Amazon EC2 console at https://console.aws.amazon.com/ec2/ .
- On the navigation pane, choose Load Balancers.
- Select the load balancer, scroll down click Manage Listeners, and add the following setting
Rule for the Security Group of the Load Balancer
HTTPS 443 HTTP 80 <name of the certificate>You should be good to go with the HTTPS protocol now.
Custom domain name using AWS Route 53
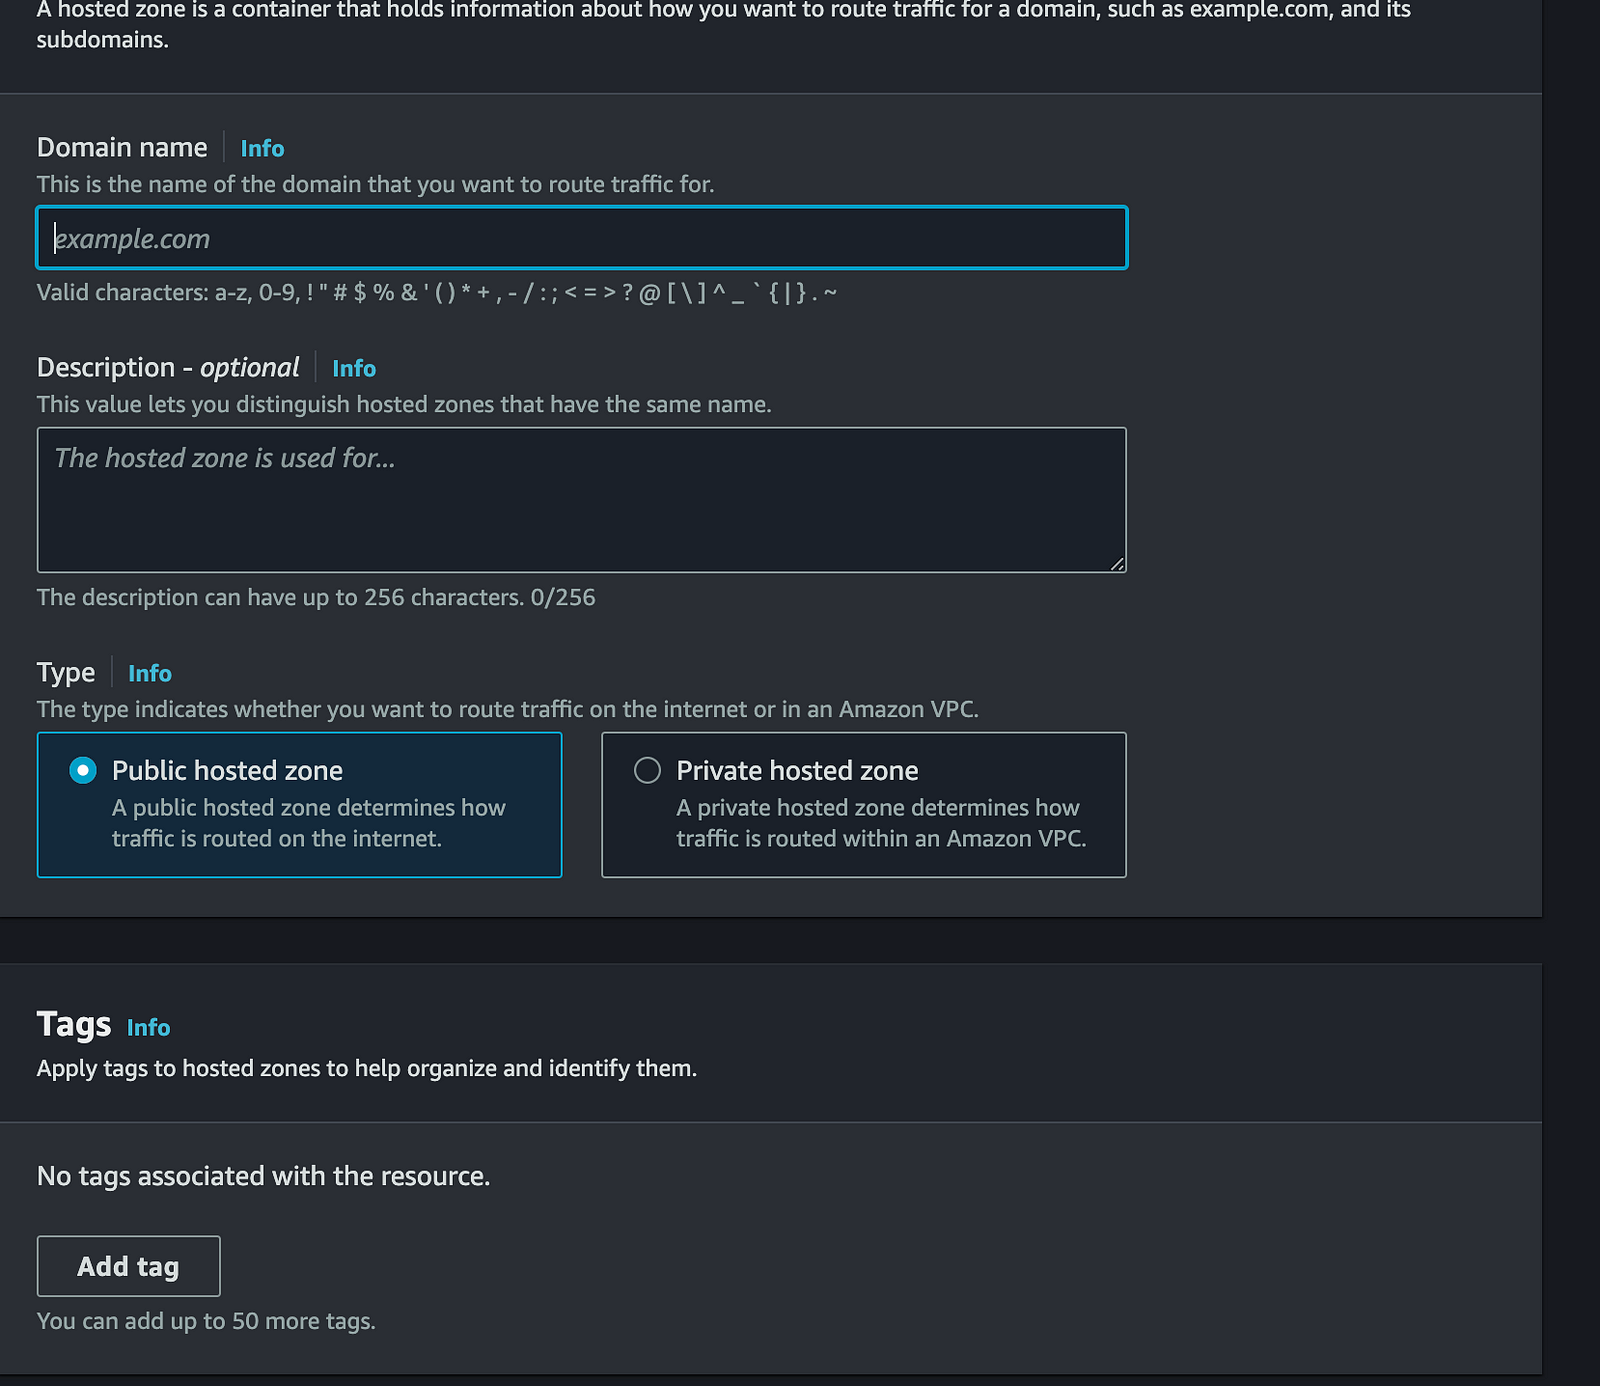
Search for Route 53 in the AWS console, navigate to hosted zones from the menu, and press Create a hosted zone.
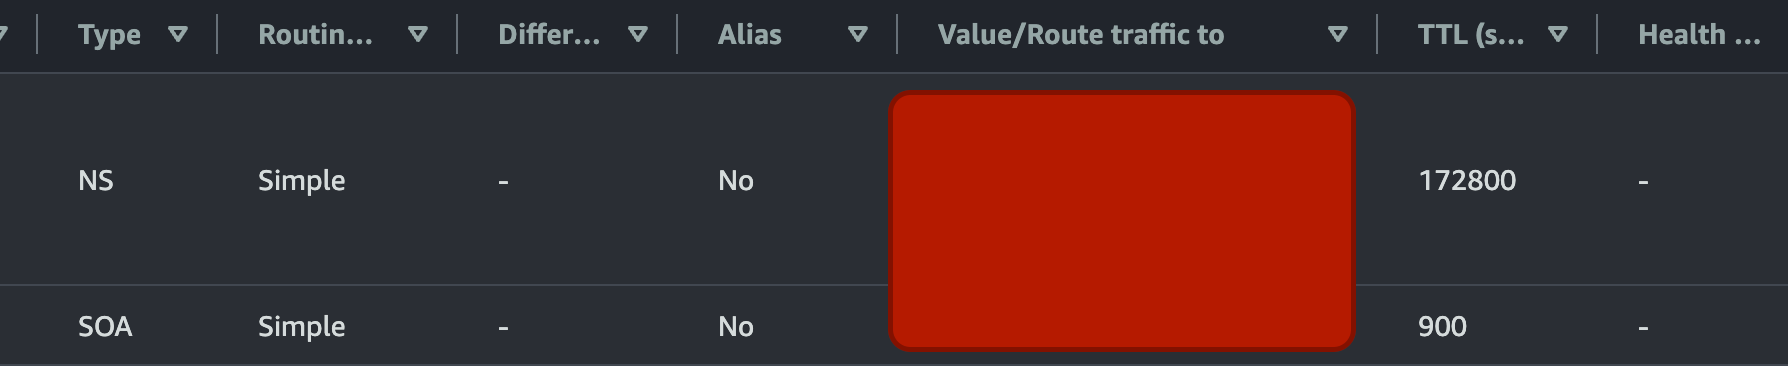
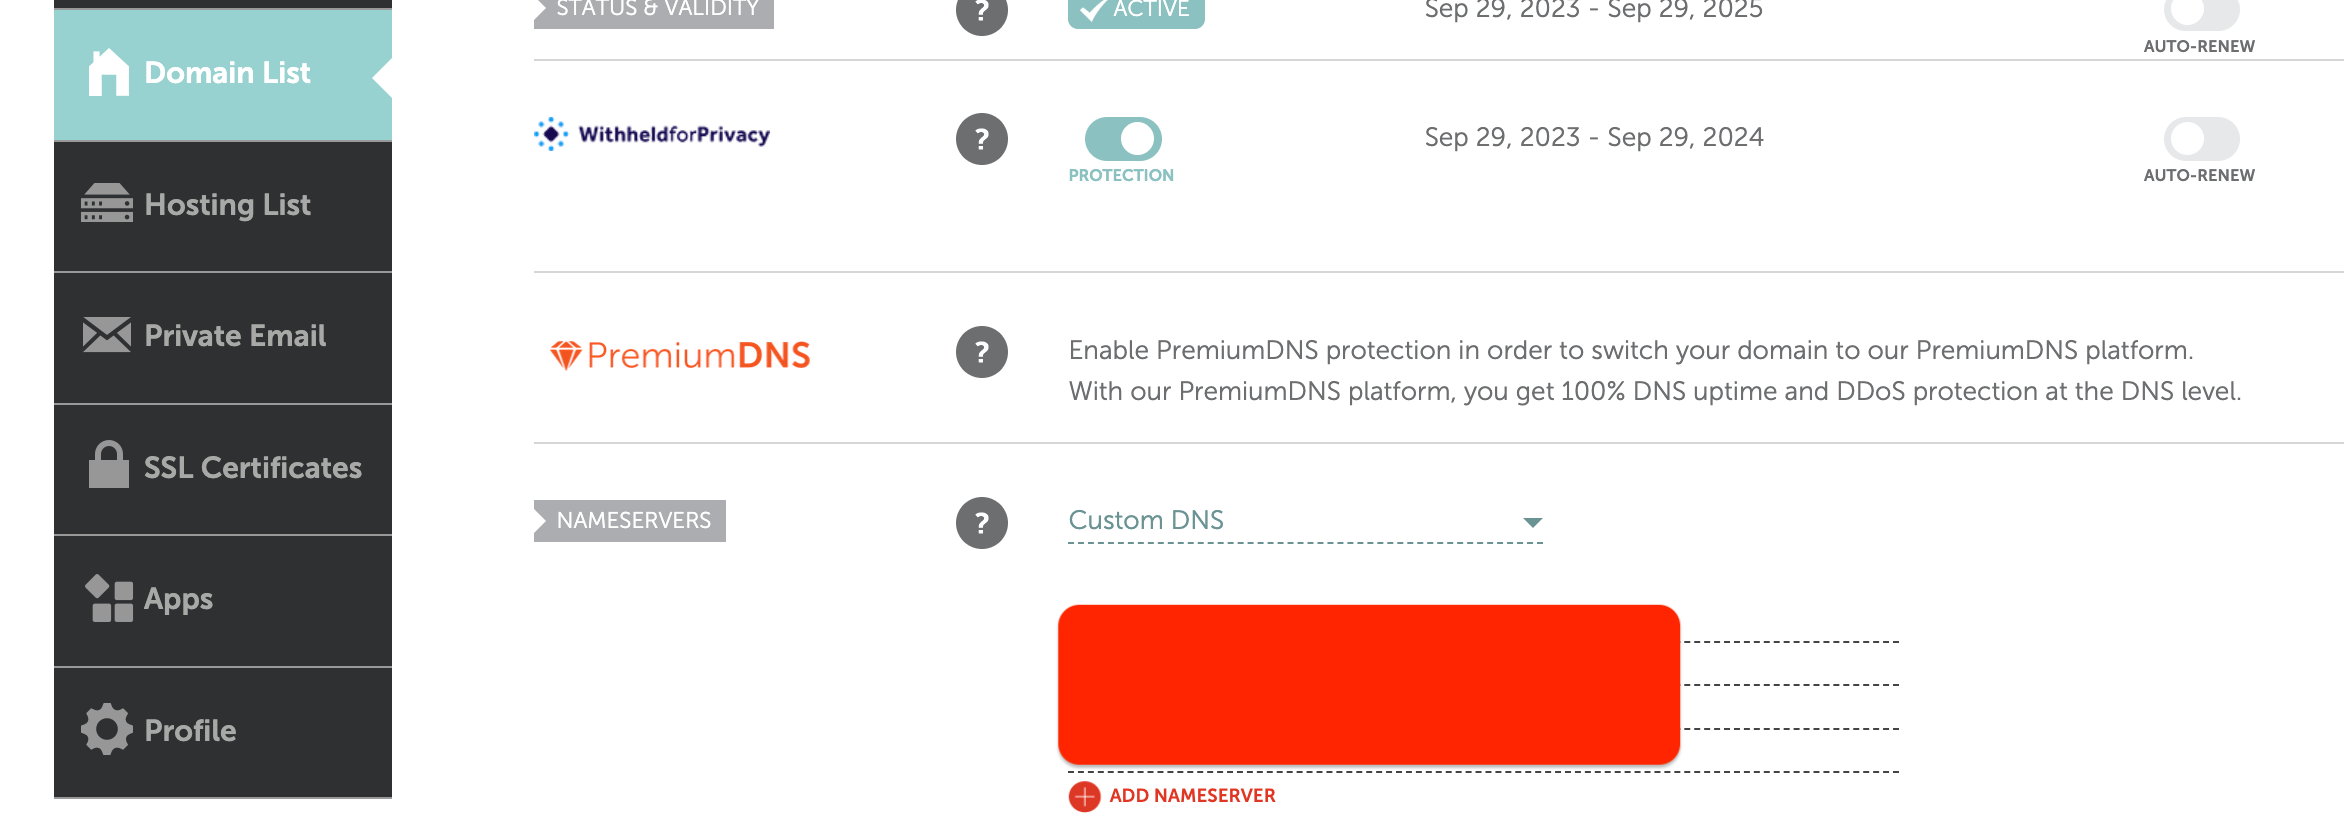
you will see a list of values, route traffic to, copy all 4 of them, and add it to your domain DNS list
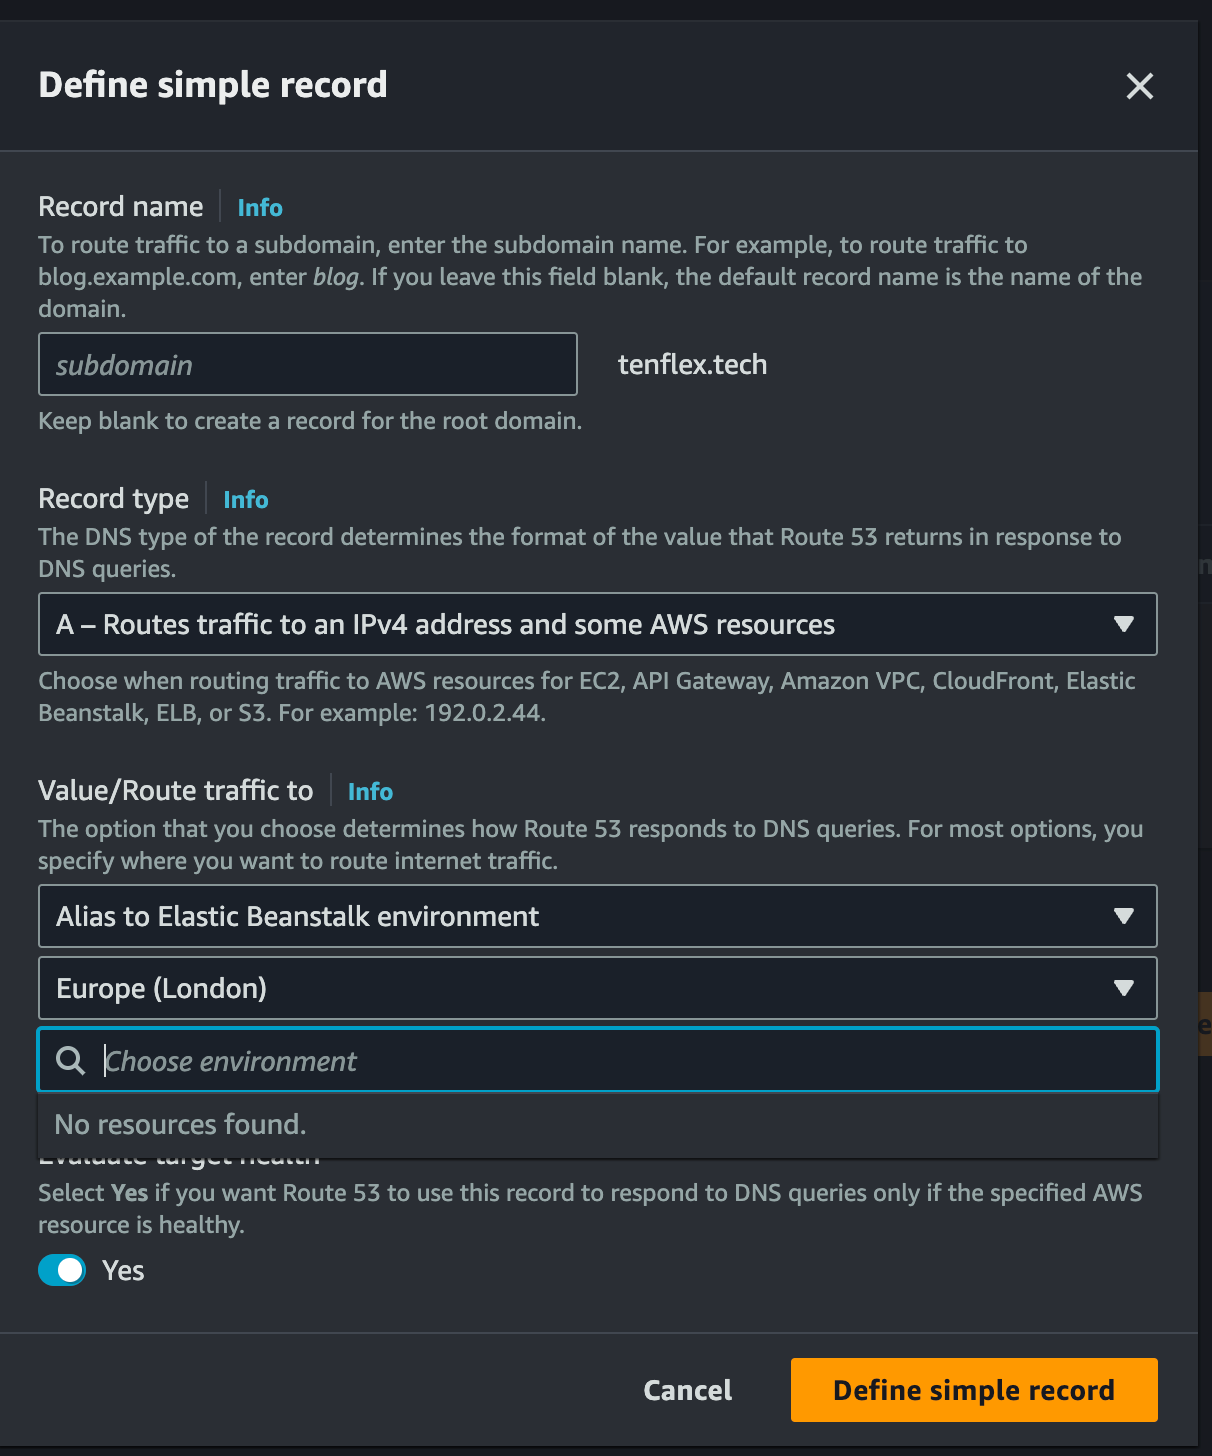
Now, create a new record, add a subdomain for your elastic beanstalk endpoint, select your application, and press the submit button, depending on your domain provider it can take some time, but once it’s done you will see your traffic coming from elastic beanstalk application to this subdomain or if you didn’t write the subdomain it will route directly to the root domain.
Congratulations, your APIs are successfully up and routed. 🚀
Host Next.JS/React.JS applications using S3 and Cloudfront
To host Next.js/React.js applications using S3 and CloudFront, first, deploy the Next.js application using the
next build command to generate the production-ready build.Next, create an Amazon S3 bucket and upload the contents of the build output to the bucket. Make sure the bucket is publicly accessible, after you upload the contents of the application in the S3 bucket navigate to the properties tab and scroll all the way down you will see the option to make this app static, select that option and add index.js as root origin. After finishing this step a link will be generated to access your application.
Now, we need to add bucket policies, you should be able to see that in the permissions tab, click Edit and add the following policies
{ "Version": "2008-10-17", "Statement": [ { "Sid": "PublicReadGetObject", "Effect": "Allow", "Principal": "*", "Action": "s3:GetObject", "Resource": "arn:aws:s3:::BUCKET_NAME_HERE/*" }, { "Sid": "2", "Effect": "Allow", "Principal": { "AWS": "arn:aws:iam::cloudfront:user/CloudFront Origin Access Identity YOUR_IDENTITY" }, "Action": "s3:GetObject", "Resource": "arn:aws:s3:::BUCKET_NAME_HERE/*" } ]}Now, here you need Cloud Front identity, go to the AWS console and search for Cloud Front.
Navigate to the security tab, then origin access, there you will be able to see your CloudFront identities, copy the ID, and add it to the above policy.
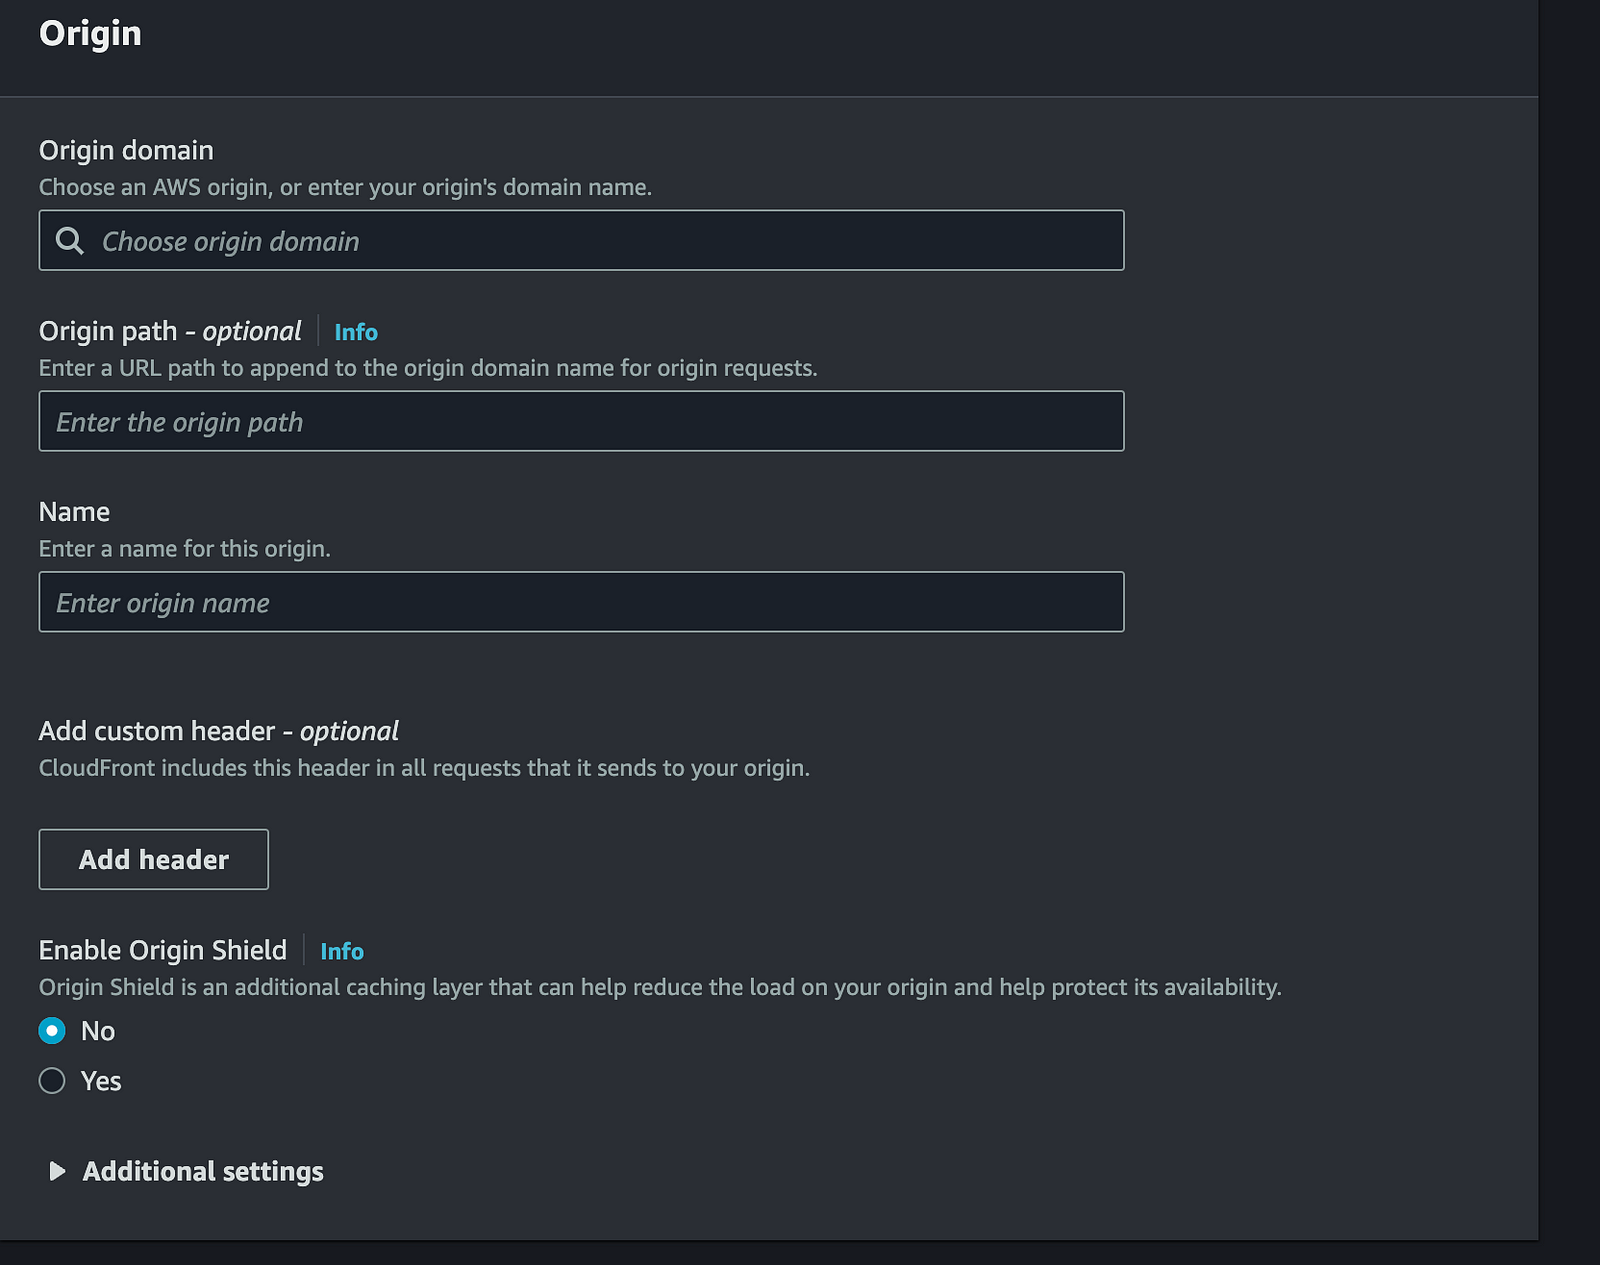
After finishing this step, create Cloudfront's new distribution.
Here in the origin domain, you need to add that static website link without http:// or https:// , which was generated in the above step, and choose HTTP only.
Follow these settings in the default cache behavior and Press Create Distribution.
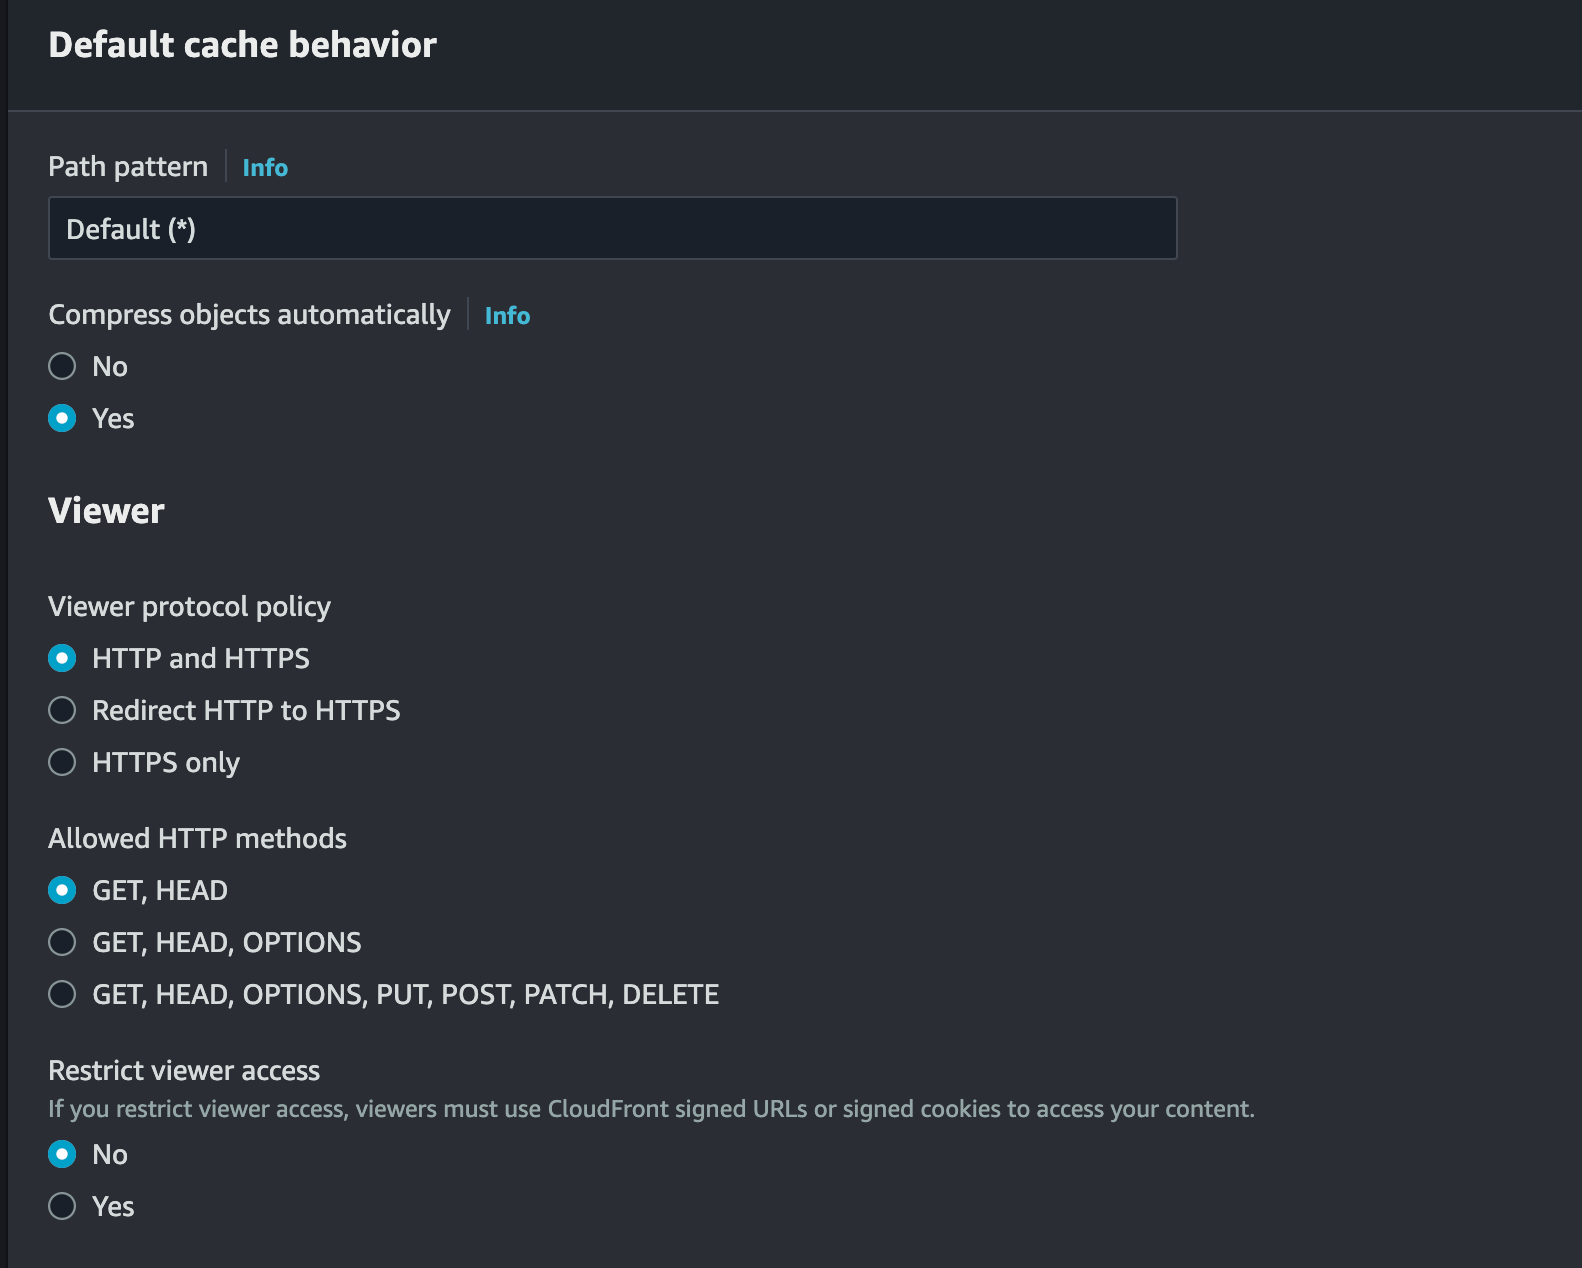
A CloudFront domain name will be generated, which you can use to access your web application. To route traffic from the custom domain follow the same steps as we did above for Route 53, and choose the origin Cloudfront this time.
Deploy Elastic Beanstalk to staging and production
By using git now we will deploy our application to staging and production using CircleCi.
Firstly, add the following environment variables to your circle ci application.
AWS_ACCESS_KEY_IDAWS_SECRET_ACCESS_KEYCreate .circleci/config.yml in your project root and add the following code this code will push the elastic Beanstalk application to stage or production depending on the GitHub branch you are pushing code to.
version: 2jobs:  deploy:    working_directory: ~/app    docker:      - image: circleci/ruby:2.4.3    steps:      - checkout
      - run:          name: Installing deployment dependencies          working_directory: /          command: |            sudo apt-get -y -qq update            sudo apt-get install python3-pip python3-dev build-essential            sudo pip3 install awsebcli
      - run:          name: Deploying          command: eb deploy my-app-$CIRCLE_BRANCH
workflows:  version: 2  build:    jobs:      - deploy:          filters:            branches:              only:                - staging                - production
Now, create .elasticbeanstalk/config.yml in your project root directory and add the following code, make sure to change the application name, region, and platform depending on what you are deploying
branch-defaults: production: environment: my-app-production staging: environment: my-app-stagingglobal: application_name: my-app default_platform: 64bit Amazon Linux 2 v5.8.3 running Node.js 18 default_region: YOUR_AWS_REGION sc: gitAfter your first deployment with CDK, this pipeline will be triggered by GitHub which will automatically build and deploy applications to elastic Beanstalk.
Deploy NextJS/ReactJS staging and production
Add the file to your project directory in .circleci/config.yml, make sure to replace the YOUR_DISTRIBUTION_ID with yours.
version: 2.1jobs:  build:    working_directory: ~/repo    docker:      - image: cimg/node:21.6.0    steps:      - checkout      - restore_cache:          keys:          - v1-dependencies-{{ checksum "package-lock.json" }}          - v1-dependencies-      - run:          name: Install dependencies          command: npm install      - save_cache:          key: v1-dependencies-{{ checksum "package-lock.json" }}          paths:            - node_modules      - run:          name: Build          command: |              npm run build      - run:          name: Export          no_output_timeout: 10m          command: npm run export      - run:          name: Deploy          command: |            if [ $CIRCLE_BRANCH = 'staging' ]; then              aws s3 sync build s3://my-app-staging              aws cloudfront create-invalidation --distribution-id YOUR_DISTRIBUTION_ID --paths "/*"
            fi            if [ $CIRCLE_BRANCH = 'production' ]; then              aws s3 sync build s3://my-app-production              aws cloudfront create-invalidation --distribution-id YOUR_DISTRIBUTION_ID --paths "/*"            fiworkflows:  version: 2  build:    jobs:      - deploy:          filters:            branches:              only:                - staging                - production
After your first deployment, this pipeline will be triggered by GitHub which will automatically build and deploy your application to S3 and invalidate the cloudfront.
Papertrail system monitoring and logs
Papertrail is a cloud-based log management and log aggregation service that allows users to collect, monitor, and analyze log data from various sources. It simplifies the process of centralizing log information, making it easier for developers, system administrators, and IT teams to troubleshoot issues, monitor system performance, and gain insights into the behavior of their applications and infrastructure.
To add a papertrail to your elastic beanstalk app, we need to first generate key pairs for EC2 your elastic beanstalk app is pointing to.
Search EC2 in the AWS console, and navigate to key pairs in the network and security menu, press create, give it a name and this will generate a .pem file for your EC2 instance.
Navigate to elastic beanstalk environment configurations, edit service access, and select the key pair file that we generated above.
ssh -i ~/Downloads/your-key.pem ec2-user@YOUR_EC2_domainconnect to ssh, and run the papertrail install script.
You can check the GitHub repo for CDK code, and all the code used here.
Happy deploying 🚀
Enjoyed reading this content? Let the author know!
Your likes, comments, shares, and saves help creators reach more builders.

Loading recommendations
Loading article